Tasty Crispy Mashed Potatoes Stuffed with Cheese & Beef
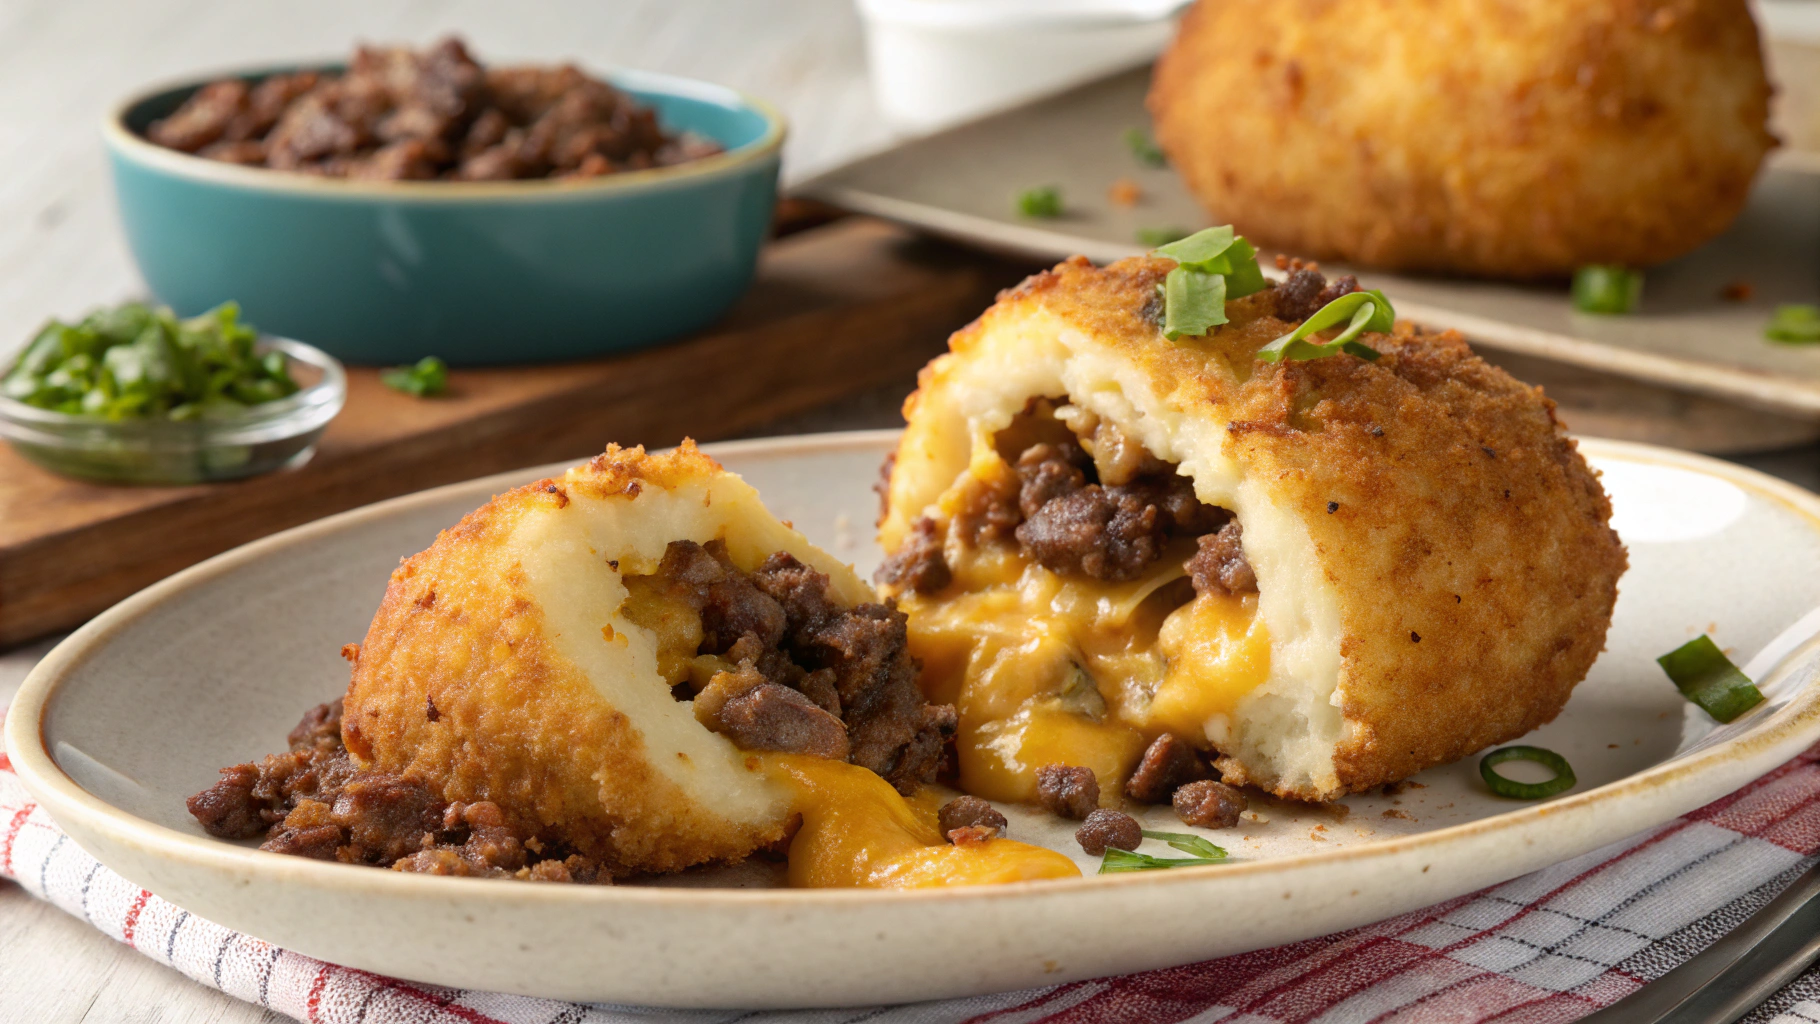
Have you ever peered into the fridge, spotted a bowl of leftover mashed potatoes, and wondered if they could be destined for something greater? We certainly have. While mashed potato is a beloved side dish in its own right, its second act can be truly show-stopping. Imagine transforming that humble mash into golden, crunchy spheres, each one hiding a delicious centre of savoury beef and molten cheese.
Well, wonder no more. This recipe for Crispy Mashed Potatoes Stuffed with Cheese & Beef is the comfort food creation you’ve been dreaming of. It’s a culinary delight that perfectly balances a crisp outer shell with a soft, fluffy interior and a rich, deeply satisfying filling. This dish works beautifully as a family meal, a party food favourite, or simply an inspired way to turn leftovers into an unforgettable treat. Let’s begin and prepare these delightful little bites of joy together.
Why This Recipe is an Absolute Winner
Before we roll up our sleeves, let’s explore exactly why we’re so certain you’ll adore this dish. We believe it’s one of the very best ways to prepare potatoes, and here’s our reasoning:
- A Sensational Texture Contrast: The deep-fried coating delivers a fantastic crunch that yields to the soft, pillowy mash, finally revealing the rich, cheesy beef filling. It truly is a textural journey in every single bite.
- Packed with Rich Flavour: The seasoned beef mince, gooey melted cheese, and creamy potato come together to create a taste profile that is both timeless and completely irresistible.
- A Genius Way to Use Leftovers: This is one of those brilliant leftover mashed potato recipes that elevates something ordinary into a mealtime star. Say goodbye to food waste!
- Wonderfully Versatile: While we are partial to the beef and cheese filling, you can easily switch it up based on your preferences or what’s available in your kitchen. We will provide you with some suggestions soon!
- The Epitome of Comfort Food: This is food that provides a warming, hearty, and wholesome feeling. It’s satisfying, delicious, and feels like a comforting hug on a plate.
Ingredients for Crispy Mashed Potatoes Stuffed with Cheese & Beef
To craft these golden spheres of tastiness, we will need a selection of simple, quality ingredients. It is essential to use cold, day-old mashed potatoes, as their lower moisture content makes them firmer and much easier to shape. If you plan to make mash from scratch, be sure to let it cool down fully in the refrigerator first.
For the Mashed Potatoes:
- 900g (approx. 2 lbs) starchy potatoes (like Maris Piper or King Edward), peeled and chopped
- 60g (4 tbsp) unsalted butter
- 60ml (1/4 cup) whole milk or double cream, warmed
- 1 large egg yolk
- Salt and freshly ground black pepper, to taste
- (Note: Or use approx. 5-6 cups of leftover cold mashed potatoes)
For the Beef & Cheese Filling:
- 1 tbsp olive oil
- 1 small onion, finely diced
- 2 cloves garlic, minced
- 250g (1/2 lb) lean beef mince
- 1 tsp Worcestershire sauce
- 1/2 tsp dried thyme or oregano
- Salt and pepper, to taste
- 150g (1 1/2 cups) mature Cheddar or mozzarella cheese, grated or cut into small cubes
For the Crispy Coating:
- 100g (3/4 cup) plain flour
- 2 large eggs, beaten
- 200g (2 cups) dried breadcrumbs (panko works brilliantly for extra crunch)
- Vegetable or sunflower oil, for frying
Step-by-Step Instructions to Perfection
We have organised the method into four manageable stages: crafting the filling, preparing the mash, assembling the balls, and finally, frying them until they are perfectly crisp. If you follow these steps closely, we guarantee you’ll achieve wonderful results.
1. Prepare the Savoury Beef Filling
First things first, let’s prepare the wonderfully savoury heart of our potato balls.
- Heat the oil in a small skillet over medium heat. Add the diced onion and sauté for 5-7 minutes, until softened and translucent.
- Add the garlic and sauté for another minute until fragrant, avoiding burning.
- Raise the heat and add the ground beef to the pan, using a wooden spoon to do so. Cook the meat until it is evenly browned, then remove any excess fat that remains.
- Stir in the Worcestershire sauce mixture, along with the herbs, salt, and pepper. Allow the mixture to simmer for a few minutes to enhance and merge the flavors.
- Remove the heat and allow the beef mixture to cool completely. This is important: using a hot press will make the mashed potatoes too soft to handle properly.
2. Make the Perfect Mashed Potato Casing
If you’re not using leftovers, this is our guide to making the ideal mash for this recipe. The secret is to create a firm mash that isn’t too wet. For more expert tips, take a look at this guide on making the perfect mashed potato from BBC Good Food.
- Add the peeled and diced potatoes to a large saucepan and submerge with cold salted water. Bring to a rolling boil and simmer for 15-20 minutes until they become tender when pierced with a fork.
- Drain the potatoes very well and pop them back into the hot, dry saucepan for a minute to allow any excess moisture to steam away.
- Mash the potatoes until they are smooth and creamy. Add the butter, warmed milk or cream, egg yolk, and seasoning. Gently mix until everything is just incorporated, taking care not to overmix.
- Spoon the mash onto a baking tray and let it cool completely. For the very best results, we recommend chilling it in the fridge for at least one hour, or ideally overnight. Cold mash is the key to success!
3. Assemble Your Stuffed Potato Cakes
Here comes the really enjoyable part! This is where we bring all our prepared elements together to form our magical stuffed potato cakes.
- Organise your workspace. You will need your bowl of cold mash, the cooled beef filling, and your cheese.
- Take a substantial portion of mashed potato (about golf ball-sized) in your hand and carefully press it into a circular, flat shape.
- Spoon a teaspoon of the beef mixture into the centre, and top it with a cube or a pinch of cheese.
- Carefully fold the edges of the potato disc upward around the filling, making sure it’s completely sealed. Roll it between your palms to create a smooth, compact ball.
- Complete the ball’s journey to the baking sheet. This will involve covering the sheet with parchment paper. Continuing this process until all of the puree or filling has been utilized.
- For a better outcome, place the tray of potato balls in the fridge to chill for an additional 30 minutes. This will help them become firmer and maintain their shape during frying.
4. Coat and Fry for Ultimate Crispiness
This is the final, transformative step that turns our potato balls into irresistibly crispy, golden-brown delights.
- Create a station that makes breading with three different shallow dishes: one for the plain flour, one for the beat eggs, and one for the breadcrumbs. Season the flour with salt and pepper to enhance the flavor.
- Take a cold potato ball and brush it lightly with the seasoned flour, removing any extra.
- Next, imbibe the floured ball with the beaten egg, making sure it is coated uniformly.
- Ultimately, cover it in the breadcrumbs, slapping gently to ensure the crumbs are spread across the entire surface. Return the coated ball to the baking sheet. Play with the remaining balls:
- To fry in the oven, pour about 5 to 7 centimeters (2 to 3 inches) of vegetable oil into a deep, heavy-bottomed pan or a Dutch oven. Heat the oil to a temperature of 180°C (350°F). If you lack a thermometer, you can assess the oil by placing a breadcrumb in it. It’s prepared when the breadcrumbs become sizable and golden in approximately 30 seconds.
- Carefully add 3 to 4 potato pellets into the hot oil at a time, ensuring the pan is not overcrowded. Fry for 3-5 minutes, then gently rotate them until they are deep golden brown and have a crispy appearance on all sides.
- Remove them with a slotted spoon and let them drain on wire racks or a plate lined with paper towels.
Top Tips for the Best Beef and Potato Croquettes
To help you achieve perfect results every single time, we’ve gathered our most essential tips. These secrets will ensure you create flawless beef and potato croquettes.
- The Colder the Mash, the Better: We cannot emphasise this enough. Mash that is warm or too wet will be sticky, hard to shape, and risk falling apart when you fry it.
- Don’t Be Tempted to Overfill: As much as you might want to, please resist the urge to overstuff your potato balls. Too much filling makes them tricky to seal and more likely to burst open in the hot oil.
- Chilling is Key: Chilling the balls before you coat them, and again before you fry them, is a simple step that makes a huge difference in helping them hold their shape.
- Watch Your Oil Temperature: If the oil isn’t hot enough, the balls will absorb it and become greasy. If the heat is too high, the breading may burn before the center has warmed and the cheese has melted.
Variations and Substitutions
One of the greatest advantages of this recipe is its versatility.Consider it a fantastic starting point for your culinary experiments!
- Cheese Swaps: Exchange the Cheddar for mozzarella to achieve a spectacular cheese pull. Alternatively, try Gruyère, Monterey Jack, or even a spicy pepper jack for an extra kick of flavour.
- Vegetarian-Friendly: For a tasty meat-free alternative, you can replace the beef mince with finely chopped mushrooms and spinach, or perhaps a mixture of black beans and sweetcorn. These create wonderful cheesy mashed potato balls.
- Different Meats: Have you got leftover roast chicken? Shred the meat and use it as a filling instead of beef.
- Making it Gluten-Free: Use a good-quality gluten-free flour blend and gluten-free breadcrumbs for the crispy coating.
- Baking or Air Frying: For a lighter take, you can bake these at 200°C (400°F) for 20-25 minutes until golden, turning them over halfway through cooking. In an air fryer, cook at 190°C (375°F) for 12-15 minutes. We recommend spraying them with a little oil beforehand to enhance their crispiness.
Serving, Storing, and Reheating
These crispy stuffed mashed potatoes are truly fantastic just as they are, but they are even more delicious when served with a dip. We love to serve them piping hot with a side of rich brown gravy, a dollop of sour cream with chives, or a simple tomato salsa.
After a wonderfully hearty meal like this one, you might be in the mood for a simple, comforting pudding. Our classic Banana Bread makes for the perfect sweet treat. If you’re looking for something more indulgent, consider trying our amazing options. Banana Bread Brownies a try?
Storing Leftovers
- You can store leftover potato balls in an airtight container in the refrigerator for up to three days.
- Freeze: These balls freeze beautifully! You can freeze them either before or after frying. Simply arrange them in a single layer on a baking sheet until they are firm, then transfer them to a freezer-safe bag. They will stay fresh for up to three months.
Reheating for Maximum Crunch
To restore that glorious crispy texture, we strongly advise against using the microwave! The best method for reheating is in an oven or air fryer at 190°C (375°F) for 10-15 minutes (add a few extra minutes if cooking from frozen) until they are hot all the way through and perfectly crisp again.
Conclusion: Your New Favourite Comfort Food
And there we have it – a complete guide to creating what we’re sure will become your new favourite comfort food: Crispy Mashed Potatoes Stuffed with Cheese & Beef. This recipe is so much more than a collection of ingredients; it’s a celebration of how simple foods can be transformed into something utterly spectacular. It’s proof of the kitchen magic that happens when a little creativity meets classic, comforting flavours.
We sincerely hope you will give this recipe a try. Whether you’re aiming to impress dinner guests, treat your family, or give your leftovers a delicious new purpose, these stuffed potato balls are guaranteed to be a hit.
What are you waiting for? It’s time to start mashing! Please do leave a comment below to let us know how you got on, or tag us in your pictures on social media. We always love to see your wonderful kitchen creations!

2 Comments
Comments are closed.