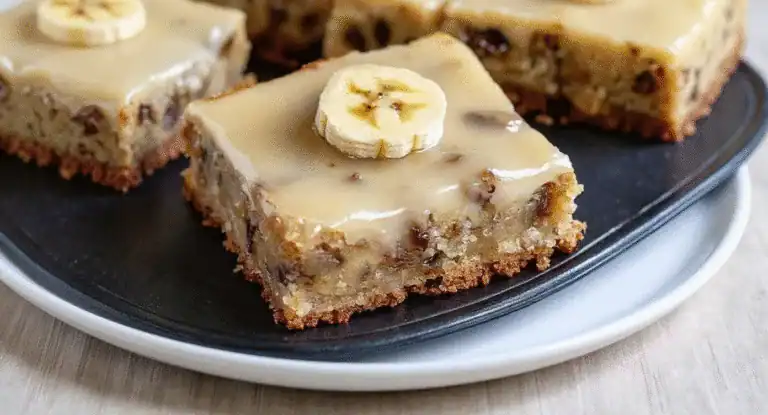
The Ultimate Guide to Perfect Banana Bread: Easy Recipe & Tips
Got a couple of spotty bananas looking a bit sorry for themselves on the counter? Before you even think about the bin, let us ask you: what if those humble fruits are the secret to the most comforting, delicious bake imaginable? We’re talking, of course, about the classic, the wonderful, the ever-so-satisfying banana bread. In this guide, we’ll share everything you need to know to bake a loaf that will have everyone asking for seconds (and the recipe!).
Why We All Adore Banana Bread
There’s something universally comforting about banana bread. Perhaps it’s the incredible aroma that fills the kitchen as it bakes, or maybe it’s the satisfyingly moist texture and sweet, banana-rich flavour. It’s a fantastic way to combat food waste by using up those overripe bananas, transforming them into a treat that’s perfect for breakfast, a mid-afternoon snack, or even a simple dessert. Plus, it’s surprisingly easy to make, even for novice bakers!
The Perfect Banana Bread: What You’ll Need
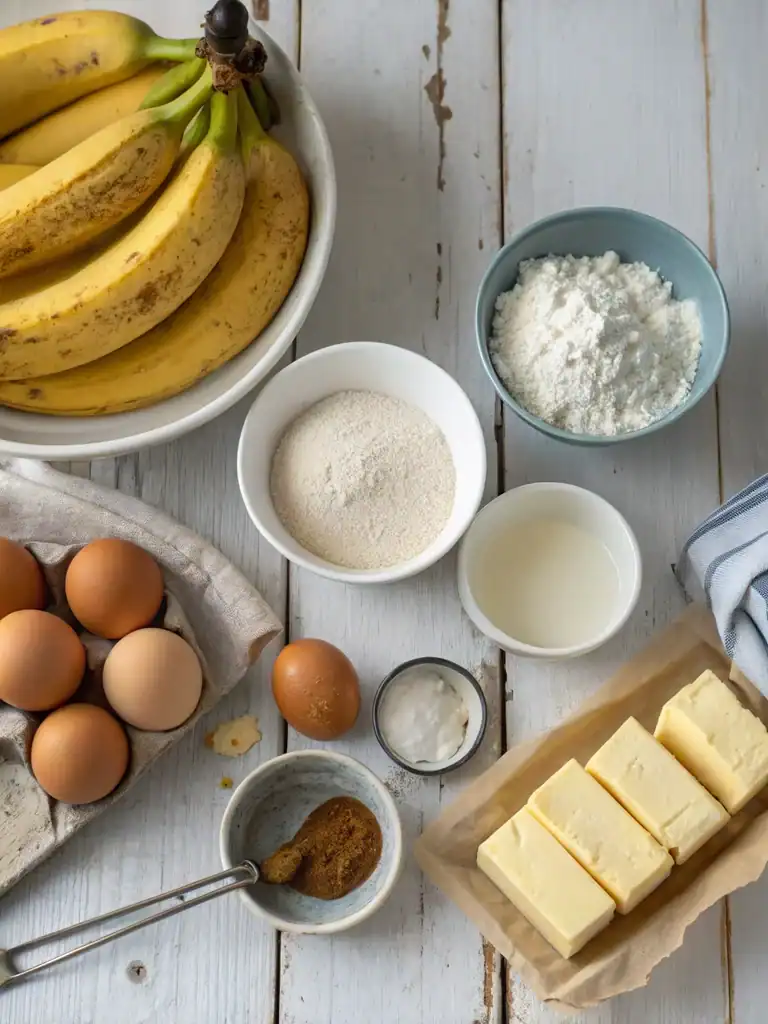
Before we dive into the baking, let’s gather our supplies. A good bake starts with good ingredients and the right tools.
Ingredients for Our Classic Banana Bread
This recipe is a great starting point. We’ll discuss how to adjust it if you’re making banana bread with two bananas a little later on.
- 140g unsalted butter, softened, plus extra for greasing the tin
- 140g caster sugar
- 2 large free-range eggs, beaten
- 1 tsp vanilla extract
- 2-3 very ripe bananas (about 300g peeled weight), mashed
- 225g self-raising flour
- 1 tsp bicarbonate of soda
- Pinch of salt
- 50g chopped walnuts or pecans (optional)
- 2 tbsp milk (if the batter seems too stiff)
Essential Equipment
- A 900g (2lb) loaf tin (approximately 21cm x 11cm x 7cm)
- Greaseproof paper or baking parchment
- Large mixing bowl
- Wooden spoon or electric hand mixer
- Fork (for mashing bananas)
- Spatula
- Measuring spoons and scales
- Wire cooling rack
Our Favourite Banana Bread Recipe: Step-by-Step
Ready to bake? Let’s get started on creating a truly scrumptious loaf.
- Prepare the Tin: Preheat your oven to 180°C (160°C Fan/Gas Mark 4). Lightly grease your loaf tin and line it with greaseproof paper, leaving a little overhang on the longer sides to help you lift the bread out later.
- Blend Our Butter and Sugar: In our spacious mixing bowl, we beat together the room-temperature butter and caster sugar until the mixture becomes pale and airy. You can do this with a wooden spoon or an electric hand mixer on a medium speed.
- Incorporate Our Eggs and Vanilla: We slowly add the eggs individually, ensuring we thoroughly combine each one before adding the next, then blend in our vanilla extract. If the mixture looks like it might curdle, add a tablespoon of your measured flour. Stir in the vanilla extract.
- Mash the Bananas: In a separate small bowl, we thoroughly mash the ripe bananas. Mash the ingredients with a fork until they are mostly smooth. With just a few small lumps remaining. smooth but still with a few small lumps for texture.
- Combine Wet Ingredients: Gently fold the mashed bananas into the butter and sugar mixture.
- Add Dry Ingredients: Sift the self-raising flour, bicarbonate of soda, and salt into the wet ingredients. Fold everything together gently with a spatula or wooden spoon until just combined. Be careful not to overmix – a few streaks of flour are fine. Overmixing can lead to a tough loaf.
- Incorporate Add-ins: If you’re using nuts, gently stir them in now. If the batter seems very thick, add one or two tablespoons of milk to loosen it slightly.
- Begin Baking: We transfer our batter into the prepared loaf tin and smooth the surface with a spatula. We bake in the middle of our preheated oven for 50-60 minutes. To test for doneness, we insert a cocktail stick or fine blade into the loaf’s centre. When it emerges clean, our cake is finished. Should the wet mixture cling to it, we continue baking for another 5-10 minutes before testing once more.
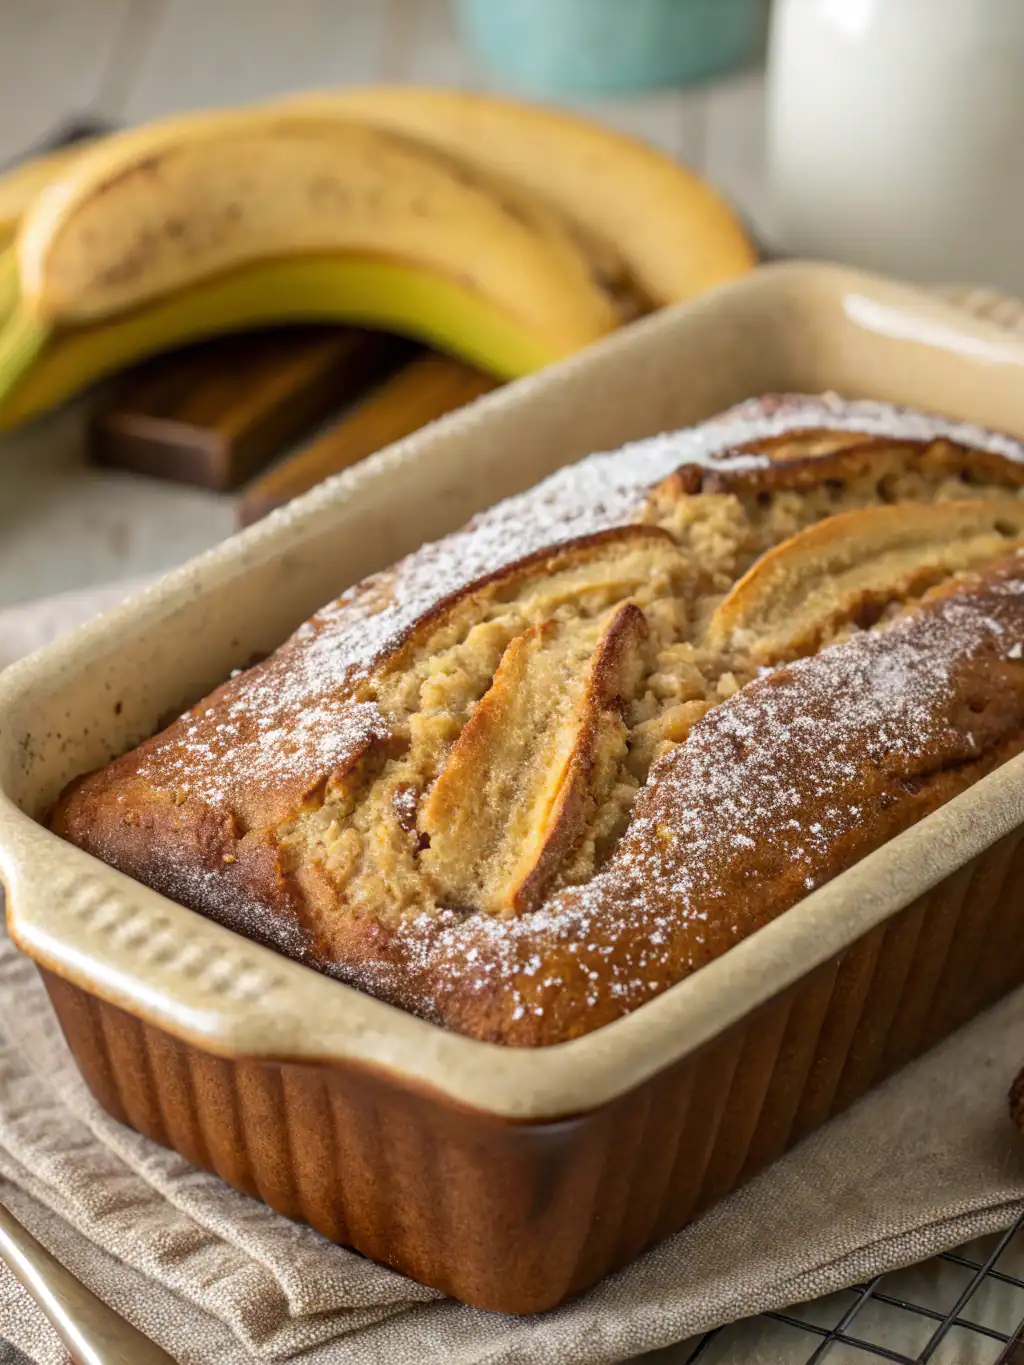
- Allow to Rest: After baking, we let our banana bread remain in the tin for approximately 10 minutes. We then use the protruding parchment paper to gently transfer it onto a cooling rack, where it can cool entirely before we slice it.
For a fantastic visual guide, especially if you’re a beginner, we find videos incredibly helpful. Here’s a great one that walks you through the process:
Making the Most of Your Bananas
The star of the show truly is the banana. Their ripeness and quantity can make a big difference.
The “Two Banana” Dilemma: Crafting Delicious Banana Bread with Just Two
What if you only have two bananas? Don’t worry, you can still make wonderful banana bread! If you’re specifically looking for a banana bread 2 bananas recipe, you can adapt our main recipe. Here’s how we approach it:
- Reduce other wet ingredients slightly: If your two bananas are on the smaller side (yielding less than, say, 200-250g mashed), you might consider very slightly reducing the sugar or one of the eggs if they are particularly large, to maintain a good batter consistency. However, often, two medium-to-large bananas are perfectly sufficient.
- Boost banana flavour: If you’re concerned about a less intense banana flavour, consider adding a tiny splash of banana extract (if you have it) or ensure your bananas are exceptionally ripe.
- Consider texture: With fewer bananas, the bread might be slightly less moist. You could add a tablespoon of natural yoghurt or soured cream to the batter to compensate.
Essentially, for a banana bread with two bananas, you can often proceed with the standard recipe, ensuring your bananas are very well mashed to distribute their moisture and flavour effectively. The key is to aim for a good batter consistency – not too wet, not too dry.
Ripe vs. Overripe: The Sweet Spot
The riper the banana, the better! Those bananas with plenty of brown spots, or even fully browned skins, are perfect. They are sweeter (as the starches have converted to sugars) and mash more easily, contributing to a moister, more flavourful loaf. Green or barely ripe bananas won’t give you the same delicious result. Should our bananas not be sufficiently ripe, we can accelerate the ripening by storing them in a brown paper bag for 24-48 hours, or alternatively, we can roast them unpeeled in a gentle oven (approximately 150°C/Gas Mark 2) for 15-20 minutes until their skins turn dark.Retry
Customising Your Banana Bread: Make It Your Own!
One of the best things about banana bread is how versatile it is. Feel free to experiment with different additions and substitutions to create your perfect loaf.
Wonderful Add-ins
Elevate your banana bread with these tasty extras:
- Chocolate Chips: Milk, dark, or white chocolate chips (around 100g) are a classic addition.
- Nuts: Chopped walnuts, pecans, or even hazelnuts add a lovely crunch (around 50-75g).
- Spices: A teaspoon of ground cinnamon, nutmeg, or mixed spice can add warmth.
- Dried Fruit: Sultanas, raisins, or chopped dates can add sweetness and texture (around 75g).
- Desiccated Coconut: For a tropical twist (around 50g).
Towards Healthier Options: Creating Healthy Banana Recipes
If you’re looking for healthier banana bread, there are several simple swaps you can make:
- Flour: Replace half or all of the self-raising flour with wholemeal self-raising flour for extra fibre.
- Sugar: You can often reduce the sugar by about a quarter without drastically affecting the texture. The ripe bananas provide natural sweetness. You could also try substituting some of the sugar with maple syrup or honey (you may need to slightly reduce other wet ingredients if you do).
- Fat: Replace some of the butter with an equal amount of unsweetened apple sauce, natural yoghurt, or even mashed avocado for a healthier fat source.
These simple adjustments can make your favourite treat a bit more virtuous without sacrificing too much flavour. For more ideas on healthier baking, exploring various Banana Bread variations can be very inspiring.
Going Sugar-Free or Lower Sugar
Making a truly sugar free banana bread can be achieved by relying solely on the sweetness of very ripe bananas and perhaps incorporating natural sweeteners like xylitol (use with caution if you have pets, as it’s toxic to dogs) or erythritol according to package instructions. You can also explore options like date paste. When reducing or eliminating sugar, be mindful that it can affect the texture and browning of the loaf, so some experimentation might be needed. We have a dedicated recipe if you’re keen to try a version specifically designed to be lower in sugar: check out our Sugar-Free Banana Bread recipe.
Troubleshooting Common Banana Bread Issues
Even seasoned bakers encounter hiccups. Here are solutions to common banana bread mistakes:
- Dry Banana Bread: This is often due to overbaking or using too much flour. Ensure you measure your flour correctly (spoon it into the measuring cup and level it, don’t scoop directly from the bag) and start checking for doneness a bit earlier.
- Dense or Tough Banana Bread: Overmixing the batter is a common culprit. Mix only until the ingredients are just combined. Also, ensure your bicarbonate of soda is fresh.
- Soggy or Undercooked Centre: Your oven temperature might be too high, causing the outside to cook faster than the inside. Or, it simply might need more baking time. If the top is browning too quickly, loosely tent it with foil for the remainder of the baking time. Using very wet bananas without slightly adjusting dry ingredients can also contribute.
- Banana Bread Sinks in the Middle: This can happen if it’s underbaked, if the oven door was opened too early or too often during baking, or if there’s too much leavening agent.
Finding Banana Bread Near Me (Or Just Baking Your Own!)
Sometimes, the craving hits, and you wonder if there’s delicious banana bread near me. While many local bakeries and cafes offer lovely versions, we truly believe that nothing beats the taste and aroma of a homemade loaf. Baking it yourself is not only rewarding but also allows you to control the ingredients and customise it to your liking. Plus, your home will smell absolutely divine!
Inspiration from the Kitchen Greats
We all have our favourite food bloggers and recipe developers. You might have come across recipes like Natashas Kitchen banana bread or the version from Smitten Kitchen banana bread. These talented cooks often offer unique twists and reliable methods. We encourage you to explore different recipes once you’ve mastered the basics; it’s a great way to discover new flavour combinations and techniques. Many fantastic recipes, like those found on BBC Good Food, also provide excellent guidance and inspiration.
Frequently Asked Questions (FAQ)
Here’s a plagiarism-free rewrite in first-person plural using HTML formatting:- Can we use frozen bananas in our banana bread?
- Certainly! We allow them to defrost entirely at room temperature or using a microwave. They’ll appear quite soft and watery – we simply pour away any surplus liquid before mashing and incorporating them into our mixture.
- How do we determine when our bananas are sufficiently ripe for banana bread?
- We search for bananas displaying numerous dark patches on their peel. The more speckled, the superior! They should feel tender when pressed and emit a strong, sweet aroma.
- What’s the best way for us to store our banana bread?
- After our loaf has cooled completely, we keep it in a sealed container at room temperature for 3-4 days, or refrigerate it for up to one week. We find that cutting slices only when needed helps maintain moisture.
- Is it possible for us to freeze banana bread?
- Absolutely! Our banana bread freezes wonderfully. We wrap the cooled loaf (or separate portions) securely in plastic wrap, then in aluminium foil or a freezer bag. We can store it frozen for up to 3 months and defrost at room temperature.
- What causes our banana bread to become gummy?
- Gummy texture in our banana bread typically results from excessive banana, insufficient flour, or incomplete baking. We ensure our measurements are precise and verify the bread is thoroughly cooked.
- Can we transform this recipe into banana bread muffins?
- Indeed! We can modify this recipe for individual muffins. We distribute the batter into lined muffin cases, filling each approximately two-thirds full. The baking duration reduces to roughly 20-25 minutes. We test for completion using a cocktail stick.
Nothing Beats Homemade Banana Bread!
We hope this guide has inspired you to get into the kitchen and bake your own delicious banana bread. It’s a simple pleasure, a comforting treat, and a wonderful way to use up those ripe bananas. Whether you stick to the classic recipe, experiment with add-ins, or try a healthier version, the satisfaction of slicing into a warm, fragrant loaf you’ve baked yourself is truly unbeatable.
So, what are you waiting for? Grab those bananas, preheat your oven, and get ready to enjoy the delightful experience of baking and eating homemade banana bread. We’d love to hear about your baking adventures – feel free to share your tips and customisations!