No-Bake Orange Creamsicle Cheesecake – Light, Creamy & Delicious!
Do you fondly remember the bright, tangy taste of an orange creamsicle from days gone by? That wonderful marriage of sharp orange and silky vanilla is a flavour that transports you straight back to childhood. We’re here to show you how to capture that very essence in a dessert that is not only luxurious and impressive but also remarkably straightforward to make. We present the most wonderful no-bake orange creamsicle cheesecake you will ever have the pleasure of tasting. This recipe requires absolutely no time in the oven, which makes it the ideal sweet for a warm summer afternoon, a special celebration, or whenever you fancy a show-stopping pud without any fuss.
Why This No-Bake Orange Cheesecake is a Must-Try
Before we get to the method, let’s explore precisely why this recipe is destined to become your new favourite dessert. We believe that an exceptional recipe should be as delightful to prepare as it is to enjoy, and this one certainly delivers on all fronts. It’s a superb option for novice cooks and experienced dessert aficionados alike.
- No Oven Required: Keep your kitchen wonderfully cool! This is the ultimate easy no-bake dessert, making it perfect for escaping the summer heat or simply freeing up your oven during busy holiday periods.
- Nostalgic Flavour: It beautifully encapsulates the classic orange and vanilla partnership that is so universally adored. Every mouthful is a delightful trip down memory lane.
- Simple, Accessible Ingredients: You will not need to embark on a quest for obscure items. Everything you need for this recipe can be easily found at your local supermarket.
- Perfect for Making Ahead: This cheesecake requires several hours to chill, making it a brilliant dessert to prepare the day before you need it. This takes the pressure off when you’re entertaining guests.
- Incredibly Creamy Texture: When you use full-fat ingredients and adhere to our simple guide, you will be rewarded with a velvety, melt-in-the-mouth texture that could rival any traditionally baked cheesecake.
Ingredients for Your Creamsicle Cheesecake
To achieve that flawless texture and a perfect harmony of flavours, we strongly advise using high-quality, full-fat ingredients. This is certainly not the recipe for low-fat alternatives, as they contain more water and can stop the cheesecake from setting correctly. Here is the list of what you will need for this creamy orange dessert.
For the Buttery Biscuit Base:
- 300g digestive biscuits (or shortbread for a richer base)
- 150g unsalted butter, melted
For the Creamy Orange Filling:
- 600g full-fat cream cheese, at room temperature
- 150g icing sugar, sifted
- 1 teaspoon pure vanilla extract
- Zest of 2 large oranges (about 2 tablespoons)
- 120ml fresh orange juice (from the zested oranges)
- 300ml double cream, cold
- A few drops of orange food colouring (optional, for a more vibrant colour)
Essential Equipment
You won’t need any highly specialised kitchen gadgets for this recipe. Having these fundamental tools ready will ensure the entire process is both smooth and enjoyable.
- 23cm (9-inch) springform tin
- Food processor or a zip-top bag and rolling pin
- Large mixing bowl
- A separate bowl for whipping cream
- Electric hand mixer or stand mixer
- Spatula
- Zester or fine grater
- Juicer
Step-by-Step Instructions to Make the Perfect No-Bake Cheesecake
We have organised the entire process into clear, manageable stages. Just follow along with us, and you will have a truly stunning cheesecake ready to chill in your fridge before you know it.
Step 1: Prepare the Biscuit Base
- Crush the Biscuits: Add the digestive biscuits to a food processor and whizz them into a fine, sandy powder. If you don’t own a food processor, you can place them inside a sealed food bag and bash them with a rolling pin. We find this part to be quite therapeutic!
- Combine with Butter: Tip the biscuit crumbs into a mixing bowl. Drizzle over the melted unsalted butter and stir everything together until the crumbs are fully moistened and have the consistency of damp sand.
- Press into the Tin: Transfer the buttery crumb mixture into your 23cm springform tin. Using the back of a spoon or the flat bottom of a glass, press the mixture down firmly to create an even layer across the base. For a neater edge, you can push the crumbs a little way up the sides of the tin.
- Chill the Base: Put the tin into the refrigerator to firm up for at least 30 minutes whilst you get on with the filling. This step ensures your base is solid and crisp.
Step 2: Create the Luscious Orange and Vanilla Cheesecake Filling
- Whip the Cream: Into a clean, chilled bowl, pour the cold double cream. With an electric mixer, whisk the cream until it forms firm peaks that hold their shape. Take care not to overbeat it, otherwise it can become grainy. Set this aside for a moment.
- Beat the Cream Cheese: In another large mixing bowl, place the room-temperature cream cheese and the sifted icing sugar. Use your electric mixer on a medium setting to beat them together until the mixture is perfectly smooth and creamy, without any lumps. This forms the silky foundation of your cheesecake.
- Add the Flavour: Into the cream cheese mixture, stir in the vanilla extract, fresh orange zest, and freshly squeezed orange juice. Mix on a slow speed until just combined. If you wish to use food colouring for a more vivid look, add a few drops now and stir until you reach the desired hue. This is the moment you create that signature orange and vanilla cheesecake flavour.
Step 3: Assemble and Chill Your No-Bake Orange Creamsicle Cheesecake
- Fill the Tin: Take your chilled biscuit base out of the fridge. Spoon the glorious orange filling onto the base and, using your spatula, gently spread it out to the edges. Smooth over the top to create a lovely, flat surface.
- Chill to Perfection: Cover the springform tin loosely with cling film, ensuring the film doesn’t make contact with the cheesecake’s surface. Pop it in the refrigerator to set for a minimum of 6 hours, though we find overnight is best. Patience is a virtue here; a thorough chill time is vital for clean slices and the ideal set.
Our Top Tips for Cheesecake Success
To help you achieve a flawless result on your very first try, we have put together a few of our most valued, tried-and-tested tips that truly make a difference.
- Use Room Temperature Cream Cheese: This is our single most crucial piece of advice! Cold cream cheese is difficult to work with and results in a lumpy filling. Let it sit out of the fridge for about an hour before you begin.
- Full-Fat is Essential: For a no-bake orange cheesecake, full-fat cream cheese and double cream are non-negotiable. They are fundamental to the structure and richness. Low-fat versions have a higher water content and will likely give you a runny filling that fails to set.
- Fresh Orange Juice and Zest Only: For the most authentic and vibrant taste, please use fresh oranges. Juice from a carton can taste flat or artificial. As an added benefit, fresh citrus provides a beautiful aroma, a key part of flavour. You can learn more about how citrus elevates recipes from the experts at King Arthur Baking.
- Don’t Overmix: When incorporating the whipped cream, remember to be gentle. Overmixing will deflate the mixture, knocking out all the air and leading to a dense, heavy filling.
Fun Variations and Topping Ideas
Whilst this cheesecake is absolutely beautiful as it is, you can certainly add your own creative touches. If you adore experimenting with dessert flavours, why not give our superb Mini Lemon Cheesecakes a go for another zesty treat?
- Change the Base: Try swapping the digestive biscuits for gingernuts to introduce a warm, spicy element, or opt for shortbread for an even more buttery crust.
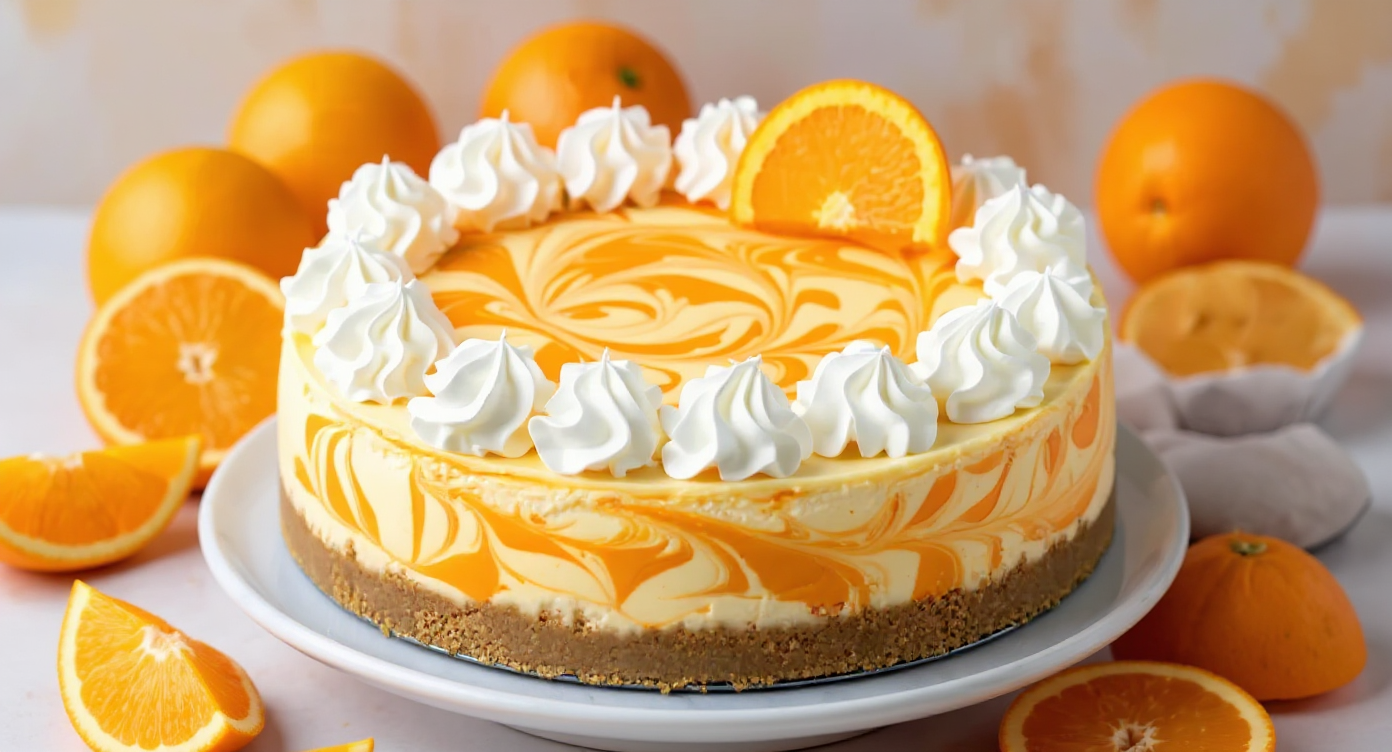
- Add a Swirl: Just before chilling, drop a few spoonfuls of orange curd over the filling, then use a skewer to gently drag it through the mixture for a stunning marbled look.
- Get Creative with Toppings: When you’re ready to serve, adorn your cheesecake with delicate curls of candied orange peel, shavings of white chocolate, a piped rosette of whipped cream, or some fresh orange segments.
Frequently Asked Questions (FAQ)
Why is my no-bake cheesecake not setting?
This is the most frequent query we receive about no-bake cheesecakes. The cause is nearly always one of two issues: using ingredients that are not full-fat (especially the cream cheese and double cream) or not allowing it to chill for long enough. Be patient and give it at least 6 full hours in the fridge!
Can I make this cheesecake gluten-free?
Of course! It’s very simple to do. Just replace the digestive biscuits in the base with your preferred brand of gluten-free biscuits. The cheesecake filling itself is already naturally free from gluten.
Can I make this ahead of time?
Yes, this dessert is absolutely perfect for preparing in advance. You can make it up to two days before you plan to serve it. Simply keep it covered in the fridge, and the flavours will have even more time to mingle and deepen.
Can I freeze this cheesecake?
You certainly can! For the best outcome, freeze the cheesecake whole before adding any decorations. Wrap it well in a layer of cling film, followed by a layer of aluminium foil. It will store well in the freezer for up to two months. Defrost it overnight in the refrigerator before you slice and serve.
A Slice of Sunshine on a Plate
And there you have it – a straightforward yet truly elegant no-bake orange creamsicle cheesecake that is guaranteed to impress your friends and family. It is the ideal balance of a crunchy, buttery base and a light, airy filling that is simply bursting with flavour. This dessert brings a ray of sunshine to any table and serves as proof that you don’t need an oven to create something utterly spectacular.
We are so thrilled for you to try this nostalgic recipe in your kitchen! When you do, we would love for you to leave a comment below to tell us how you got on. And if you’re searching for another decadent treat for your sweet tooth, we heartily recommend our classic Brownie Recipe For Deliciously Fudgy Treats. Happy (no) baking!


