The Chocolate Raspberry Drip Cake: A Step-by-Step Recipe
We know the incredible satisfaction that comes from revealing a cake that leaves everyone speechless—a genuine showpiece that delivers on flavour just as much as appearance. That magical moment when you present a towering, beautifully decorated cake is truly incomparable. We’re confident that with proper guidance, everyone can achieve that rewarding feeling of baking success. This is precisely why we’ve developed this comprehensive tutorial for creating the ideal Chocolate Raspberry Drip Cake. More than just a recipe, this is your reliable guide to crafting an extraordinary homemade celebration cake that will leave your guests wondering how you did it.
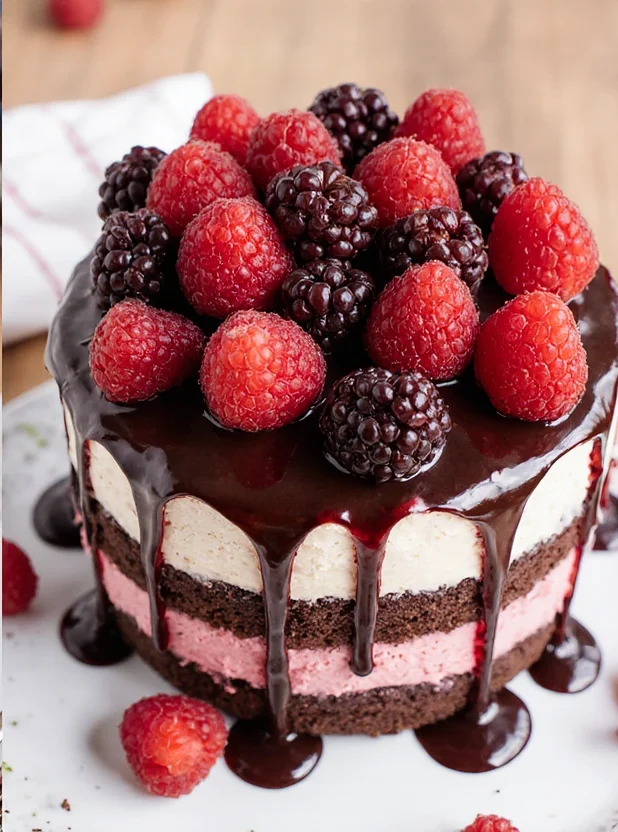
The combination of luxurious, velvety chocolate paired with the vibrant, sharp flavour of raspberry remains a timeless classic for good reason. We’ve perfected each component, from the delightfully moist chocolate layers and the fresh raspberry frosting to the flawless, shiny chocolate drip that elegantly cascades down the sides. Let’s embark on this baking adventure together!
Why You Will Love This Cake Recipe
We’re confident this cake will become a favourite, and here are several compelling reasons why:
- A Harmony of Flavours: The intense, indulgent chocolate layers are perfectly complemented by the fresh, tangy notes of real raspberry buttercream. It’s a match made in heaven.
- A Visual Delight: The dramatic effect of the rich chocolate drip against the delicate pink frosting creates a stunning centrepiece that looks like it belongs in a professional patisserie window.
- Simple to Master: Don’t let its sophisticated appearance intimidate you! We’ve broken down each phase into manageable instructions, leading you through the sponge, frosting, and distinctive drip with confidence.
- Perfect for Any Celebration: From birthdays to anniversaries, or even as a weekend treat, this cake transforms any gathering into something memorable.
Ingredients for Your Chocolate Raspberry Creation
For the finest results, we recommend sourcing high-quality ingredients and using kitchen scales for accuracy. Here’s what you’ll need to begin this delicious journey.
For the Rich Chocolate Sponge
- 225g plain flour
- 350g caster sugar
- 85g high-quality cocoa powder, sifted
- 2 tsp bicarbonate of soda
- 1 tsp baking powder
- 1 tsp salt
- 120ml vegetable oil
- 2 large free-range eggs, at room temperature
- 240ml buttermilk, at room temperature
- 240ml freshly brewed hot coffee (or hot water)
For the Luscious Raspberry Buttercream
- 250g unsalted butter, softened
- 500g icing sugar, sifted
- 100g fresh or frozen raspberries, pureed and strained to remove seeds
- 1 tsp vanilla extract
- 1-2 tbsp double cream or milk (if needed)
For the Perfect Chocolate Ganache Drip
- 100g dark chocolate (at least 70% cocoa solids), finely chopped
- 100ml double cream
Step-by-Step Instructions to Bake and Assemble
To achieve outstanding results, we encourage you to follow these directions carefully. We’ve found it beneficial to review the complete process before starting.
Making the Rich Chocolate Cake Recipe
- Preheat and Prepare: Begin by setting your oven to 180°C (160°C Fan/Gas Mark 4). Next, butter three 8-inch (20cm) round baking tins and cover the bases with baking parchment circles.
- Combine Dry Ingredients: Take a spacious mixing bowl and whisk together the flour, sugar, sifted cocoa, bicarbonate of soda, baking powder, and salt. This initial mixing helps create a uniform texture.
- Combine Wet Ingredients: Using another bowl or measuring jug, gently beat the oil, eggs, and buttermilk until they’re just blended.
- Mix the Batter: Pour the liquid ingredients into the dry mixture. Stir on a gentle speed until barely combined. Resist mixing too thoroughly; the mixture will appear quite dense at this stage.
- Add the Coffee: Gradually incorporate the hot coffee into the dense mixture, stirring slowly until the batter becomes silky. The consistency will thin considerably, which is exactly what creates our wonderfully moist texture!
- Bake to Perfection: Divide the mixture equally between your prepared tins. Place in the oven for 30–35 minutes. Test for doneness by inserting a cocktail stick into the centre—it should emerge without any wet batter.
- Cool Completely: Let the cakes rest in their tins for approximately 10 minutes. Then, gently invert them onto cooling racks to finish cooling entirely. This patience is crucial, as decorating warm sponges would be disastrous!
Whipping Up the Vibrant Raspberry Buttercream
- Beat the Butter: Using a spacious bowl and an electric mixer (or stand mixer fitted with the paddle), whip the soft butter at medium-high speed for 5 minutes. It will transform into something wonderfully light and fluffy.
- Add the Sugar: Running the mixer slowly, introduce the sifted icing sugar bit by bit. After it’s all added, increase to high speed and whip for an additional 3-5 minutes until beautifully airy.
- Flavour with Raspberry: Incorporate the sieved raspberry puree and vanilla. Start mixing slowly, then build up to medium-high speed until your raspberry buttercream becomes velvety smooth. If it seems too firm, a small amount of cream or milk will achieve the ideal spreading texture.
Assembling and Frosting Your Cake
- Level the Cakes: If your sponges have domed during baking, carefully slice off the peaks using a long knife. This creates the foundation for a beautifully straight cake.
- First Layer: Place your initial cake round on your chosen serving dish or rotating stand. Apply a generous dollop of raspberry buttercream and spread it smoothly to the edges.
- Stack and Repeat: Add the next layer carefully and cover with more buttercream. Crown with the third layer, positioning it upside down for the flattest possible surface.
- Apply the Crumb Coat: With a palette knife, spread a modest coating of buttercream across the entire cake. This initial layer traps any loose crumbs, ensuring a pristine final appearance. A dough scraper helps achieve beautifully smooth sides.
- Chill the Cake: Place the cake in the refrigerator for at least 30 minutes, or up to 60 minutes. This crucial step solidifies the structure, making the finishing touches far more manageable.
- Final Frosting: Once chilled, add a thicker, more luxurious coating of buttercream. Perfect the surface using your dough scraper and palette knife until you achieve that bakery-quality smoothness.
Creating the Perfect Chocolate Ganache Drip
The drip is what transforms this cake into something extraordinary, and achieving the proper texture is crucial.
- Heat the Cream: Pour the double cream into a microwave-suitable dish. Warm it until steaming hot with tiny bubbles appearing at the edges. Take care to prevent it from bubbling over.
- Melt the Chocolate: Place your chopped chocolate in a heatproof dish. Pour the steaming cream over the chocolate pieces and let it sit undisturbed for 5 minutes. The heat will soften the chocolate beautifully.
- Stir Until Smooth: Following the waiting period, stir slowly from the centre outward. Keep stirring until you achieve a glossy, consistent ganache with no lumps.
- Cool to the Right Temperature: Let the ganache rest for approximately 10-15 minutes. It should feel warm but not hot, as excessive heat would damage the buttercream. You’re aiming for a consistency reminiscent of thick honey.
- Apply the Drip: Remove your chilled masterpiece from the fridge. Using a teaspoon or squeeze bottle, delicately drizzle the chocolate ganache drip along the top edge, encouraging it to flow naturally downward. Once the drips are complete, fill the centre and spread gently to meet the edges.
- Final Decoration: Work swiftly while the ganache remains pliable. Crown your creation with fresh raspberries, elegant chocolate curls, or perhaps some dainty macarons for added sophistication.
Top Tips for a Flawless Drip Cake
- Use Room Temperature Ingredients: To achieve the smoothest batter and buttercream, allow your eggs, buttermilk, and butter to reach room temperature. This ensures they blend harmoniously for superior results.
- Avoid Overmixing the Batter: Excessive mixing activates the flour’s gluten, potentially creating a dense cake. Stop mixing as soon as everything is just incorporated.
- The Importance of Chilling: We emphasise this repeatedly: proper refrigeration is essential for crisp edges and those coveted, controlled drips. Please don’t rush these cooling periods.
- Check Your Ganache Consistency: Test readiness by dripping a small amount down a chilled glass. If it races to the base, allow more cooling time. If it barely moves, warm it briefly in short bursts.
- Experiment with Flavours: Though chocolate and raspberry make a wonderful pair, consider this recipe your canvas. For a variation, you might try adapting an airy Cloud Cake Recipe as your foundation.
- Baking for a Crowd: When serving this alongside other treats, it pairs beautifully with bite-sized sweets. Consider preparing our irresistible Almond Joy Cookie Recipe as accompaniments.
Frequently Asked Questions (FAQ)
Can I make this cake ahead of time?
Absolutely! The chocolate layers keep wonderfully for two days when properly stored. After cooling entirely, wrap each layer snugly in cling film and store at room temperature. The buttercream also stores brilliantly; keep it refrigerated in a sealed container. Before using, bring it back to room temperature and re-whip briefly.
Can I use frozen raspberries for the buttercream?
Indeed, frozen raspberries work brilliantly. Defrost them completely before pureeing and straining, treating them exactly like fresh berries. The puree might be slightly thinner, so be prepared to adjust with extra icing sugar for the right consistency.
My ganache was too runny/thick. What did I do wrong?
This happens occasionally and usually relates to temperature or proportions. Runny ganache typically means it needed more cooling time before application. Thick ganache might have cooled excessively or used chocolate with higher cocoa content. Remedy this by gently rewarming or adding a splash of warm cream.
How do I store leftover chocolate raspberry drip cake?
Store remaining cake in a sealed container in the refrigerator for up to 4 days. The buttercream preserves the sponge’s moisture beautifully. For optimal enjoyment, we recommend allowing slices to sit at room temperature for 20-30 minutes before serving.
What type of chocolate is best for the ganache?
We strongly recommend premium dark chocolate containing at least 70% cocoa solids. This delivers an intense, sophisticated taste that balances the sweetness whilst setting to a gorgeous sheen. Avoid chocolate chips, which often include stabilisers that prevent smooth melting. For additional tips, this guide on how to melt chocolate from BBC Good Food offers valuable insights.
Conclusion: Your Turn to Be the Star Baker
So there we are—our thorough blueprint for crafting a spectacular Chocolate Raspberry Drip Cake at home. We trust we’ve shown that creating such an impressive dessert is both enjoyable and entirely within reach. By following our methodical approach, you’ll produce a cake worthy of any special occasion.
The stage is set for you. Time to don that apron, gather your ingredients, and start crafting something extraordinary. We’re certain you’ll find the experience as delightful as the final result.
Have you attempted our Chocolate Raspberry Drip Cake? We’re always thrilled to see your creations, so do share your triumphant bakes with us! Connect with us on social media or drop a comment below with your experiences and any queries. Enjoy your baking adventure!


