Tasty Red Velvet Cheesecake – The Perfect Blend of Two Favourites
Imagine combining the vibrant, zesty appeal from red velvet cakes with the luxurious richness and velvety texture of traditional cheesecake. If you love desserts, this is a stunning possibility. We’re delighted to announce that this dream can be a reality. Let us help you in making the most amazing dessert, The absolutely gorgeous Chocolate Red Velvet Cake. This recipe combines the stunning aesthetics and delicate chocolate notes of red velvet with the indulgence, silky, and incredibly creamy flavor of a perfect cheesecake. This is a delicious dessert that does more than just impress with its flavor but also provides an incredible focal point for any celebration.
If you’re planning an unforgettable party or hoping to impress your guests at your dinner, or just want to savor something extraordinary, this recipe is sure to deliver outstanding outcomes. We’ve carefully outlined every step that allows even the most novice bakers to create a flawless, non-crack, and absolutely irresistible display.
What Makes Our Red Velvet Cheesecake Recipe So Special?
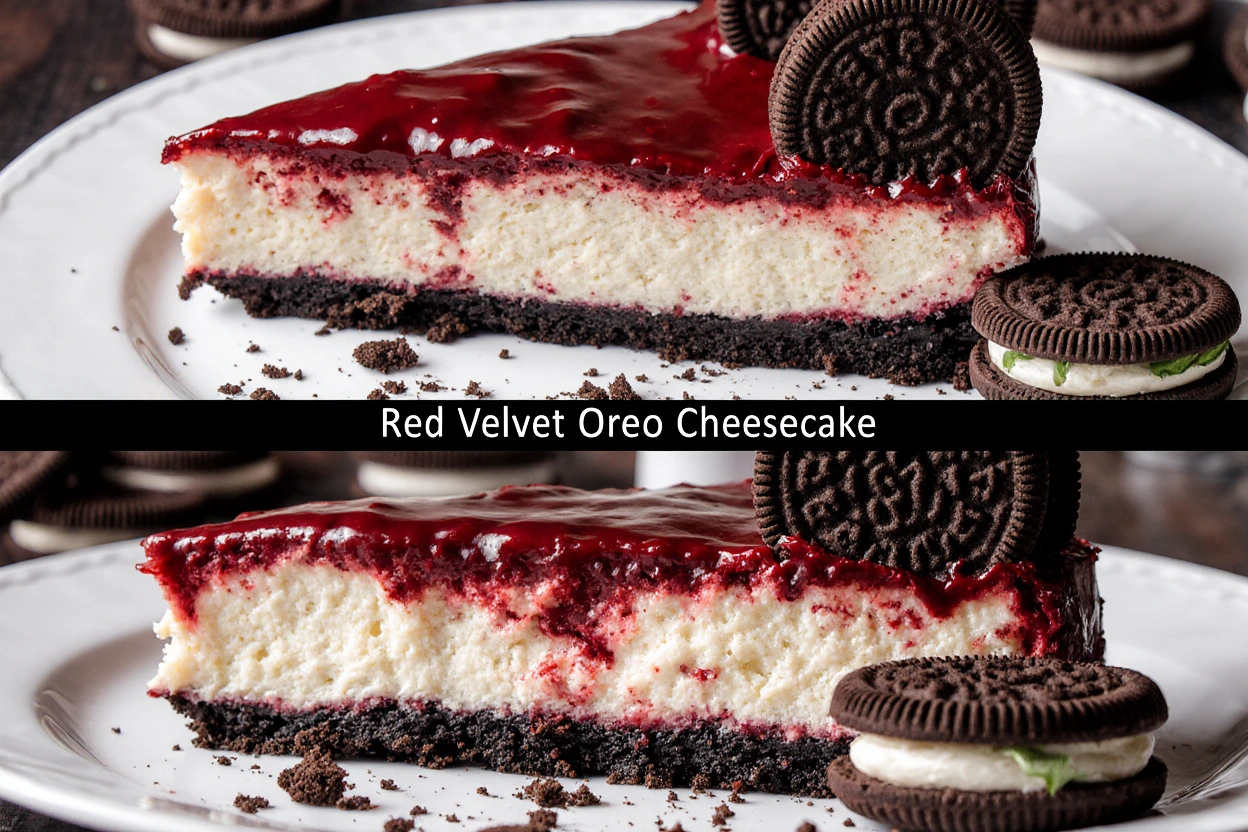
This is more than just an appetizer; it’s an actual culinary experience. We’ve refined this recipe to find the perfect harmony between flavor and consistency. The base has a crunchy dark chocolate biscuit layer that provides an amazing contrast to the creamy filling. The cheesecake is decorated by premium cocoa and the characteristic crimson hue. It embodies the essence of red velvet and preserving the distinctive creamy cream cheese flavor.
To finish for a perfect finish, we apply the delicious cream cheese frosting that adds an extra layer of tart sweetness as well as an old-fashioned flavor. The outcome is a multi-textured confection that is deliciously indulgent and perfectly balanced, which makes it almost impossible to finish just one slice. Through our comprehensive instructions, you’ll be able to master the most important techniques, such as the technique of water bath to ensure a smooth and flawless result for every occasion.
Essential Ingredients for the Perfect Red Velvet Cheesecake
Gathering the best ingredients is the first step to baking with excellence. We recommend using the full-fat option for this recipe, especially those made of cream cheese as well as soured cream, because they are essential to achieving the perfect consistency and flavor. Quality ingredients make everything!
For the Chocolate Cookie Crust
- 250g Oreo cookies (or similar chocolate sandwich biscuits) finely crushed
- 85g of unsalted butter and melted
For the Red Velvet Cheesecake Filling
- Full-fat cream cheese weighing 900g at room temperature
- 250g of caster sugar
- 200g of soured cream at room temperature
- 1 cup cocoa powder
- 1 teaspoon vanilla extract
- 1 tablespoon white vinegar. 1 tablespoon white vinegar.
- 2 teaspoons of red gel food coloring
- 4 large eggs, at room temperature
For the Cream Cheese Frosting Topping
- 240g of full-fat cream cheese at room temperature
- 120g unsalted butter softened, unsalted
- 400g icing sugar, sifted
- 1 teaspoon vanilla extract
Step-by-Step Guide to Baking Your Homemade Cheesecake
Follow these directions exactly follow these steps and you’ll receive delicious, mouthwatering cheesecake. We’ll share every tip, trick, and trick we’ve learned from our own experience.
- Make for the Pan and Oven: Preheat your oven to 160°C (140 °C fan/Gas Mark 3). Spread butter on the 23cm (9-inch) springform tin, then line the bottom with baking parchment. Securely cover the exterior of the tin with two layers of aluminum foil, making sure you have total coverage to stop the water from leaking into the bathing process.
- Create the Crust: Mix together the chocolate biscuits that have been crushed and the melted butter into a mixing bowl till the texture is similar to wet sand. Then, press the mixture into an even layer on the base of your tin. We’ve found that pressing it using the flat surface of a glass makes an extremely uniform crust. Set it aside in the fridge for a few hours to set while you prepare the filling.
- Mix the cheesecake filling: Using a large mixing bowl, beat room-temperature cream cheese using an electric mixer at a low speed until smooth and silky without lumps. Add the sugar gradually, blending until the mixture is barely incorporated and taking care not to scratch around the edges of your bowl.
- Add Flavor and Colour: Incorporate the soured cream, cocoa powder, vanilla extract, white vinegar, and red gel food coloring into the mixture. Blend at a low speed until the ingredients are together. It is essential to avoid overmixing at this stage!
- Incorporate the eggs: Introduce the eggs separately, mixing at a slow speed only until they are fully incorporated. A lot of beating creates undesirable air bubbles, which can cause cracks in the surface.
- Bake and Assemble with a Water Bath: Carefully pour your cheesecake mix over the crust, which is chilled. Set the springform tin into an oven-proof dish. Add hot water to the dish until it is halfway into the tin for cheesecake. This technique of water bathing is crucial to ensure an evenly moist and perfectly baked cheesecake. For a better understanding of this method, learn how to utilize the water bath to bake cheesecake from expert bakers.
- Bake and cool slowly: Bake for 60-70 minutes. When you can tell it’s finished, the outside of the cake is solid, while the middle has an ebb and flow. Switch off the oven, break the door using a wooden spoon, and then let the cheesecake cool completely within the oven for at least 1 hour. The gentle reduction in temperature helps to prevent surface cracks.
- Chill thoroughly: Once cooled in the oven, take the cheesecake from the water bath and then peel off the foil. Allow it to cool down to temperatures of room temperature in a rack for cooling. After that, wrap in Cling film and chill for at least 6 hours, and preferably for a night.
- Make the topping: For the frosting, whisk the soft butter and cream cheese until it becomes creamy. Incorporate the icing sugar sifted as well as vanilla extract and beat until smooth and airy. Spread or pipe this frosting on top of your chilled cheesecake shortly before serving.
Our Top Tips for Cheesecake Success
The art of making cheesecakes can seem difficult, but it’s within everyone’s reach. These are the tried and tested secrets to achieve excellence consistently.
- The temperature of the room is essential: We can’t emphasise this enough! Making use of chilled eggs, cream cheese, or soured cream can result in an unbalanced mixture. Be sure that your refrigerated items are warmed up on the counter for at least 60 minutes prior to beginning.
- Don’t overmix the batter: Beating too much air into the filling, particularly after the eggs have been added, can cause expansion during baking, which is followed by deflation as it cools. This can cause cracks on the surface. Mixing speeds should be kept low and stop the mixing immediately when ingredients have been mixed.
- Accept the Water Bath: Never think of omitting the bath (or “bain-marie”). The water bath creates a humid and steamy environment in the oven, allowing the cake to bake evenly and slowly, creating a perfect smooth texture all over.
- Patience during Cooling: Quick temperature changes can cause catastrophe for cheesecakes. The method of cooling slowly, starting in the oven that has been turned off and continuing at room temperature, and ending in the fridge–is essential for creating a smooth, flawless top.
- for A Perfect Slice To make those perfect magazine-worthy slices, soak the large, razor-sharp knife in boiling water, and dry it completely before each cutting. This method allows you to warm the cheesecake as you cut it, allowing the knife to move through it effortlessly.
Flavour Variations and Customisation
This recipe is an old-fashioned favorite and we encourage individual additions! If you’re a fan of cooking, think about serving this delicious cheesecake alongside the delicate, airy texture that is Cloud Cake Recipe. cloud Cake Recipe for a wonderful dessert in contrast. Here are some additional suggestions to stimulate your creativity:
- White Chocolate Drizzle: Warm some premium white chocolate until it is melted, then artistically drizzle it over the surface of the frosted. This will add elegance and stunning visual appeal.
- Alternate Crusts Are you looking for something that is different than Oreos? You can try digestive biscuits and buttery shortbread to get equally tasty outcomes. For a more ambitious approach, bake a thin layer of sponge in red velvet to serve as your base.
- Creative Toppings Decorate with freshly picked strawberries or raspberries to create the most vibrant and fruity flavor. Chocolate shavings, mini chocolate chips, and reserved cake crumbs from red velvet are wonderful decorative accents. If you’re looking for more desserts inspired by cheesecake, you’ll be awestruck by our delicious blueberry cheesecake swirl cookies simple.
Commonly asked questions (FAQ) concerning Red Velvet Cheesecake
What caused my cheesecake to crack?
Surface cracks are typically caused by three primary causes that include excessive mixing (particularly after mixing eggs) and not using the water bath or speeding up in the cool process. Our method is thorough and addresses all of these potential dangers.
Could I prepare this cake without food colourings like red?
Absolutely! Just remove the food coloring if you’d like. The result will be what we like to call”a “Velvet Cocoa Cheesecake.” The taste is still equally impressive with delicious vanilla and chocolate flavors. The term “red velvet” was once used to describe “red velvet” referred to the natural reaction of cacao and acidic ingredients like vinegar, but modern recipes create that famous red hue by coloring.
What should I do to conserve the Red Velvet cheesecake I bought?
Place your cheesecake in a tightly sealed container or wrapped in Cling film in the refrigerator. It will keep its freshness for up to 5 days; however, the biscuit base may change slightly in texture with the passage of time.
Can I freeze this cake?
In fact, this cheesecake can be frozen wonderfully! It is recommended to freeze it in its entirety or portioned prior to making the topping of cream cheese. Wrap it in clingfilm and then aluminium foil. If properly stored, it will remain good for up to two months. When you are ready, take it out of the freezer overnight in the refrigerator and then add freshly-made frosting prior to serving.
What type of cream cheese do I buy?
To ensure the highest quality of consistency and texture, we recommend using brick-style cream cheese that is full-fat (like Philadelphia). Avoid spreadable cheeses in tubs, since the higher moisture levels result in an unsteady cheesecake that is unable to keep its shape.
Ready to Wow Your Guests?
Here is your complete recipe for making an amazingly smooth and creamy impressive home-cooked cheesecake. This dessert is a real success in taste, bringing two of the most beloved recipes into one unforgettable creation. It demonstrates that with proper instruction and mindful technique, you can achieve professional-standard desserts in your own kitchen.
It’s time to heat the oven, put together your ingredients, and then create your dessert that leaves lasting impressions that last beyond the final crumb. We’d love to see your desserts! Send us your photos and tag us on social media or leave a comment below to tell us about your wonderful Red Velvet Cheesecake experience.


