Sweet White Chocolate Raspberry Cookies Recipe
There’s a special kind of magic that happens when you pair creamy, sweet white chocolate with the sharp, vibrant tang of raspberries. It’s a combination that feels both indulgent and wonderfully fresh. This White Chocolate Raspberry Cookies Recipe is the result of years of tweaking and testing in my own kitchen to get that perfect balance: a cookie with delightfully crisp edges that gives way to a soft, chewy, and slightly gooey centre. I’ve been making this for over 9 years, and it never disappoints.
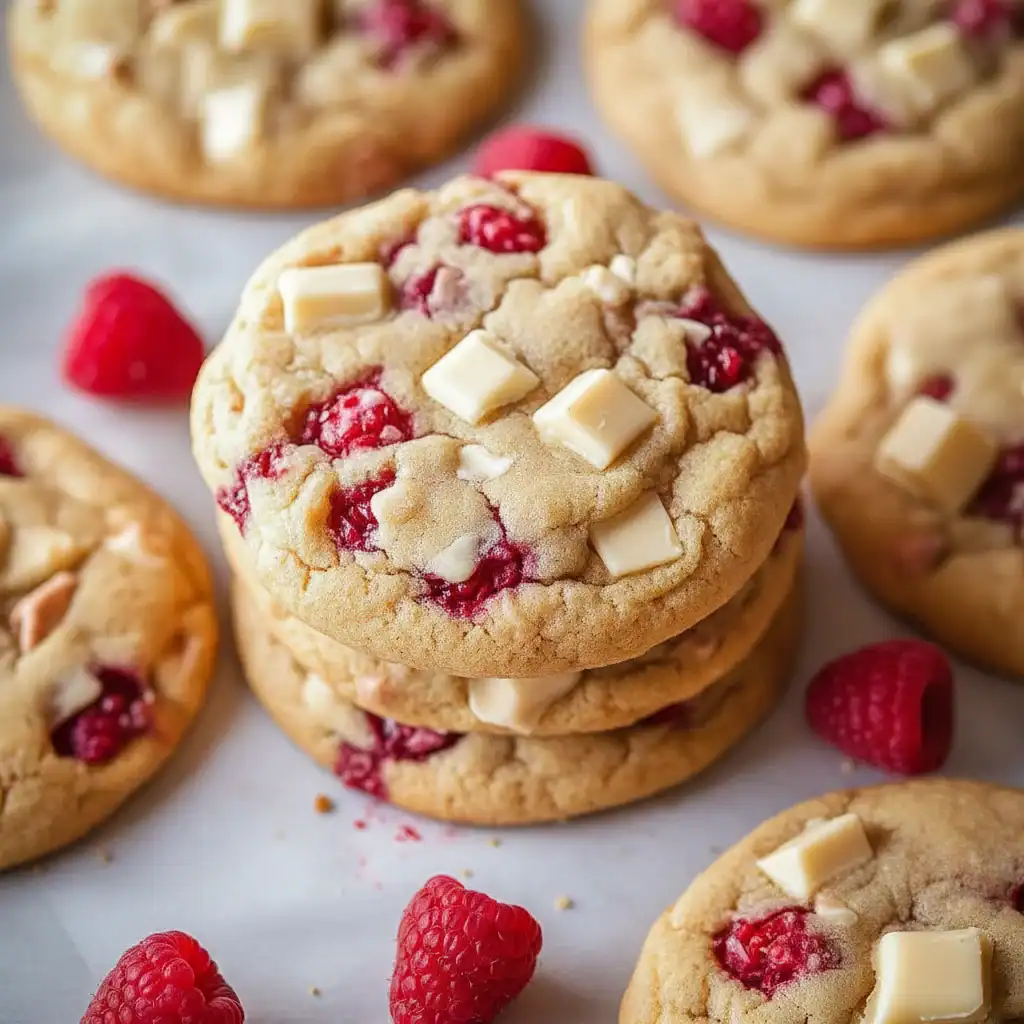
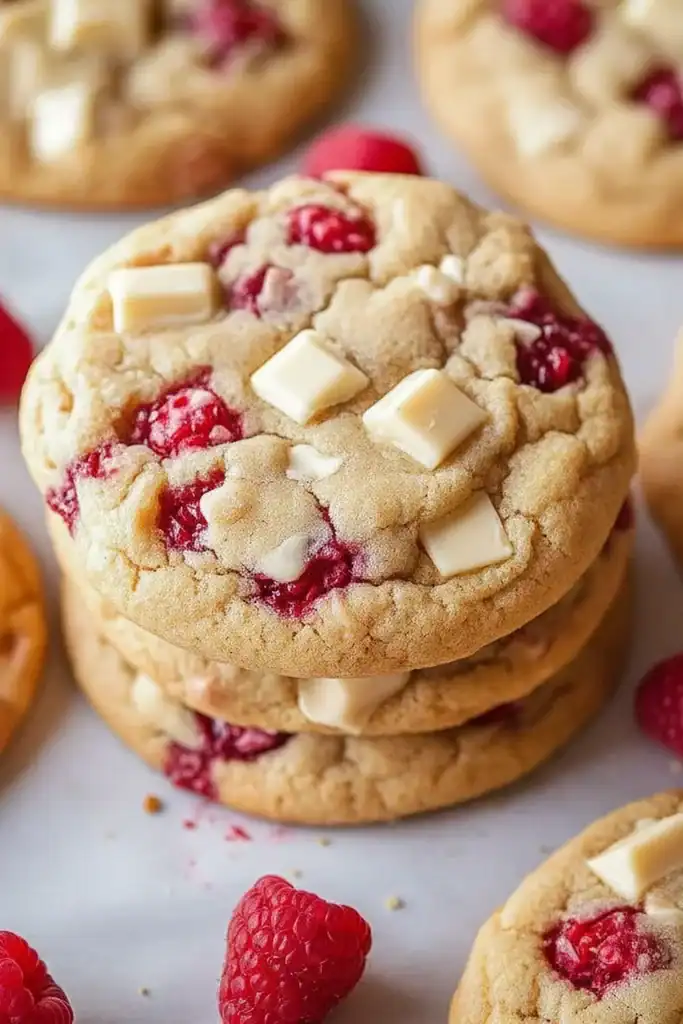
What makes these cookies truly special is how the textures and flavours play together. The smooth, vanilla-scented white chocolate melts into little pockets of sweetness, a perfect contrast to the bright bursts of raspberry that cut through the richness. They look absolutely beautiful, with the pale cookie dough studded with ivory chocolate and ruby-red fruit. They’re a fantastic bake for a weekend treat, ideal when you want to fill the house with that incredible freshly-baked smell, or to package up as a thoughtful gift for a friend.
Whether you’re an experienced baker or just starting, this guide will walk you through every step. We’ll cover everything from getting the right ingredients to the little tips I’ve picked up over the years that guarantee a perfect batch every single time. Get your apron on, and let’s bake something wonderful together.
Recipe Overview
This recipe creates wonderfully soft and chewy cookies, loaded with chunks of creamy white chocolate and tangy raspberries. The dough uses a classic creaming method to ensure a light texture, and a short chilling time prevents the cookies from spreading too much in the oven. In my testing, I found that using a combination of chopped white chocolate and chocolate chips gives the best melt and texture throughout the cookie.
- Prep Time: 20 minutes
- Chill Time: 30 minutes
- Cook Time: 12-15 minutes
- Total Time: 1 hour 5 minutes
- Servings: Makes approximately 24 cookies
- Difficulty: Easy
Why You’ll Love This White Chocolate Raspberry Cookies Recipe
- Sublime Flavour and Texture: You get the best of both worlds here. The edges are lightly golden and crisp, while the centre remains soft and chewy for days. The sweetness of the white chocolate is perfectly balanced by the sharp fruitiness of the raspberries.
- Ready in Just Over an Hour: From starting the dough to pulling the first batch from the oven, the whole process comes together in about an hour, including the essential chill time.
- A Truly Forgiving Recipe: This dough is very cooperative. You can swap in different berries, add nuts, or even use different types of chocolate. It’s a great base for your own creative touches.
- Works Beautifully for Afternoon Tea: These cookies are an elegant addition to an afternoon tea spread or a lovely treat to share with friends over a coffee. They also make a fantastic homemade gift.
- Family Tested and Approved: My kids absolutely devour these every time I make them. They often say these are their favourite cookies, and they love helping to press the chocolate chunks into the dough balls.
Ingredients You’ll Need
For the best results, using good quality ingredients makes all the difference, especially the white chocolate. I prefer using a bar of proper white chocolate, like Callebaut or Green & Black’s, and chopping it myself. This creates both big melty pools and smaller flecks throughout the cookie, which you don’t always get with chips alone.
- 250g plain flour
- 1/2 tsp bicarbonate of soda
- 1/2 tsp baking powder
- 1/4 tsp salt
- 150g unsalted butter, softened to room temperature
- 100g granulated sugar
- 120g light brown soft sugar
- 1 large free-range egg, at room temperature
- 1 tsp vanilla extract
- 180g white chocolate, roughly chopped (or a mix of chopped and chips)
- 150g frozen raspberries
Sara’s Tip: Use frozen raspberries directly from the freezer. They hold their shape much better when being mixed into the dough and are less likely to bleed colour everywhere, which can happen with fresh raspberries.
How to Make White Chocolate Raspberry Cookies
The process for making these cookies is straightforward. The most important parts are creaming the butter and sugar properly and not overworking the dough once the flour is added. This ensures a tender, chewy cookie rather than a tough one.
- Prepare Your Dry Ingredients: In a medium bowl, whisk together the plain flour, bicarbonate of soda, baking powder, and salt. This step ensures the raising agents are evenly distributed. Set it aside.
- Cream Butter and Sugars: In the bowl of a stand mixer fitted with the paddle attachment, or in a large bowl with a hand mixer, beat the softened butter, granulated sugar, and light brown sugar on medium-high speed for about 3-4 minutes. The mixture should become light, pale, and fluffy. This process incorporates air, which is key to the cookie’s texture.
- Add Egg and Vanilla: Scrape down the sides of the bowl. Add the room temperature egg and vanilla extract and beat on medium speed until just combined, about 30 seconds. Don’t overmix at this stage.
- Combine Wet and Dry: With the mixer on its lowest speed, gradually add the dry flour mixture to the wet ingredients. Mix until the flour is almost fully incorporated, but you can still see a few streaks. This is important to avoid developing too much gluten.
- Fold in the Goodies: Remove the bowl from the mixer. Gently fold in the chopped white chocolate and the frozen raspberries with a spatula until they are just evenly distributed. I find it’s best to work quickly here so the raspberries don’t thaw and stain the dough too much.
- Chill the Dough: Cover the bowl with cling film and place it in the refrigerator to chill for at least 30 minutes (or up to 48 hours). Chilling the dough is a crucial step; it solidifies the butter, which prevents the cookies from spreading into thin, crispy discs in the oven. For a deeper dive into the science behind this, Serious Eats has a great explanation of how resting dough improves flavour and texture.
- Preheat and Prepare: While the dough is chilling, preheat your oven to 180°C (160°C fan) and line two large baking trays with parchment paper.
- Portion and Bake: Scoop out portions of dough, about 2 tablespoons each, and roll them into balls. Place them on the prepared baking trays, leaving at least 5cm (2 inches) of space between each one to allow for spreading. I like to press a few extra chunks of white chocolate on top of each ball for a prettier finish.
- Bake to Perfection: Bake for 12-15 minutes, or until the edges are lightly golden brown and the centres look slightly underdone. The cookies will continue to cook on the hot tray after you remove them.
- Cool Down: Let the cookies cool on the baking trays for 5-10 minutes before carefully transferring them to a wire rack to cool completely. This helps them set up properly.
Tips From My Kitchen
- Temperature Control is Key: Using room temperature butter and eggs is non-negotiable for a smooth, well-emulsified dough. Cold ingredients won’t cream together properly. Take your butter and egg out of the fridge about an hour before you start.
- The Secret to Chewy Centres: I learned that slightly underbaking the cookies is the secret. Pull them from the oven when the centres still look a little soft. They will firm up as they cool on the baking tray, resulting in that perfect soft and chewy texture.
- Make-Ahead Magic: You can make the cookie dough and chill it in the fridge for up to 3 days. You can also scoop the dough into balls, place them on a tray, and freeze them. Once solid, transfer them to a freezer bag. You can bake them straight from frozen; just add an extra 2-3 minutes to the baking time.
- Proper Storage: Store the cooled cookies in an airtight container at room temperature. They will stay fresh and chewy for up to 4 days. If they start to lose their softness, you can pop a slice of bread in the container to help them retain moisture.
Equipment You’ll Need
- Stand mixer or a large bowl with an electric hand mixer
- 2 large baking trays
- Parchment paper or a silicone baking mat
- Wire cooling rack
- Ice cream scoop or two spoons for portioning dough
Common Mistakes to Avoid
- Overcrowding the Baking Tray: Giving each cookie dough ball plenty of space is essential. If they’re too close together, they will spread into each other and steam instead of bake, resulting in soft, cakey edges instead of crisp ones.
- Using Melted or Cold Butter: The temperature of your butter is critical. If it’s too soft or melted, the cookies will spread too much. If it’s too cold, it won’t cream properly with the sugar. ‘Room temperature’ means it’s soft enough to indent with your finger but still holds its shape.
- Skipping the Chill Time: I know it’s tempting to bake the dough straight away, but chilling is what makes these cookies great. It prevents excessive spreading and deepens the flavour of the dough. Don’t skip it!
Delicious Variations to Try
Once you’ve mastered this base recipe, it’s fun to experiment with other flavours. Here are a few ideas that work beautifully:
- White Chocolate, Raspberry & Macadamia: Add 100g of roughly chopped, toasted macadamia nuts along with the chocolate and raspberries for a wonderful buttery crunch.
- Lemon & Raspberry Zing: Add the finely grated zest of one lemon to the butter and sugar mixture when creaming. The citrus brightens the flavours even more and pairs wonderfully with raspberry.
- Triple Chocolate Chunk: For the ultimate chocolate lover, use a mix of white, milk, and dark chocolate chunks instead of just white chocolate.
What to Serve With White Chocolate Raspberry Cookies
These cookies are magnificent on their own, but here are a few simple pairings that take them to another level:
- A Glass of Cold Milk: The classic and unbeatable pairing for any cookie.
- Vanilla Bean Ice Cream: Create a simple cookie sandwich by placing a small scoop of good-quality vanilla ice cream between two cookies.
- A Hot Cup of Tea: A cup of Earl Grey or English Breakfast tea is a lovely, comforting companion to the sweet and fruity notes of the cookie.
And if you’re planning your meals for the week after you’ve enjoyed these delicious cookies, you might be looking for a simple but flavourful dinner. My Lemon Garlic Chicken is a fantastic option that our family loves just as much as these cookies. Or for something with a bit more spice, the Black Pepper Chicken always gets great reviews.
Frequently Asked Questions
White Chocolate Raspberry Cookies
Ingredients
Method
- Prepare Your Dry Ingredients: In a medium bowl, whisk together the plain flour, bicarbonate of soda, baking powder, and salt. This step ensures the raising agents are evenly distributed. Set it aside.
- Cream Butter and Sugars: In the bowl of a stand mixer fitted with the paddle attachment, or in a large bowl with a hand mixer, beat the softened butter, granulated sugar, and light brown sugar on medium-high speed for about 3-4 minutes. The mixture should become light, pale, and fluffy. This process incorporates air, which is key to the cookie's texture.
- Add Egg and Vanilla: Scrape down the sides of the bowl. Add the room temperature egg and vanilla extract and beat on medium speed until just combined, about 30 seconds. Don't overmix at this stage.
- Combine Wet and Dry: With the mixer on its lowest speed, gradually add the dry flour mixture to the wet ingredients. Mix until the flour is almost fully incorporated, but you can still see a few streaks. This is important to avoid developing too much gluten.
- Fold in the Goodies: Remove the bowl from the mixer. Gently fold in the chopped white chocolate and the frozen raspberries with a spatula until they are just evenly distributed. I find it’s best to work quickly here so the raspberries don't thaw and stain the dough too much.
- Chill the Dough: Cover the bowl with cling film and place it in the refrigerator to chill for at least 30 minutes (or up to 48 hours). Chilling the dough is a crucial step; it solidifies the butter, which prevents the cookies from spreading into thin, crispy discs in the oven. For a deeper dive into the science behind this, Serious Eats has a great explanation of how resting dough improves flavour and texture.
- Preheat and Prepare: While the dough is chilling, preheat your oven to 180°C (160°C fan) and line two large baking trays with parchment paper.
- Portion and Bake: Scoop out portions of dough, about 2 tablespoons each, and roll them into balls. Place them on the prepared baking trays, leaving at least 5cm (2 inches) of space between each one to allow for spreading. I like to press a few extra chunks of white chocolate on top of each ball for a prettier finish.
- Bake to Perfection: Bake for 12-15 minutes, or until the edges are lightly golden brown and the centres look slightly underdone. The cookies will continue to cook on the hot tray after you remove them.
- Cool Down: Let the cookies cool on the baking trays for 5-10 minutes before carefully transferring them to a wire rack to cool completely. This helps them set up properly.
Notes
I truly hope you enjoy making this White Chocolate Raspberry Cookies recipe. It’s a staple in our house for a reason, and there’s nothing better than sharing a warm, freshly baked cookie with the people you love. If you try them, please let me know how they turned out in the comments below. I love hearing from you! Happy baking, Sara.


