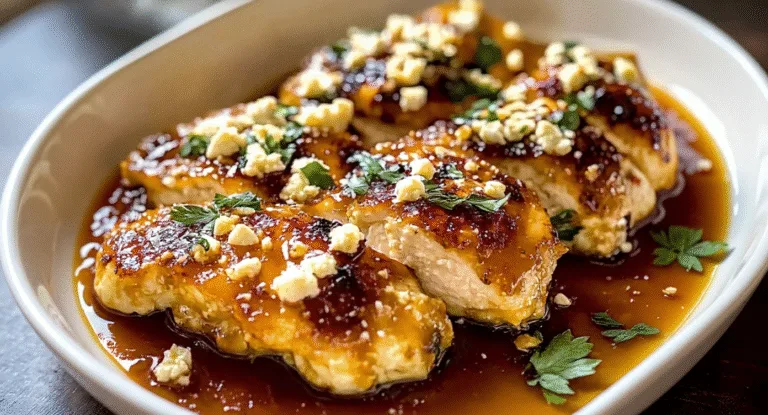
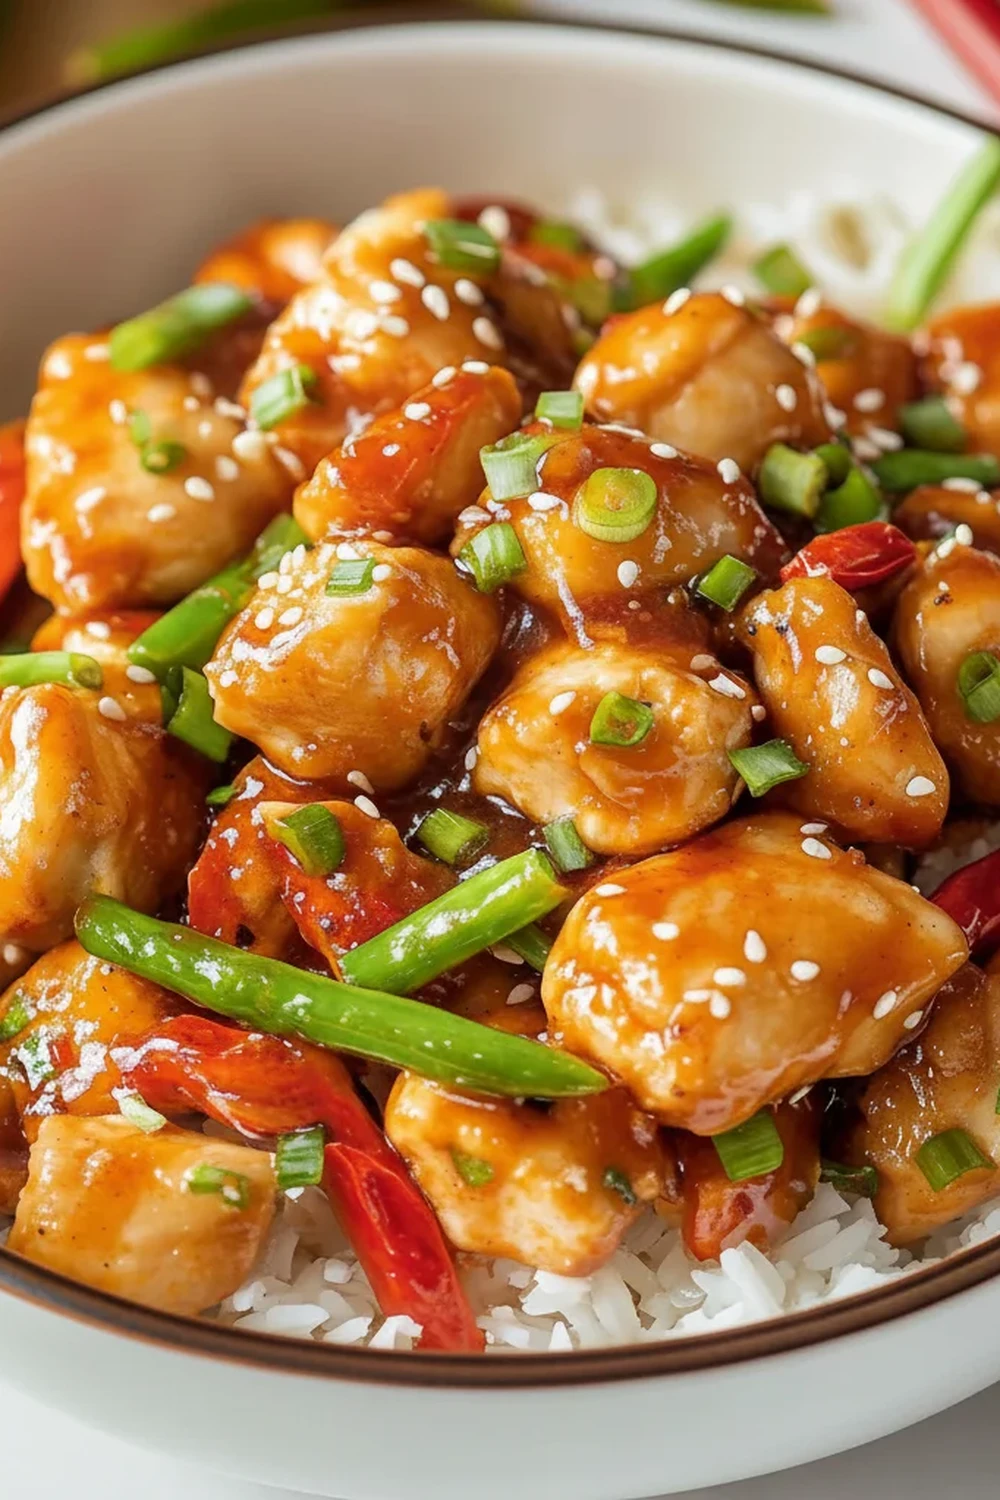
Sticky Sweet Chili Chicken Recipe for Dinner
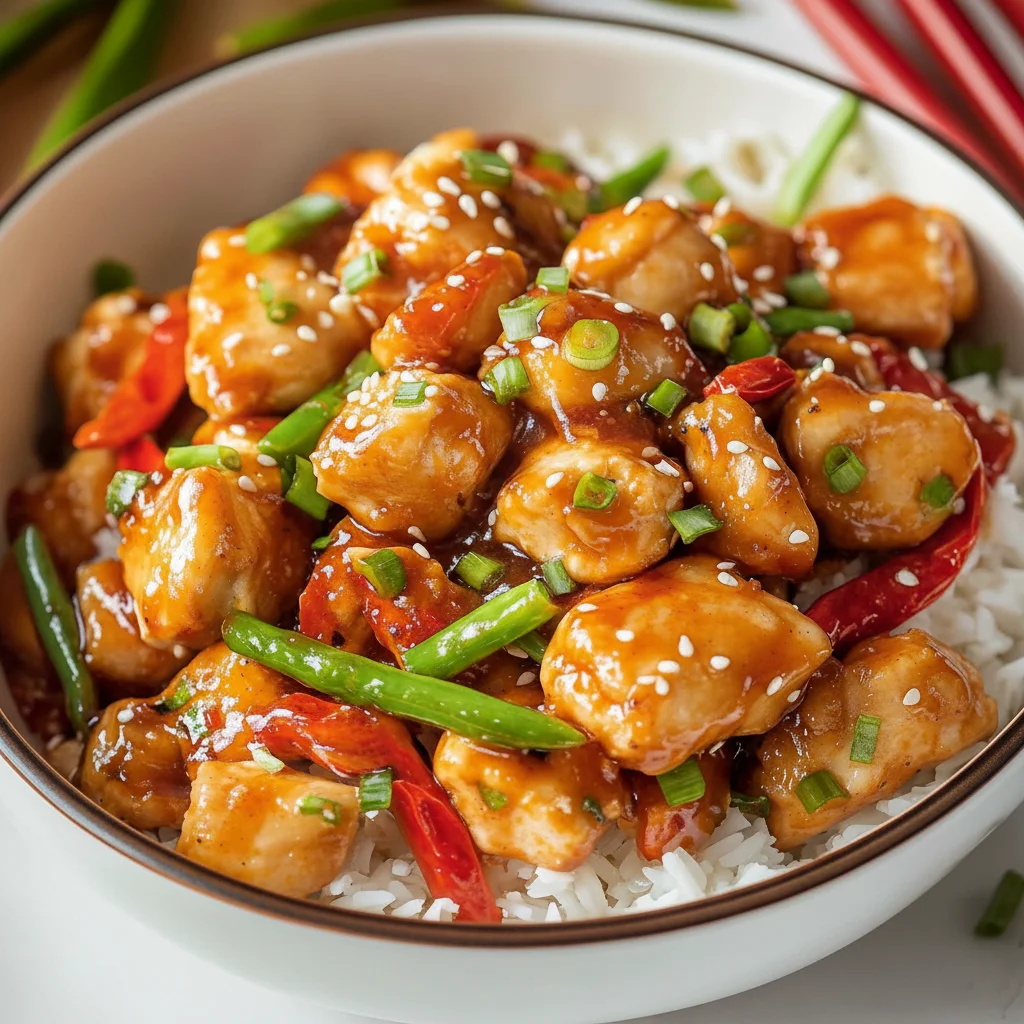
There are some weeknight meals that just hit the spot, and this Sweet Chili Chicken recipe is one of them. It has all the satisfying appeal of a takeaway, but it comes together in your own kitchen in about 30 minutes. The magic is in the sauce – a glossy, perfectly balanced blend of sweet, savoury, and tangy with a gentle, warming heat that clings beautifully to every piece of tender chicken. I stumbled upon this combination by accident one evening, trying to use up a bottle of sweet chili sauce, and it’s been a fixture on our family menu ever since.
This isn’t a fiery dish that will have you reaching for a glass of milk; rather, it’s a mellow, aromatic chili chicken that everyone can enjoy. The secret is in the layering of flavours – the umami depth from the soy sauce, the bright tang of rice vinegar, and the mellow sweetness of honey all work together to complement the sweet chili base. It’s the kind of meal that works wonderfully for a busy Tuesday evening but is also special enough to serve when you have friends over at the weekend. If you enjoy creating dishes that are packed with flavour without being overly complicated, this recipe is for you. It’s a real step up from a simple stir-fry and delivers a truly satisfying result.
Recipe Overview
This Sweet Chili Chicken recipe involves coating tender pieces of chicken breast in a light cornflour dusting, pan-frying them until golden, and then tossing them in a luscious, homemade sweet chili sauce that thickens into a perfect glaze right in the pan. The result is succulent chicken with a slightly crisp coating, all enveloped in that signature sticky sauce. I’ve tested this dozens of times, and the key is not to overcrowd the pan when frying the chicken; it ensures each piece gets that lovely golden-brown colour.
- Prep Time: 15 minutes
- Cook Time: 15 minutes
- Total Time: 30 minutes
- Servings: 4 people
- Difficulty: Easy
Why You’ll Love This Sweet Chili Chicken Recipe
- Genuine Flavour: The sauce is the star here. It’s not just sweet; it has a real depth from the fresh ginger and garlic, a savoury backbone from the soy sauce, and a clean, tangy finish from the rice vinegar. It’s a beautifully balanced chili chicken experience.
- Ready in 30 Minutes: From dicing the chicken to serving it up, the entire process comes together in about half an hour, making it a brilliant option for those evenings when time is tight.
- Flexible Recipe: This is a great base for adding vegetables. Throw in some sliced bell peppers, mangetout, or broccoli florets during the last few minutes of cooking for extra crunch and nutrition. You can also easily swap the chicken for prawns or even firm tofu.
- Great for Midweek Dinners: It’s a straightforward recipe that feels like a treat. It’s my go-to when I want to make something a bit more interesting than our usual Lemon Garlic Chicken without spending hours in the kitchen.
- Family Tested: My husband, who’s usually picky about ‘sticky’ sauces, asked for seconds the first time I made this! It’s mild enough for most palates, and everyone seems to love it.
Ingredients You’ll Need
For this recipe, the quality of your sweet chili sauce makes a difference. I often use the Blue Dragon brand as it has a great balance of sweetness and chili warmth. All these ingredients should be readily available at your local supermarket.
- For the Chicken:
- 600g skinless, boneless chicken breasts, cut into 2-3 cm cubes
- 4 tbsp cornflour
- 1/2 tsp salt
- 1/4 tsp black pepper
- 2 tbsp vegetable oil (or other neutral oil)
- For the Sweet Chili Sauce:
- 120ml sweet chili sauce
- 60ml low-sodium soy sauce
- 2 tbsp honey
- 1 tbsp rice vinegar
- 3 cloves garlic, finely minced
- 1 tbsp fresh ginger, grated
- 1 tsp sesame oil
- For Garnish (Optional):
- 2 spring onions, thinly sliced
- 1 tbsp toasted sesame seeds
- 1 red chili, thinly sliced
Sara’s Tip: Using fresh ginger and garlic is non-negotiable for the best flavour. The jarred stuff just doesn’t have the same aromatic punch. A microplane grater is your best friend for getting them both super fine so they melt into the sauce.
How to Make Sweet Chili Chicken
The process is straightforward. We’ll start by preparing and cooking the chicken, then create the sauce in the same pan to pick up all those lovely caramelised bits. It all comes together very quickly at the end, so have all your ingredients ready to go.
- Prepare the Chicken: In a medium mixing bowl, combine the cornflour, salt, and pepper. Add the cubed chicken and toss well until every piece is evenly coated. This light dusting is what will give the chicken a slightly crisp exterior and help thicken the sauce later.
- Mix the Sauce: In a separate small bowl or jug, whisk together all the sauce ingredients: sweet chili sauce, soy sauce, honey, rice vinegar, minced garlic, grated ginger, and sesame oil. Set it aside.
- Cook the Chicken: Heat the vegetable oil in a large frying pan or skillet over a medium-high heat. Once the oil is shimmering, carefully add half of the coated chicken to the pan in a single layer. Don’t overcrowd it!
- Get it Golden: Fry the chicken for 3-4 minutes per side, until it’s cooked through and beautifully golden brown. What works best for me is to let it cook undisturbed for the first few minutes to develop a good crust. Once cooked, remove the chicken from the pan with a slotted spoon and set it aside on a plate. Repeat with the remaining chicken.
- Create the Sauce Base: Reduce the heat to medium. There should be a little oil left in the pan along with some tasty browned bits from the chicken. If you added extra garlic and ginger to the sauce mix, this is where you could add them and sauté for 30 seconds until fragrant, but our sauce mix already has them included.
- Simmer and Thicken: Give the sauce mixture a final whisk and pour it into the hot pan. It will bubble up immediately. Bring it to a steady simmer, stirring occasionally with a wooden spoon, and let it cook for 2-3 minutes. You’ll see it start to thicken and become glossy as the honey caramelises and the cornflour from the chicken residue does its work.
- Combine and Coat: Return the cooked chicken to the pan with the thickened sauce. Gently toss everything together for about a minute until every piece of chicken is coated in the glorious, sticky glaze.
- Serve Immediately: Take the pan off the heat. Serve the Sweet Chili Chicken straight away, garnished with a scattering of sliced spring onions, toasted sesame seeds, and a few slices of fresh red chili if you like a little extra heat.
Tips From My Kitchen
- Temperature Control: It’s important to cook the chicken on a medium-high heat to get it crisp, but be sure to lower the heat to medium when you add the sauce. The honey and sugar in the sauce can burn quickly if the pan is too hot.
- The Secret Step: That initial cornflour coating does more than just make the chicken crisp. It’s a simple form of a Chinese cooking technique called velveting, which helps to lock in the juices and keep the chicken incredibly tender. I learned that this small step makes a huge difference to the final texture of the dish.
- Make-Ahead: To get ahead, you can chop the chicken and mix the sauce ingredients a day in advance. Store them in separate airtight containers in the refrigerator. This turns the recipe into a 15-minute assembly job.
- Storage: Leftovers keep well. Store the cooled chicken in an airtight container in the fridge for up to 3 days. Reheat gently in a pan with a splash of water to loosen the sauce, or in the microwave.
Equipment You’ll Need
You don’t need any specialist equipment for this chili chicken recipe, just a few kitchen basics.
- Large frying pan or skillet (non-stick is great for this)
- Sharp knife and cutting board
- Two mixing bowls (one for the chicken, one for the sauce)
- Whisk and a wooden spoon or spatula
What to Serve With Sweet Chili Chicken
This dish is incredibly versatile and pairs well with a variety of sides. Here are a few of my favourite combinations:
- Steamed Jasmine Rice: This is the classic pairing. Its fluffy texture and fragrant aroma are perfect for soaking up every last bit of that delicious sticky sauce. It’s very similar to how we serve our Sticky Chicken Rice Bowls.
- Steamed Greens: Tenderstem broccoli, pak choi, or even simple green beans, steamed or lightly stir-fried with a touch of garlic, provide a fresh, vibrant contrast to the rich sauce.
- Drink Pairing: A slightly off-dry Riesling or a crisp Sauvignon Blanc cuts through the sweetness of the sauce beautifully. For a non-alcoholic option, a sparkling elderflower pressé works a treat.
Frequently Asked Questions
Sweet Chili Chicken Recipe
Ingredients
Method
- Prepare the Chicken: In a medium mixing bowl, combine the cornflour, salt, and pepper. Add the cubed chicken and toss well until every piece is evenly coated. This light dusting is what will give the chicken a slightly crisp exterior and help thicken the sauce later.
- Mix the Sauce: In a separate small bowl or jug, whisk together all the sauce ingredients: sweet chili sauce, soy sauce, honey, rice vinegar, minced garlic, grated ginger, and sesame oil. Set it aside.
- Cook the Chicken: Heat the vegetable oil in a large frying pan or skillet over a medium-high heat. Once the oil is shimmering, carefully add half of the coated chicken to the pan in a single layer. Don't overcrowd it!
- Get it Golden: Fry the chicken for 3-4 minutes per side, until it's cooked through and beautifully golden brown. What works best for me is to let it cook undisturbed for the first few minutes to develop a good crust. Once cooked, remove the chicken from the pan with a slotted spoon and set it aside on a plate. Repeat with the remaining chicken.
- Create the Sauce Base: Reduce the heat to medium. There should be a little oil left in the pan along with some tasty browned bits from the chicken. If you added extra garlic and ginger to the sauce mix, this is where you could add them and sauté for 30 seconds until fragrant, but our sauce mix already has them included.
- Simmer and Thicken: Give the sauce mixture a final whisk and pour it into the hot pan. It will bubble up immediately. Bring it to a steady simmer, stirring occasionally with a wooden spoon, and let it cook for 2-3 minutes. You’ll see it start to thicken and become glossy as the honey caramelises and the cornflour from the chicken residue does its work.
- Combine and Coat: Return the cooked chicken to the pan with the thickened sauce. Gently toss everything together for about a minute until every piece of chicken is coated in the glorious, sticky glaze.
- Serve Immediately: Take the pan off the heat. Serve the Sweet Chili Chicken straight away, garnished with a scattering of sliced spring onions, toasted sesame seeds, and a few slices of fresh red chili if you like a little extra heat.
Notes
I really hope you give this Sweet Chili Chicken recipe a go. It’s a truly reliable and delicious meal that has saved many of our busy weeknights from becoming boring. It always gets compliments, and I love seeing the empty plates at the end of the meal. If you try it, please let me know how it turned out in the comments below – I love hearing from you! Happy cooking, Sara.