Irresistible Snow Ice Cream Recipe: The Ultimate Winter Delight You’ll Love!

Have you ever looked out at a pristine, sparkling blanket of freshly fallen snow and felt a childlike wonder? That magical, untouched landscape often brings back memories of winter fun. But have you ever thought, “I wonder if I could actually *eat* that snow?”
Well, we’re here to tell you that, with a few simple precautions and ingredients, you absolutely can! Get ready to transform a snowy day into an even more delightful experience with our ultimate snow ice cream recipe. It’s a simple, quick, and wonderfully whimsical way to enjoy winter’s bounty.
What Exactly Is Snow Ice Cream?
Snow ice cream is exactly what it sounds like: a delightful, frozen dessert made primarily from fresh, clean snow. Think of it as nature’s own ice cream base! It’s a wonderfully nostalgic treat for many, perhaps reminiscent of stories like “Little House on the Prairie,” where simple pleasures were made from what nature provided. We find it’s an incredibly easy, no-churn alternative to traditional ice cream that you can whip up in minutes, provided you have the key ingredient: a fresh snowfall!
The beauty of a snow ice cream recipe lies in its simplicity. By mixing snow with a few sweet and creamy ingredients, you create an instant frozen confection that captures the very essence of winter. It’s a bit like magic, watching fluffy snow transform into a scoopable, sweet treat right before your eyes.
Is It Safe to Eat Snow? The All-Important Question!
Before we dive into our delightful snow ice cream recipe, we must address the most important question: is it actually safe to eat snow? The short answer is: yes, *if* you collect it carefully and from the right places. Snow forms high up in the atmosphere, but as it falls, it can pick up pollutants or particles from the air. The ground it lands on can also affect its cleanliness.
We want your homemade snow ice cream experience to be joyful and worry-free, so following some guidelines for collecting snow is crucial.
Tips for Collecting Clean Snow
To ensure your snow is as pure as possible for your easy snow dessert, we recommend following these tips:
- Wait for a Good Layer: Don’t use the very first snow of a downfall, especially if it’s been dry for a while. Allow it to snow for at least a few hours to help “clean” the air. The best snow is often found after a continuous, heavy snowfall.
- Choose Your Location Wisely: Collect snow from areas far away from roads, driveways, and industrial zones. Car exhaust and road treatments can contaminate snow. Your back garden, away from pathways, is often a good bet.
- Fresh is Best: Use freshly fallen snow. Old, compacted snow or snow that has been on the ground for days is more likely to have picked up contaminants or started to melt and refreeze, affecting the texture.
- Avoid Animal Tracks: Steer clear of any snow that shows signs of animal activity (tracks, yellow spots – an obvious no-no!).
- Skim the Top: Gently scoop the top, fluffy layer of snow. Avoid digging down to the ground.
- Use a Clean Bowl: Collect your snow in a large, clean bowl or container.
- White and Bright: Only use snow that is pure white. Any discoloration is a sign to leave it be.
When to Avoid Making Snow Ice Cream
There are times when making this winter treat recipe might not be the best idea:
- During a Thaw: If the snow is melting and refreezing, it’s best to avoid it.
- High Pollution Areas: If you live in an area with known high air pollution, it might be best to skip eating snow, even if it looks clean.
- Windy Days During Collection: If it’s very windy, debris from roofs, trees, or the ground can be blown into the snow as you collect it.
- If in Doubt, leave it out: Your peace of mind is most important. If you have any concerns about the snow’s cleanliness, it’s better to enjoy it visually and opt for traditional ice cream.
For more information on atmospheric conditions and snow, you can explore resources from meteorological services or environmental science departments. For instance, McGill University’s Office for Science and Society offers a good discussion on the safety of eating snow, which echoes many of these precautions.

Gathering Your Ingredients for the Perfect Snow Ice Cream Recipe
One of the best things about making snow ice cream is how few ingredients you actually need. You likely have most of them in your kitchen already! Here’s what we use for our classic vanilla snow ice cream:
The Star of the Show: Clean Snow!
- Fresh, Clean Snow: Approximately 8-10 cups (or about 2-2.5 litres). The amount can vary depending on how fluffy your snow is. It’s better to collect a little more than you think you’ll need.
The Creamy Base
- Milk: 1 cup (240ml). We find whole milk works best for a creamier texture, but you can use semi-skimmed or even a dairy-free alternative like almond or oat milk (though the texture might be slightly icier).
- Sweetened Condensed Milk: ½ cup (approx. 160g or 120ml). This is our secret weapon for sweetness and an incredibly smooth, creamy texture. It helps prevent the snow ice cream from becoming too icy.
- Granulated Sugar (Optional): 2-4 tablespoons. If you prefer your ice cream sweeter, or if you’re not using sweetened condensed milk, you’ll want to add sugar. Adjust to your taste.
Flavour Enhancers
- Vanilla Extract: 1 teaspoon. This gives it that classic ice cream flavour. Good quality vanilla makes a difference!
Fun Toppings (Optional but Highly Recommended!)
This is where you can get really creative! Some of our favourites include:
- Sprinkles (chocolate or rainbow)
- Chocolate chips or shavings
- Crushed biscuits
- Fresh berries (if you have them!)
- Chocolate or caramel sauce
- Maple syrup
Our Easy Step-by-Step Snow Ice Cream Recipe
Alright, are you ready to make some magic? This snow ice cream recipe is incredibly simple and quick. The key is to have all your ingredients ready to go *before* you bring the snow inside, as it will start to melt quickly.
- Chill Your Mixing Bowl (Optional): If you remember, pop the large bowl you’ll use for mixing into the freezer for about 15-20 minutes. This will help keep the snow cold and slow down melting.
- Collect Your Snow: Head outside with a large, clean bowl and gather your 8-10 cups of fresh, clean snow. Follow our safety tips from above! Work quickly and bring it inside immediately.
- Prepare Your Creamy Mixture: In a separate, smaller bowl or a jug, whisk together the milk, sweetened condensed milk, vanilla extract, and any optional sugar until the sugar (if using) is dissolved.
- Combine and Mix: Pour the milk mixture over the bowl of snow.
- Mix Gently but Quickly: Using a large spoon or spatula, gently fold the milk mixture into the snow. Mix until it’s just combined and has the consistency of soft-serve ice cream. Be careful not to overmix, as this can make it too dense or cause it to melt faster. You want it to remain light and airy.
- Taste and Adjust (Quickly!): Give it a quick taste. If it’s not sweet enough, you can try to quickly stir in a little more sugar or a drizzle more of condensed milk, but do this sparingly to avoid overmixing.
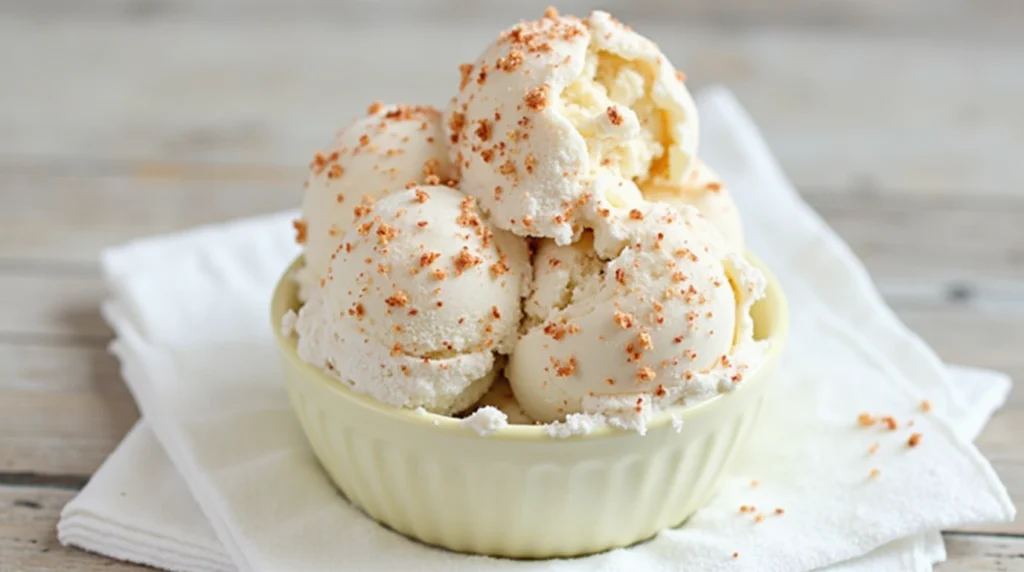
- Serve immediately: Scoop your freshly made snow ice cream into bowls.
- Add Toppings: Now for the fun part! Pile on your favourite toppings and enjoy your delicious, homemade snow ice cream straight away.
Tips and Tricks for the Best Snow Ice Cream Experience
We want your snow ice cream recipe to turn out perfectly every time! Here are a few extra pointers:
- Work Fast: This is the golden rule. Snow melts! Have everything prepped and ready to go.
- Snow Texture Matters: Light, fluffy snow works best. Wet, heavy snow can result in a slushier texture.
- Don’t compact the Snow: When you collect the snow, try to keep it light and airy in the bowl.
- Adjust Liquid as Needed: If your snow seems very dry and powdery, you might need a tiny bit more milk. If it’s very wet, you might use slightly less. Start with the recipe amounts and adjust cautiously.
- Sweetness to Taste: The sweetness of sweetened condensed milk can vary by brand, and personal preference also plays a big role. Our recipe provides a good starting point.
- Embrace Imperfection: Snow ice cream is a rustic, fun treat. Don’t worry if it’s not perfectly smooth like store-bought ice cream. Its unique texture is part of its charm!
Fun Flavour Variations for Your Snow Ice Cream Recipe
While classic vanilla is delicious, our basic snow ice cream recipe is a fantastic canvas for other flavours! Here are a few ideas to get you started:
Chocolate Snow Ice Cream
- Reduce the milk slightly (by about 2 tablespoons) and whisk in 2-3 tablespoons of cocoa powder with the milk mixture. You might want to add a little extra sugar to balance the bitterness of the cocoa.
- Alternatively, stir in chocolate syrup to taste along with the milk mixture.
Strawberry or Raspberry Snow Ice Cream
- Add a few tablespoons of strawberry or raspberry syrup (like the kind for milkshakes or Italian sodas) to your milk mixture.
- You could also try blitzing a few frozen berries with a little of the milk before adding it to the main milk mixture, then straining out any seeds.
Peppermint Snow Ice Cream
- Add ¼ to ½ teaspoon of peppermint extract along with the vanilla extract.
- Top with crushed candy canes or chocolate chips for a festive treat!
Maple Snow Ice Cream
- Reduce or omit the granulated sugar and replace some of the sweetness with pure maple syrup in the milk mixture. This gives it a lovely, warm flavour. A true Canadian-inspired delight!
- Drizzle extra maple syrup on top before serving.
Coffee or Mocha Snow Ice Cream
- Dissolve 1-2 teaspoons of instant coffee granules in the warm milk before mixing it with the other liquid ingredients. For mocha, add cocoa powder too.
We encourage you to experiment! A splash of almond extract, a dash of cinnamon, or even some citrus zest could create exciting new versions of your homemade snow ice cream.
The Science Bit: Why Does This Snow Ice Cream Recipe Work?
It might seem like pure magic, but there’s a little bit of simple science behind why our snow ice cream recipe works so well and so quickly! The key is the incredibly cold temperature of the snow itself.
When you pour the relatively warmer milk mixture (which contains water, sugar, and fats) onto the sub-zero snow, the snow rapidly chills the mixture. The tiny ice crystals already present in the snow act as nuclei, encouraging the water in the milk mixture to freeze quickly around them. This rapid freezing process results in very small ice crystals in the final product, which is what gives ice cream its smooth texture. If it froze slowly, larger, crunchier ice crystals would form.
The fats from the milk and sweetened condensed milk also play a role by coating the ice crystals and air bubbles, contributing to a creamier mouthfeel and preventing it from becoming just a solid block of ice. Sugar not only adds sweetness but also lowers the freezing point of the mixture, which helps keep the snow ice cream scoopable and not rock-hard, even at very cold temperatures.
It’s a bit like how old-fashioned ice cream makers work, using salt and ice to create a super-cold environment to freeze the cream mixture quickly. With snow ice cream, the snow itself is the super-cold environment!
Making Snow Ice Cream a Winter Tradition
We believe that making a batch of snow ice cream can be more than just a quick dessert; it can become a cherished winter tradition. There’s something wonderfully bonding about dashing out into the snow together, carefully collecting the perfect fluffy mounds, and then rushing back into the warmth to mix up your sweet treat.
It’s an activity that delights children and adults alike. For kids, it’s a hands-on experience that connects them with nature in a fun and tasty way. They can help collect the snow, choose the toppings, and, of course, enjoy the delicious results of their efforts. These are the simple moments that often create the most lasting memories. So, the next time your world is transformed into a winter wonderland, we hope you’ll think of this snow ice cream recipe and create some sweet memories of your own.
Frequently Asked Questions (FAQ) about our Snow Ice Cream Recipe
Here’s a revised version of your FAQ content, broken into shorter, more readable paragraphs while keeping everything natural, friendly, and SEO-friendly:
How much snow do I actually need for the snow ice cream recipe?
We recommend starting with about 8–10 cups of light, fluffy snow. The exact amount can vary depending on how compacted or wet your snow is. It’s always better to gather a bit more than you think you’ll need — you can always add more if the mixture ends up too runny.
Can I make snow ice cream without sweetened condensed milk?
Yes, you can! While sweetened condensed milk adds creaminess and sweetness, you can substitute it. Use an extra ½ cup of regular milk and increase the granulated sugar to about ½–¾ cup, adjusting to taste. Some people also use evaporated milk with sugar. The texture may be slightly icier, but it’s still delicious.
How long does snow ice cream last? Can I store it?
Snow ice cream is best enjoyed right away. It’s made with fresh snow and has a very delicate texture. If stored in the freezer, it tends to become hard and icy, unlike traditional ice cream. Think of it as a fleeting winter treat meant to be enjoyed in the moment!
Can I use old snow from a few days ago?
We strongly recommend using only freshly fallen, clean snow. Older snow can accumulate dirt and pollutants, and its texture may have changed due to melting and refreezing. For safety and best results, stick to snow that’s just fallen.
What if my snow ice cream is too runny or too thick?
If it’s too runny, you may have added too much liquid or used wet snow. Try stirring in more fresh, fluffy snow to fix the texture. If it’s too thick or dry, add a small splash of milk. Make changes sparingly and stir gently to avoid melting the mixture too quickly.
Is this snow ice cream recipe safe for young children?
Absolutely — as long as you use clean, freshly collected snow, this easy snow dessert is perfectly safe for kids. Just supervise the snow collection and let them help with mixing and adding toppings. They’ll have a blast!
What’s the best type of snow to use?
Light, fluffy, powdery snow is ideal. It creates the best texture. Avoid using wet, heavy, or slushy snow, as it can make your snow ice cream dense and icy.
Let me know if you’d like this formatted in HTML or if you want to turn this into a downloadable PDF FAQ for your readers.
Conclusion: Embrace the Magic of Winter!
There you have it – everything you need to know to whip up a batch of magical snow ice cream! We hope this snow ice cream recipe brings a little extra joy and wonder to your next snowy day. It’s a simple reminder that sometimes the best things in life are fleeting, fun, and made with a touch of nature’s magic. Turning a winter chore (shovelling snow) into a winter treat is a delightful prospect, isn’t it?
So, the next time you’re blessed with a beautiful snowfall, we encourage you to step outside, gather some pristine flakes, and try this wonderfully easy and delicious recipe. It’s more than just a dessert; it’s an experience, a memory in the making.
Ready to try this enchanting winter treat? Gather your snow and give our snow ice cream recipe a go! Let us know in the comments how it turned out or if you discovered any new favourite flavour combinations. We’d love to hear about your snowy adventures! And for more cosy winter ideas, why not check out our collection of winter baking recipes?


One Comment