Smores Cookies Best Ever Recipe
There’s a certain magic to a campfire, the way the flames dance and the scent of woodsmoke fills the air. For many of us, that feeling is tied to one specific treat: the classic S’more. That wonderful combination of melted chocolate, toasted marshmallow, and crunchy biscuit is something truly special. But we can’t always have a campfire on hand, can we? That’s where these Smores Cookies come in. They capture all that fireside joy in a single, glorious bake you can enjoy any time, right from your own kitchen.
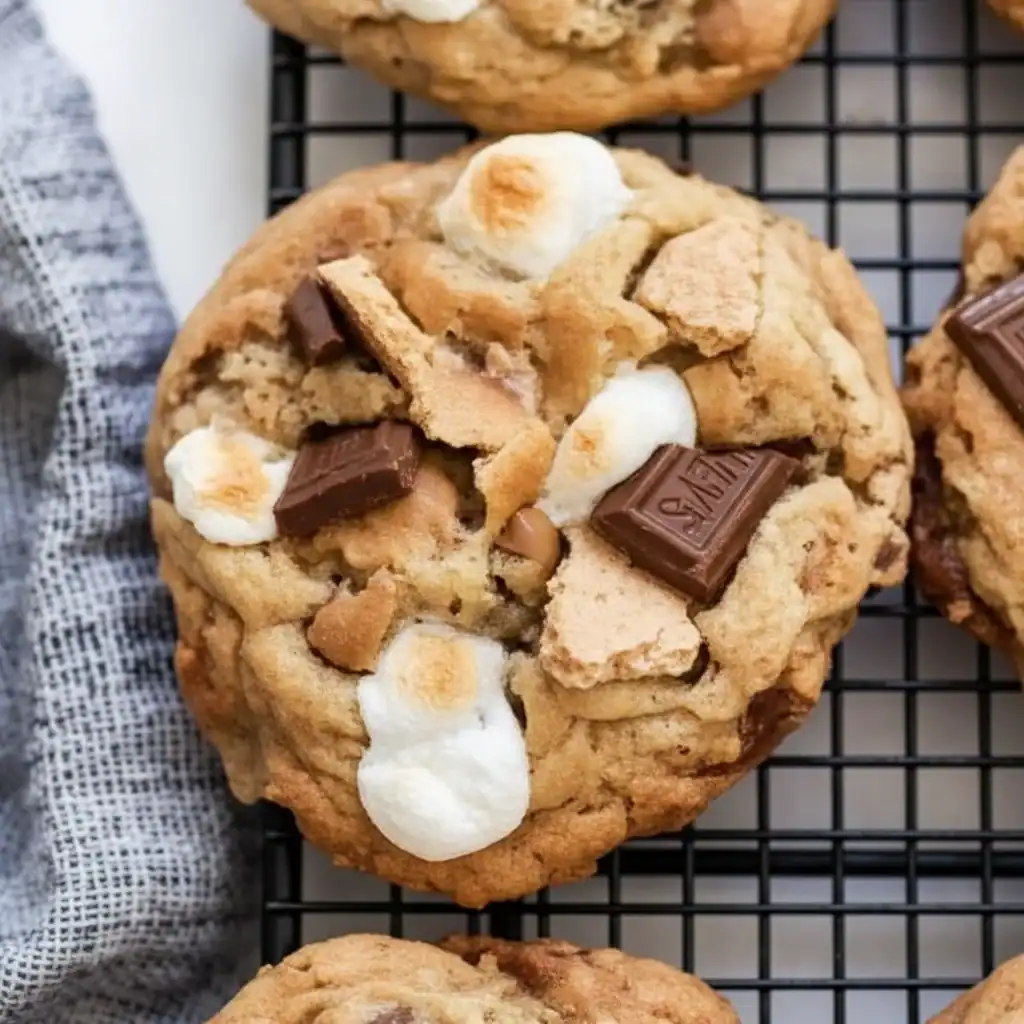
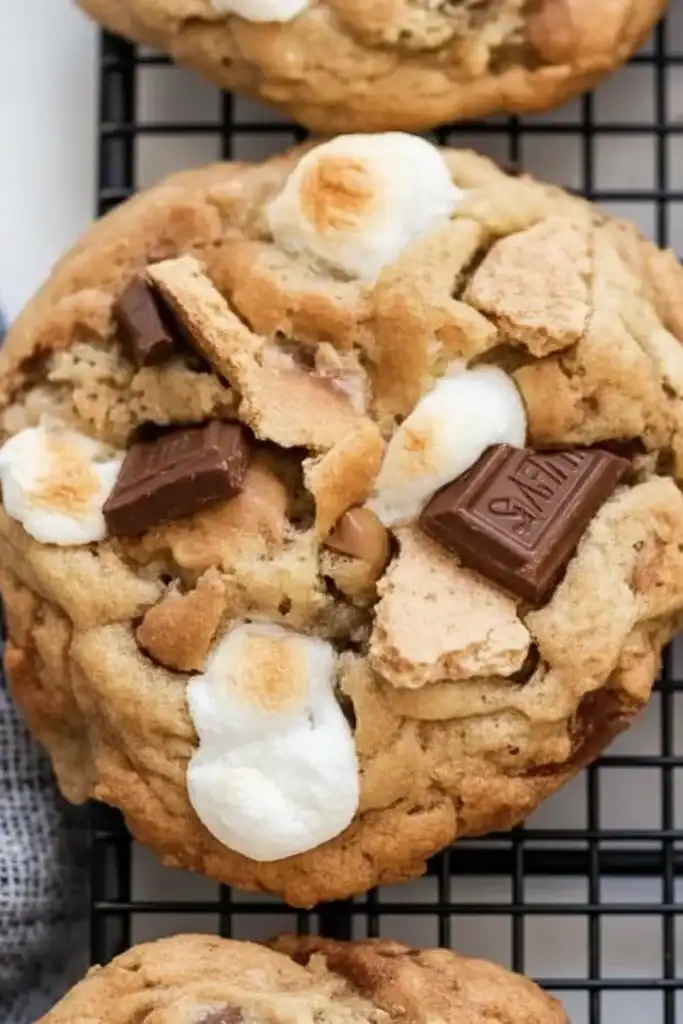
This recipe transforms the humble cookie into something spectacular. We’re talking a soft, buttery dough packed with chunks of rich milk chocolate and crushed digestive biscuits, then topped with a marshmallow that toasts to a beautiful golden brown in the oven, becoming irresistibly gooey on the inside. I stumbled upon this combination by accident one rainy afternoon when a camping trip was cancelled, and it’s been a hit ever since. The contrast between the chewy cookie, the crunchy biscuit, and the soft, sticky marshmallow is what makes every bite an absolute delight.
These Smores Cookies are ideal for when you want a treat that feels a little bit special but is still straightforward to make. They work wonderfully for sharing with friends over a cuppa, packing into lunchboxes, or simply for those moments when you need a little baked indulgence. My kids adore making these with me, especially the part where they get to press the marshmallows on top. If you’re a fan of classic Smores, you are going to fall head over heels for this cookie version.
Recipe Overview
These Smores Cookies bring the campfire experience indoors with a chewy, brown sugar cookie base loaded with chocolate and biscuit pieces, all topped with a perfectly toasted marshmallow. After testing several batches, I found that slightly underbaking them is the key to achieving that perfect soft centre that contrasts so well with the crisp edges.
- Prep Time: 20 minutes
- Cook Time: 12 minutes
- Total Time: 32 minutes
- Servings: 18 cookies
- Difficulty: Easy
Why You’ll Love These Smores Cookies
- Genuine Campfire Flavour: Each cookie has distinct layers of flavour and texture—the buttery, caramel notes from the brown sugar cookie, the crunchy, wholesome taste of the digestive biscuit, the rich, melting milk chocolate, and the sweet, gooey toasted marshmallow on top.
- Ready in about 30 Minutes: From gathering your ingredients to pulling a warm tray from the oven, this recipe comes together in just over half an hour. It’s a fantastic option when a sweet craving strikes.
- Flexible Recipe: You can easily swap the milk chocolate for dark chocolate for a more intense flavour, or even use white chocolate. Different biscuits like shortbread or even Biscoff can be used in place of digestives for a new twist.
- Great for Sharing: These are brilliant for bake sales, family gatherings, or movie nights at home. They look impressive on a platter and always get compliments.
- Family Tested: My whole family adores these, and they’ve become a staple dessert in our house. Even friends who claim they only like savoury food can’t resist one after a hearty meal of my Bruschetta Chicken.
Ingredients You’ll Need
For the best results, use good quality chocolate that you enjoy eating on its own—it makes a real difference. I always opt for a block of Cadbury Dairy Milk and chop it myself, as the irregular chunks create wonderful pockets of melted chocolate throughout the cookie.
- 125g unsalted butter, softened
- 100g soft light brown sugar
- 75g caster sugar
- 1 large free-range egg
- 1 tsp vanilla extract
- 225g plain flour
- ½ tsp bicarbonate of soda
- ¼ tsp salt
- 100g milk chocolate, chopped into chunks
- 75g digestive biscuits, roughly crushed
- 18 large marshmallows
Sara’s Tip: Don’t crush the digestive biscuits into a fine powder. You want some larger, pea-sized pieces to provide that signature crunch and texture in the final cookie. A ziplock bag and a rolling pin work perfectly for this.
How to Make Smores Cookies
The process for making these cookies is very straightforward. We’ll make a simple cookie dough, fold in our key Smores ingredients, and then top with a marshmallow for that final, gooey touch before baking.
- Preheat and Prepare: First, preheat your oven to 180°C (160°C fan) and line two large baking trays with parchment paper. This prevents the cookies from sticking and makes clean-up much easier.
- Cream Butter and Sugars: In a large bowl, using a stand mixer or an electric hand mixer, beat the softened butter with the soft light brown sugar and caster sugar for 2-3 minutes until the mixture is light, pale, and fluffy.
- Add Wet Ingredients: Add the egg and vanilla extract to the butter mixture and beat again for another minute until everything is well combined. Scrape down the sides of the bowl to ensure it’s all incorporated.
- Combine Dry Ingredients: In a separate bowl, whisk together the plain flour, bicarbonate of soda, and salt. Gradually add this dry mixture to the wet ingredients, mixing on a low speed until just combined. Be careful not to overmix at this stage.
- Fold in the Goodies: Gently fold in the chopped milk chocolate and the crushed digestive biscuits using a spatula. What works best for me is to reserve a small handful of each to press onto the tops of the cookie dough balls for a more professional look.
- Form the Cookies: Scoop out tablespoon-sized balls of dough (about 40g each) and place them on your prepared baking trays, leaving a good amount of space between each one as they will spread. I usually fit about 9 cookies per tray.
- First Bake: Place the trays in the preheated oven and bake for 8 minutes. The cookies will be slightly puffed up and just starting to turn golden at the edges.
- Add the Marshmallow: Carefully remove the trays from the oven. Gently press one large marshmallow into the centre of each partially baked cookie.
- Final Bake: Return the trays to the oven and continue baking for another 3-4 minutes, or until the edges of the cookies are golden brown and the marshmallows are puffed up and lightly toasted. Keep a close eye on them during this stage, as marshmallows can catch quickly!
- Cooling is Key: Let the cookies cool on the baking tray for 5-10 minutes before transferring them to a wire cooling rack to cool completely. The marshmallows will deflate as they cool, which is perfectly normal. This resting time allows the cookies to set properly.
Tips From My Kitchen
- Temperature Control: Using room temperature butter and egg is essential for a smooth, well-emulsified dough. If your butter is too cold, it won’t cream properly with the sugar.
- The Secret Step: For an extra chewy cookie, chill the scooped dough balls in the fridge for 20-30 minutes before baking. I learned that this small step prevents the cookies from spreading too much and results in a thicker, gooier centre.
- Make-Ahead: The cookie dough can be made up to 3 days in advance and stored in an airtight container in the fridge. You can also freeze the dough balls for up to 3 months. Just bake from frozen, adding a couple of extra minutes to the initial baking time.
- Storage: Store the baked Smores Cookies in an airtight container at room temperature. They are at their best within the first 2-3 days, when the marshmallow is still soft and gooey.
Equipment You’ll Need
You don’t need any highly specialised equipment for this baking project, just a few kitchen staples.
- Stand mixer or electric hand mixer
- Two large baking trays
- Parchment paper
- Wire cooling rack
Common Mistakes to Avoid
- Overcrowding the Pan: These cookies spread! Make sure to leave at least 2 inches of space between each dough ball on the baking tray. If they’re too close, they’ll merge into one giant cookie.
- Wrong Temperature: An oven that’s too hot will burn the marshmallows before the cookie is cooked through. An oven that’s too cool will cause the cookies to spread too thin. An oven thermometer can be a great investment for any home baker.
- Skipping the Rest Time: Don’t try to move the cookies from the tray to the cooling rack immediately. They are very soft straight out of the oven and need those 5-10 minutes on the hot tray to firm up enough to be moved without breaking.
Delicious Variations to Try
Once you’ve mastered the classic recipe, feel free to get creative with these delicious twists.
- Dark Chocolate & Sea Salt: Swap the milk chocolate for a good quality dark chocolate (70% cocoa works well) and sprinkle a tiny pinch of flaky sea salt on top of each cookie before baking. The salt beautifully balances the sweetness.
- Biscoff Smores Cookies: Replace the digestive biscuits with crushed Biscoff biscuits and add half a teaspoon of cinnamon to the dry ingredients for a warm, spiced flavour.
- Nutty Chocolate Version: Add 50g of toasted, chopped pecans or walnuts to the cookie dough along with the chocolate and biscuits for an extra layer of crunch and flavour.
What to Serve With Smores Cookies
While these cookies are fantastic on their own, a few simple pairings can elevate the experience.
- A Glass of Cold Milk: The ultimate classic pairing for any cookie. The cool milk cuts through the richness and sweetness perfectly.
- A Scoop of Vanilla Ice Cream: Serve a warm cookie straight from the oven with a scoop of vanilla bean ice cream on the side for a truly decadent dessert.
- A Mug of Hot Chocolate: Lean into the chocolate theme by serving these alongside a rich, dark hot chocolate for an indulgent winter treat.
Frequently Asked Questions
Smores Cookies
Ingredients
Method
- Preheat and Prepare: First, preheat your oven to 180°C (160°C fan) and line two large baking trays with parchment paper. This prevents the cookies from sticking and makes clean-up much easier.
- Cream Butter and Sugars: In a large bowl, using a stand mixer or an electric hand mixer, beat the softened butter with the soft light brown sugar and caster sugar for 2-3 minutes until the mixture is light, pale, and fluffy.
- Add Wet Ingredients: Add the egg and vanilla extract to the butter mixture and beat again for another minute until everything is well combined. Scrape down the sides of the bowl to ensure it's all incorporated.
- Combine Dry Ingredients: In a separate bowl, whisk together the plain flour, bicarbonate of soda, and salt. Gradually add this dry mixture to the wet ingredients, mixing on a low speed until just combined. Be careful not to overmix at this stage.
- Fold in the Goodies: Gently fold in the chopped milk chocolate and the crushed digestive biscuits using a spatula. What works best for me is to reserve a small handful of each to press onto the tops of the cookie dough balls for a more professional look.
- Form the Cookies: Scoop out tablespoon-sized balls of dough (about 40g each) and place them on your prepared baking trays, leaving a good amount of space between each one as they will spread. I usually fit about 9 cookies per tray.
- First Bake: Place the trays in the preheated oven and bake for 8 minutes. The cookies will be slightly puffed up and just starting to turn golden at the edges.
- Add the Marshmallow: Carefully remove the trays from the oven. Gently press one large marshmallow into the centre of each partially baked cookie.
- Final Bake: Return the trays to the oven and continue baking for another 3-4 minutes, or until the edges of the cookies are golden brown and the marshmallows are puffed up and lightly toasted. Keep a close eye on them during this stage, as marshmallows can catch quickly!
- Cooling is Key: Let the cookies cool on the baking tray for 5-10 minutes before transferring them to a wire cooling rack to cool completely. The marshmallows will deflate as they cool, which is perfectly normal. This resting time allows the cookies to set properly.
Notes
I really hope you enjoy baking—and eating—these Smores Cookies as much as my family and I do. They bring such a sense of fun and nostalgia to the kitchen, and the results are always delicious. When they come out of the oven, all golden and gooey, it’s just impossible to resist. If you’re looking for other family favourites, my recipe for a Juicy Chicken Recipe is another one that always gets great feedback. Let me know how you get on with the cookies in the comments below, I’d love to hear from you! Happy baking, Sara.


