The Ultimate Luxurious Pink Velvet Raspberry Cheesecake Recipe
Have you ever been on the hunt for a dessert that’s a feast for the eyes as much as it is for the palate? A showstopper that commands attention not just for its beauty, but for its utterly divine flavour? Well, that particular quest is about to reach a very sweet conclusion. We are here to guide you, step by step, in creating the most decadent and luxurious pink velvet raspberry cheesecake you’ve ever had the pleasure of tasting, all from the comfort of your own home.
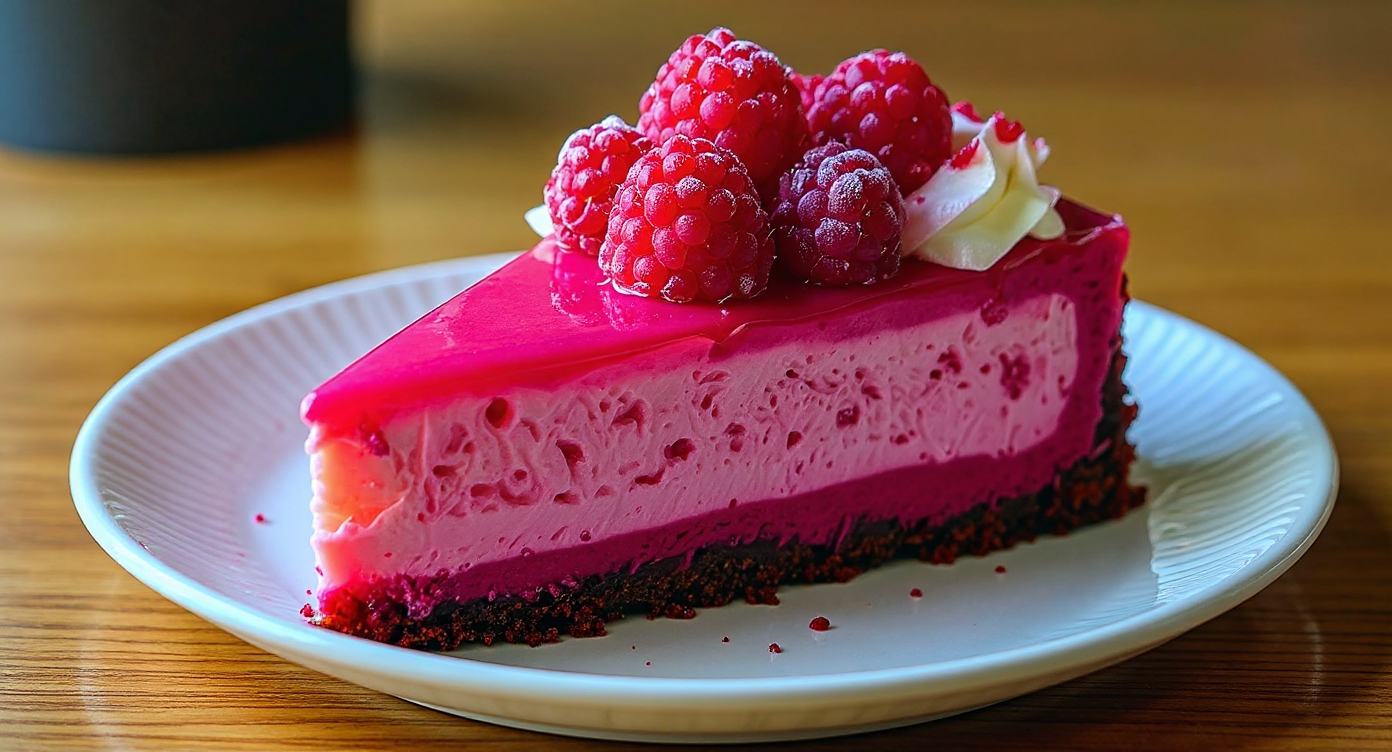
This is far more than a simple cheesecake; it’s a truly memorable experience. Just imagine a crisp, buttery biscuit foundation, a sumptuously smooth pink cream cheese filling with a delicate hint of cocoa, all crowned with a zesty raspberry topping that cuts through the richness with perfect precision. It is the definitive dessert for birthdays, anniversaries, or those moments when you feel like indulging in something truly exceptional.
Why You’ll Adore This Pink Velvet Raspberry Cheesecake
We are certain you will be smitten with this recipe from the very first taste. Here are just a few reasons why this dessert holds a special place in our hearts:
- A Harmony of Tastes: The pairing of indulgent, creamy cheesecake with the bright tang of raspberry is a time-honoured classic for good reason. The ‘velvet’ aspect, inspired by red velvet cake, introduces a subtle cocoa undertone and a gentle tartness that elevates the entire dessert to new heights.
- An Absolute Showstopper: Let’s be frank, this cheesecake is a work of art. Its lovely pastel pink shade, set against the vibrant red of the raspberry topping, makes it an unforgettable centrepiece for any celebration or gathering.
- Attainable Indulgence: Although it has the appearance of a dessert from a fancy patisserie, our clear, step-by-step guidance makes this best raspberry dessert perfectly manageable for home bakers of any experience level. We’re sharing all our secrets with you!
Essential Ingredients for Your Masterpiece
To craft the most wonderful cheesecake, we must begin with top-quality ingredients. We have organised the list into three distinct parts: the base, the filling, and that glorious raspberry topping. For the creamiest and most decadent texture, we always recommend using full-fat ingredients.
For the Biscuit Base:
- 250g digestive biscuits (or graham crackers)
- 125g unsalted butter, melted
For the Pink Velvet Filling:
- 900g full-fat cream cheese, at room temperature
- 250g caster sugar
- 200ml soured cream, at room temperature
- 1 teaspoon vanilla extract
- 3 large eggs, plus 1 egg yolk, at room temperature
- 1 tablespoon unsweetened cocoa powder
- 1-2 teaspoons red or pink food colouring gel (not liquid)
- 1 teaspoon white wine vinegar
For the Raspberry Topping:
- 300g fresh or frozen raspberries
- 50g caster sugar
- 1 tablespoon lemon juice
- 1 tablespoon cornflour mixed with 2 tablespoons of cold water (a slurry)
Step-by-Step Guide to Baking the Perfect Cheesecake
Are you ready to work a little magic in the kitchen? Follow our comprehensive steps with care, and a flawless cheesecake will be your reward. Remember that baking is a science, so precision is key. We suggest reading through the entire method before you start.
- Prepare Your Tin and Oven: First, let’s get your oven and tin ready. Preheat your oven to 160°C (140°C Fan/Gas Mark 3). Lightly grease a 23cm (9-inch) springform cake tin and line the bottom with a circle of baking parchment.
- Create the Buttery Biscuit Base: Tip the digestive biscuits into a food processor and blitz them into fine crumbs. Alternatively, place them in a resealable bag and bash them with a rolling pin. Transfer the crumbs to a bowl, pour in the melted butter, and stir until the mixture looks like damp sand. Press this mixture firmly and evenly across the base of your prepared tin. We find the back of a metal spoon helps to create a smooth, compact layer. Place it in the refrigerator to set while you prepare the filling.
- Craft the Creamy Pink Velvet Filling: In a large bowl, use an electric mixer on a low setting to beat the room-temperature cream cheese until it is completely smooth and lump-free. It’s very important not to over-whip, as this can introduce excess air and lead to cracks later on. Bit by bit, add the caster sugar, mixing on low until it is just incorporated.
- Incorporate the Flavour: Gently fold in the soured cream and vanilla extract. Add the eggs and the extra yolk one by one, mixing on a low speed only until each one is just combined before adding the next.
- Achieve the ‘Velvet’ Touch: In a separate small bowl, whisk together the cocoa powder, food colouring, and white wine vinegar to form a smooth paste. Add this vibrant paste to the cheesecake mixture and mix on a low speed until the colour is even and beautiful throughout.
- Bake with a Water Bath: Pour the delightful pink filling over your chilled biscuit base. Now for our most important tip: using a water bath. This step is essential for a creamy cheesecake recipe that doesn’t crack. Tightly wrap the outside of your springform tin with a couple of layers of strong aluminium foil to ensure it’s watertight. Set the tin inside a large roasting pan. Pour boiling water into the roasting pan so that it comes about halfway up the side of your cheesecake tin. For a fantastic explanation of the science, Food & Wine explains the science beautifully.
- Bake and Cool: Very carefully place the whole setup into the preheated oven. Bake for 60-70 minutes. You’ll know the cheesecake is done when the edges are firm, but the centre has a gentle wobble. Switch off the oven, prop the door ajar with a wooden spoon, and allow the cheesecake to cool down completely inside the oven for at least one hour. This gradual cooling is another vital trick for preventing cracks.
- Chill to Perfection: Once fully cooled, lift the cheesecake out of the water bath and remove the foil. Cover it loosely with cling film and transfer it to the refrigerator to chill for a minimum of 6 hours, though overnight is even better. This part requires patience, but it is essential!
- Whip Up the Raspberry Topping: While your cheesecake is chilling, you can make the topping. In a small saucepan, combine the raspberries, sugar, and lemon juice over a medium heat. Let it cook, stirring now and then, until the raspberries have broken down, which should take about 5-7 minutes. Stir in the cornflour slurry and continue to cook for another minute or two, until the sauce has thickened. Take it off the heat and allow it to cool completely before you use it.
- Assemble and Serve: When the cheesecake is thoroughly chilled, gently run a thin knife around the inside edge of the tin before releasing the springform clip. Spoon the cooled raspberry topping over the surface, spreading it out gently. Your magnificent creation is now ready to be served!
Our Top Tips for Cheesecake Success
Through plenty of practice, we’ve picked up a few indispensable tricks that ensure a perfect cheesecake result, time after time. Keep these pointers in mind to bake like a true professional.
- Room Temperature is Non-Negotiable: We really can’t overstate this. It is absolutely essential that your cream cheese, soured cream, and eggs are at room temperature. This ensures they combine effortlessly into a silky-smooth, lump-free batter.
- Don’t Overmix the Batter: Mixing too vigorously, particularly after the eggs are in, whips too much air into the batter. During baking, these air bubbles expand and can cause unsightly cracks to form on the cheesecake’s surface. Always mix on a low speed and stop as soon as the ingredients are blended.
- Embrace the Water Bath: Please, don’t be tempted to skip this step. The steam generated by the water bath creates a humid environment in the oven, allowing the cheesecake to bake gently and evenly, which prevents it from drying out and cracking.
- Patience is a Virtue: The long, gradual cooling and chilling period is absolutely vital. A cheesecake requires this time to set up properly. If you rush this part, you’ll end up with a soft, disappointing texture. We always recommend planning ahead and making it the day before you need it. For fruity bakes that require less waiting time, our Tasty Blueberry Cheesecake Swirl Cookies Delicious Easy are a wonderful alternative.
Frequently Asked Questions (FAQ)
We have compiled a few of the most frequently asked questions about this raspberry cheesecake recipe. If your query isn’t answered here, please don’t hesitate to ask in the comments section!
Can I make this a no-bake raspberry cheesecake?
Although this particular recipe is for a baked cheesecake, the idea could certainly be adapted. For a no-bake raspberry cheesecake, you would need to leave out the eggs and use double cream whipped to firm peaks, or a setting agent like gelatine, to help the filling become firm in the fridge.
Why did my cheesecake crack?
The usual suspects behind a cracked cheesecake are over-mixing the batter, skipping the water bath, or cooling the cheesecake too rapidly. By following our advice for gentle mixing, a steamy oven, and a slow cool-down, you’ll give yourself the best possible chance of a perfectly smooth, crack-free top.
Can I use frozen raspberries for the topping?
Of course! Frozen raspberries are ideal for the topping since they get cooked down into a lovely sauce. You don’t even need to defrost them first; just add them straight to the saucepan. They might just need an extra minute or two on the heat.
How far in advance can I make this cheesecake?
This dessert is perfect for making ahead of time. You can bake it up to two days before you plan to serve it. Just keep it well-covered in the fridge and only add the raspberry topping shortly before serving to ensure it looks its best. If you’re looking for another great make-ahead dessert, our Cloud Cake Recipe is wonderfully light and can also be made in advance.
Conclusion: Your Showstopping Dessert Awaits
And there we are—our comprehensive guide to creating a truly unforgettable and luxurious pink velvet raspberry cheesecake. This is a dessert that masterfully blends sophistication, incredible flavour, and the simple pleasure of making something special from scratch. By following our tips and detailed method, you can confidently produce a centrepiece that will have all your guests begging for the recipe.
So, it’s time to pop on your apron, gather your ingredients, and begin baking. We can assure you that the end result is well worth the time and care.
Did you give our recipe a go? We would be absolutely delighted to see your stunning cheesecakes! Feel free to share your pictures on social media and give us a tag. If you have any questions or simply want to share your baking triumph, please leave a comment below. Happy baking to you!


