no bake peanut butter cheesecake balls – Delicious & Easy!
Are you on the hunt for a truly magnificent dessert that’s incredibly simple to whip up and certain to impress everyone? Imagine capturing the rich, tangy essence of cheesecake and the comforting depth of peanut butter in one perfect, bite-sized morsel—all without switching on your oven. Well, now you can! We’re delighted to share what we’re sure will become your new go-to indulgence: our ultimate no bake peanut butter cheesecake balls.
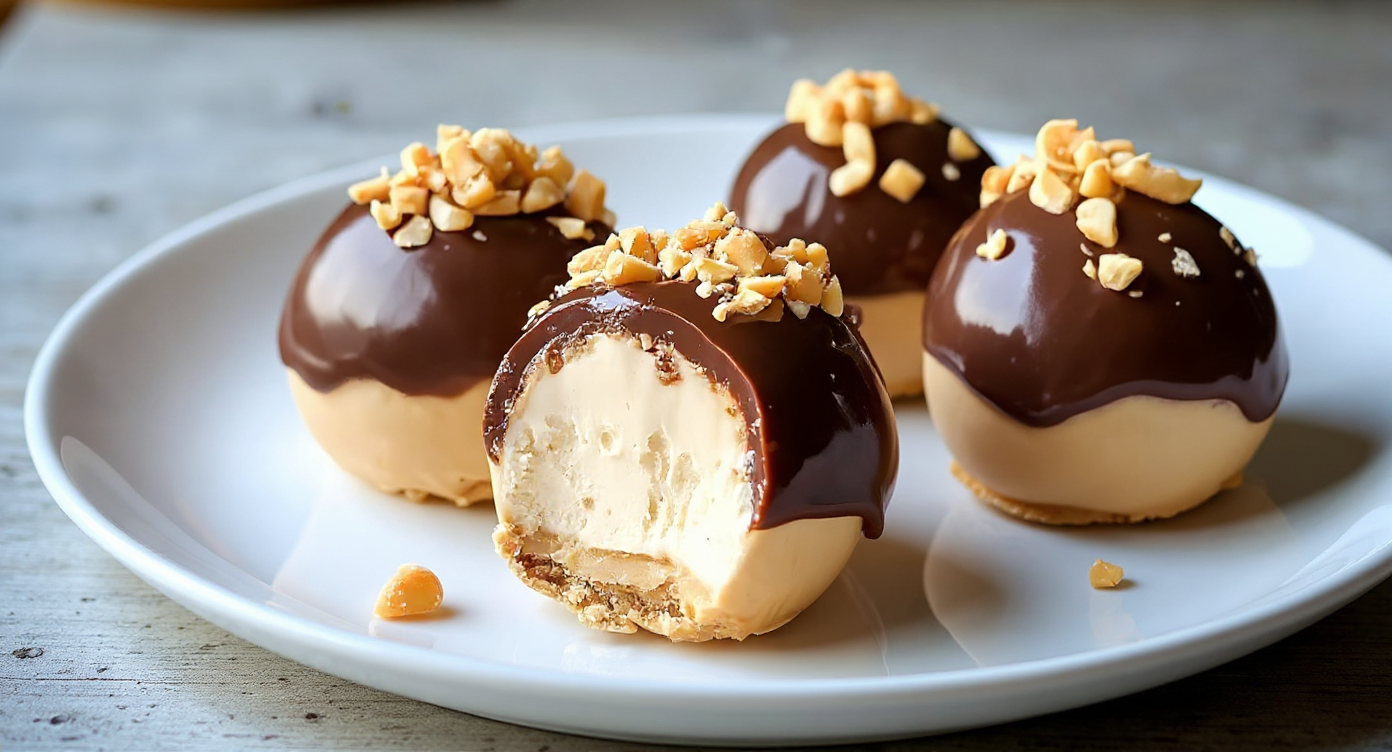
These delightful little globes are the ideal answer to any sweet tooth. They bring together a luscious, creamy peanut butter cheesecake filling and a crunchy biscuit base, all lovingly coated in a smooth, rich layer of chocolate. They’re a doddle to prepare, wonderfully versatile, and just right for any event, from a cosy evening at home to a lively gathering. Let’s get started and make these heavenly treats together.
Why You’ll Absolutely Adore These Cheesecake Balls
Before we dive into the method, let us share just why these little morsels are so utterly brilliant. We’re quite certain this recipe will become a firm favourite, and here are just a few reasons why:
- Entirely No-Bake: This recipe lets you keep your kitchen lovely and cool. It’s an absolutely fantastic no bake dessert recipe for those warm summer days or whenever you’d rather avoid the hassle of the oven.
- Effortless yet Impressive: With basic ingredients and clear instructions, even complete beginners in the kitchen can achieve wonderful results. It’s also a splendid activity to enjoy with the children.
- Guaranteed to Delight: The trio of peanut butter, cream cheese, and chocolate is a classic combination loved by almost everyone. We can assure you, there won’t be any left!
- Ideal for Sharing: These bite-sized treats are perfect for managing portions, making them a superb choice for a dessert platter or for satisfying a little craving.
- Excellent for Planning Ahead: You can easily make these a day or two before you need them, which takes the stress out of party preparations. They keep perfectly in the fridge or freezer.
Essential Ingredients for Your Peanut Butter Cheesecake Balls
The beauty of this recipe is found in its straightforwardness. We’re using just a few common cupboard staples to craft something truly exceptional. Here is what you’ll need to have ready before we start.
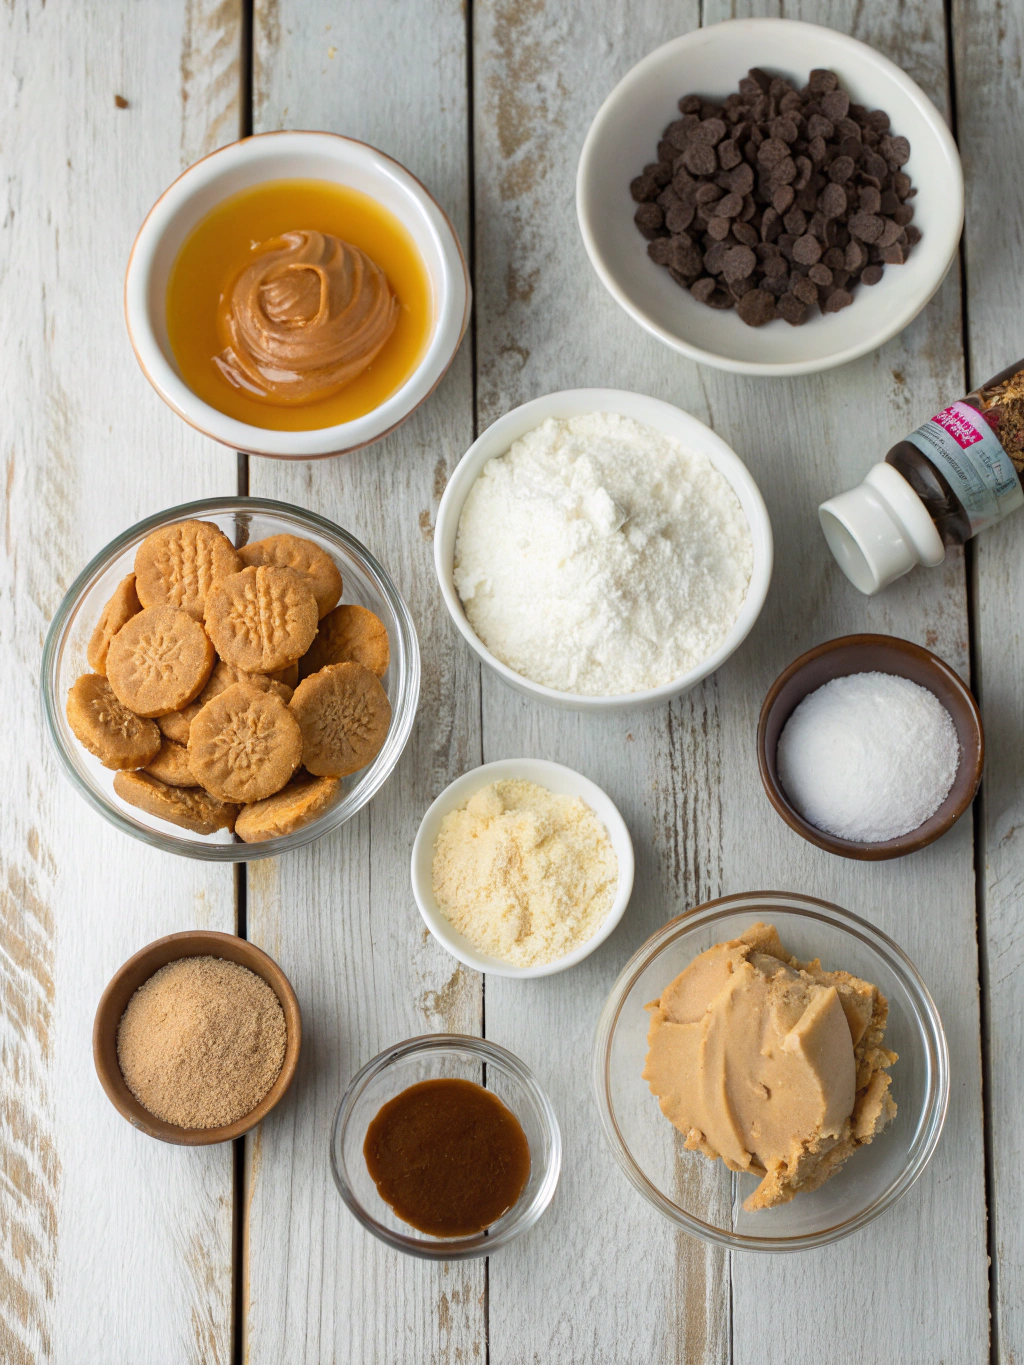
- Full-Fat Cream Cheese: 225g (8oz), softened to room temperature. The very soul of our cheesecake filling. Using full-fat is essential to achieve that wonderfully rich and creamy consistency.
- Smooth Peanut Butter: 150g (⅔ cup). Our suggestion is to use a classic smooth peanut butter, which will give you the best, creamiest result.
- Icing Sugar: 100g (1 cup), sifted. Sifting this ensures it dissolves beautifully for a perfectly smooth, non-gritty filling.
- Digestive Biscuits: 150g (about 10-12 biscuits), crushed into fine crumbs. These give a lovely bit of crunch and that traditional cheesecake base taste.
- Melted Butter: 60g (¼ cup), unsalted. This is what holds the biscuit crumb base together.
- Vanilla Extract: 1 teaspoon. Just a dash helps to amplify all the other delicious flavours.
- Milk or Dark Chocolate: 250g, chopped, for coating. For the coating, select a high-quality chocolate to ensure the best taste and a beautiful, glossy sheen.
- Vegetable Oil or Coconut Oil: 1 teaspoon (optional). This is an optional addition that thins the chocolate a little, making the dipping stage much easier.
Step-by-Step Instructions: Crafting the Perfect No Bake Peanut Butter Cheesecake Balls
Are you ready to craft these delightful morsels? We have outlined the entire process in clear, straightforward steps. Simply follow our guide, and you’ll have perfect cream cheese peanut butter balls before you know it.
- Prepare the Biscuit Base: To begin, crush the digestive biscuits until you have fine crumbs. You can achieve this by placing them in a sealed bag and using a rolling pin, or giving them a quick blitz in a food processor. In a medium-sized bowl, combine the biscuit crumbs with the melted butter, mixing until it has the consistency of damp sand.
- Create the Cheesecake Filling: Next, in a large bowl, use an electric hand mixer to whip the softened cream cheese until it is completely smooth and without any lumps. Then, add the smooth peanut butter, sifted icing sugar, and vanilla extract. Continue to beat on a medium speed until everything is thoroughly combined and the mixture is lovely and creamy.
- Combine and Chill: Gently fold the buttery biscuit crumbs into your cheesecake mixture. Stir just until they are incorporated—try not to overmix. Cover the bowl with cling film and pop it in the fridge to chill for at least one to two hours. This step is vital, as it allows the mixture to firm up, which will make it much easier to handle.
- Roll the Balls: After chilling, remove the mixture from the refrigerator. Use a small ice cream scoop or a tablespoon to measure out even portions. Roll each portion between the palms of your hands to create smooth, bite-sized balls, roughly one inch across. Arrange the finished balls on a baking tray lined with baking parchment.
- Freeze for Firmness: Now, place the tray of peanut butter balls in the freezer for a minimum of 30 minutes. This will make them nice and firm, which prevents them from falling apart when you dip them in the melted chocolate.
- Melt the Chocolate: As the balls are chilling in the freezer, it’s time to melt your chocolate. You can do this in a microwave-safe bowl, heating in 30-second bursts and stirring in between, or by using a bain-marie (a heatproof bowl placed over a pan of simmering water). Once it’s smooth, stir in the optional teaspoon of oil for an extra glossy coating. For more helpful advice, have a look at this great guide on how to melt chocolate from BBC Good Food.
- Dip and Decorate: Remove the frozen cheesecake balls from the freezer. Working with one at a time, carefully drop a ball into the melted chocolate. Use two forks to gently roll it around until it is completely covered. Lift it out, letting any excess chocolate drip back into the bowl, and then place it back onto your parchment-lined tray. If you wish, you can add sprinkles, chopped nuts, or a pinch of sea salt while the chocolate is still tacky.
- Final Chill: When all the balls have been coated, put the tray back into the fridge for a final 15-20 minutes, or until the chocolate has fully hardened. And there you have it—your delicious homemade chocolate peanut butter truffles are ready to be enjoyed!

Pro Tips and Tricks for Flawless Results
Looking to elevate your cheesecake balls from simply delicious to truly spectacular? We have a few handy tips to help you perfect this recipe.
Choosing Your Peanut Butter
Although our preference is for a standard smooth peanut butter to achieve the creamiest filling, you can certainly use a crunchy variety for added texture. Do be aware that natural peanut butters, which often separate, can alter the consistency of your mixture, potentially making it oilier or softer. If you use one, you may need to increase the chilling time.
Getting the Perfect Texture
For a beautifully silky cheesecake filling, the secret is to begin with cream cheese that is at room temperature. If it is too cold, it will not blend smoothly and you could end up with a lumpy mixture. Furthermore, try to avoid over-mixing the filling after adding the biscuit crumbs, as this can cause it to become overly dense.
Dipping Like a Pro
The dipping stage can sometimes be the most challenging. To make it easier, we suggest using a deep, fairly narrow bowl for your melted chocolate, as this allows for full submersion. The two-fork technique is a game-changer: use one fork to lower and roll the ball, and the second to help lift it out. A gentle tap of the fork against the side of the bowl will help shake off any excess chocolate before you place it back on the tray.
Creative Variations
Feel free to experiment and put your own spin on things! Here are some suggestions to help you customise your easy peanut butter balls:
- Mix-ins: Try folding some mini chocolate chips or finely chopped nuts into the cheesecake filling just before you chill it.
- Alternative Coatings: Experiment with dipping them in melted white chocolate or even butterscotch. A drizzle of a contrasting chocolate over the top also creates a very professional finish.
- Different Biscuit Bases: Instead of digestives, you could try using Oreo crumbs (with the filling removed), shortbread, or Biscoff biscuits to introduce a new flavour dimension. If you’re a fan of inventive biscuit recipes, we think you’ll adore our Tasty Blueberry Cheesecake Swirl Cookies Delicious Easy.
Storage and Make-Ahead Advice
These no-bake peanut butter cheesecake balls are ideal for preparing in advance. Once the chocolate coating has hardened, you can store them in an airtight container in the fridge, where they will remain fresh and tasty for up to a week.
For longer-term storage, they also freeze beautifully. Just arrange them in a single layer within a freezer-safe container, placing a sheet of baking parchment between layers to stop them from sticking together. They can be kept frozen for up to three months. When you’re ready to serve, simply allow them to thaw at room temperature for about 15-20 minutes.
Frequently Asked Questions (FAQ)
Can I use low-fat cream cheese?
We highly advise using full-fat cream cheese for this particular recipe. Lower-fat varieties have a higher water content and do not set as firmly. This can leave you with a mixture that is too soft to roll effectively and a filling that lacks richness.
How can I make these gluten-free?
It’s very simple! Just swap the digestive biscuits for your preferred brand of gluten-free ones. The other ingredients are generally gluten-free, but it’s always wise to check the packaging of your peanut butter and chocolate just to be sure.
Why is my mixture too soft to roll into balls?
If you find your mixture is too sticky or soft to handle, it almost certainly just needs to be chilled for a bit longer. Return it to the fridge for another 30 to 60 minutes, or for a quicker fix, place it in the freezer for 15-20 minutes until it has firmed up enough to be rolled.
Can I use a different type of biscuit for the base?
Of course! While digestive biscuits offer that classic cheesecake base taste, you could easily use shortbread, Oreos (with the filling scraped out), or even ginger nuts to add a delightful and unique twist to the flavour.
Conclusion: Your New Favourite No-Bake Treat
And there we have it—a straightforward, impressive, and completely delicious recipe for no-bake peanut butter cheesecake balls. They achieve the perfect harmony of creamy, crunchy, sweet, and salty notes, making them a truly irresistible indulgence for any occasion. This recipe proves that you don’t need an oven or hours of complex preparation to make a dessert that will have everyone clamouring for the recipe.
We really hope you’ll give this recipe a try and discover the joy of making them for yourself. It is a wonderfully fun and rewarding treat that we’re sure will become a cornerstone of your dessert collection. If you’re in the mood for another lovely nutty creation, why not have a look at our fantastic Almond Joy Cookie Recipe?
Do let us know how your cheesecake balls turn out in the comments section below. We always love to hear from you!


