Perfect Loaded Butterscotch Cheesecake
If you’re on the hunt for a dessert that truly makes an impression, look no further. We’re talking about a sweet creation that brings conversation to a halt and elicits pure joy with every spoonful. This is a dessert experience designed to be remembered, brimming with the warm, nostalgic comfort of butterscotch. Allow us to introduce our signature recipe for the perfect Loaded Butterscotch Cheesecake.
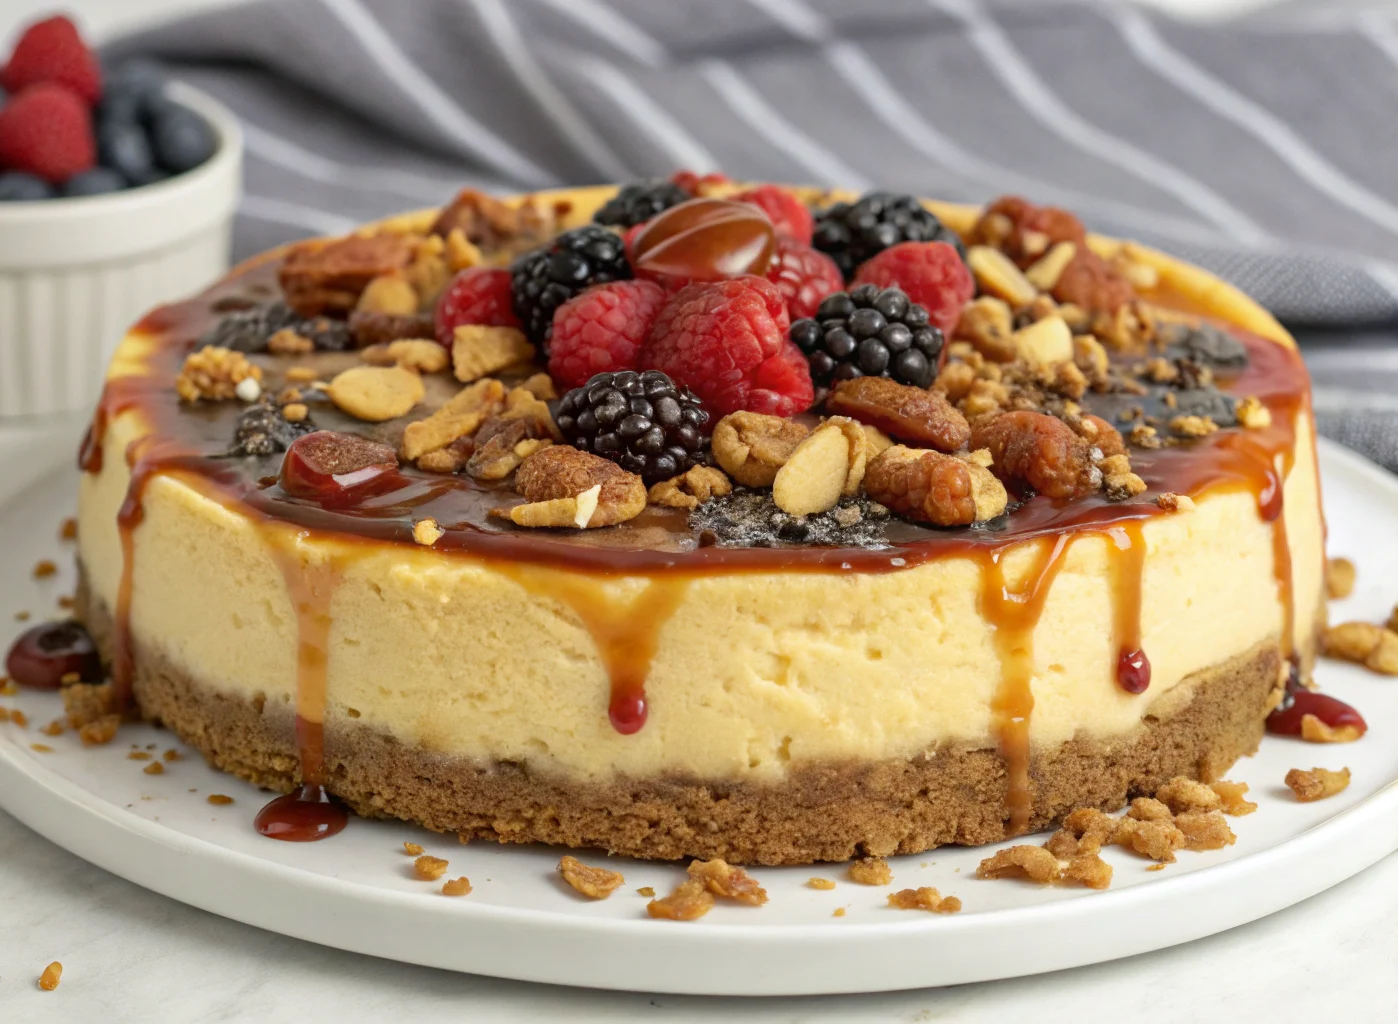
This is far more than your average cheesecake. It represents a beautiful harmony of textures and flavours, starting with its crunchy, buttery biscuit foundation, leading to a cloud-like filling, and crowned with a generous layer of homemade butterscotch sauce and an array of tempting toppings. Move over, simple sweets; this is pure celebration, and we’re here to walk you through each step towards creating it in your very own kitchen.
What Makes This Loaded Butterscotch Cheesecake So Special?
The magic of this cheesecake is right there in its name: “loaded.” We have developed this recipe to be an extraordinary experience for the senses. Every element has been carefully considered to work in harmony with the others, creating layers of flavour that are simply irresistible. Here is what makes our version so unique:
- The Base: We begin with the classic digestive biscuit, which we crush and bind with melted butter and a touch of sugar. This creates a wonderfully firm and sweet base with a hint of salt, providing the perfect counterpoint to the creamy filling.
- The Filling: This is where the real enchantment begins. We insist on full-fat cream cheese to achieve that classic, tangy cheesecake flavour, which we whip with double cream until it’s wonderfully light and airy. The hero, of course, is the butterscotch, which we incorporate directly into the filling to ensure its deep, caramelised notes are present in every single bite.
- The Toppings: A simple cheesecake is a lovely thing, but a “loaded” creation is truly phenomenal. We smother the top with a rich, homemade butterscotch sauce before piling it high with delightful extras like crunchy toffee bits, dark chocolate shavings, or anything else that takes your fancy. This is your moment to be creative!
Gathering Your Ingredients
To ensure a smooth process, we always find it best to gather and prepare all of your ingredients first. Using high-quality, full-fat products is the secret to achieving that flawless texture and rich flavour, which is especially important for a no-bake cheesecake like this. We suggest measuring everything out and making sure it’s at the right temperature before you get started.
For the Buttery Biscuit Base
- 300g Digestive biscuits
- 150g Unsalted butter, melted
- 1 tbsp Light brown soft sugar
For the Creamy Butterscotch Filling
- 600g Full-fat cream cheese (at room temperature)
- 100g Icing sugar
- 300ml Double cream (very cold)
- 1 tsp Vanilla extract
- 150g Butterscotch sauce (from the recipe below, or good quality shop-bought)
For the Homemade Butterscotch Sauce & Toppings
- 100g Unsalted butter
- 150g Light brown soft sugar
- 125ml Double cream
- 1 tsp Vanilla extract
- A generous pinch of sea salt
- Your choice of toppings: Toffee pieces, chocolate shavings, fudge chunks, or caramelised nuts work wonderfully.
Step-by-Step Instructions: Crafting Your Cheesecake Masterpiece
Are you ready to assemble this truly decadent dessert? We have organised the method into clear, easy-to-follow stages. Just follow our lead, and you’ll have a showstopping cheesecake chilling in your fridge in no time.
Step 1: Perfecting the Biscuit Base
For the beginning, grab 20cm (8-inch) springform cake tin, and give the sides and base a lightly sprayed. For the base, place the digestive biscuits into an food processor, and smash them until they form an extremely fine crumb. If you don’t have an appliance for food processing, put them in a sturdy plastic bag, and provide them with a vigorous blitz with a rolling pin. It’s very relaxing! Transfer the crumbs into the bowl, then stir into the brown sugar and sprinkle the butter over it. Mix well with a spoon until the pieces are covered and have the appearance of sand in the form of a damp. Apply the mixture firm and evenly into your container, by using the back of the spoon or flat-bottomed glass to create an even layer, particularly on the outside. Place the tin in the refrigerator to cool for at least 30 minutes before moving towards the filling.Step 2: Whipping Up the Luscious Butterscotch Filling In a large mixing bowl mix the cream cheese at room temperature together with the sugar used to make icing. Make use of an electric mixer (or whisk, and a little determination) to beat them until they’re perfectly smooth and creamy with no lumps visible. Making sure the cream cheese doesn’t get cold is essential for a silky smooth outcome. In a different bowl, whisk the cold double cream along with vanilla extract till it forms soft peak. Be careful not to over-whip since this will cause it to become look grainy. Then gently fold the whipped cream as well as 150g of butterscotch sauce in the cream cheese mixture and stop when all ingredients are incorporated. It is important to keep as much air as you can. Pour this delicious filling over your biscuit base that is chilled and smooth the top using an ice cube. The cheesecake must now be placed in the refrigerator to be set for at least 6 hours, but the overnight timeframe is ideal. It is important to be patient during this time!
- Step 3: Creating the Dreamy Butterscotch Sauce Our home-cooked Butterscotch Sauce recipe is extremely simple and has a taste better than any store-bought variety. In a small pot over an even temperature, heat the unseasoned butter along with the light brown sugar. Stir constantly until sugar crystals are been completely dissolved. Let it bubble for about a minute before adding the double cream, and adding some salt. Stir continuously as the sauce is bubbling away and becomes thicker, which will take between 3 and 4 minutes. The type of sugar you choose can impact the flavor; for more details on this you can research the various sugar types and their uses by using a reliable recipe guide like the one provided by BBC Good Food. Remove the pan from the stove and mix in the vanilla flavor. Let the sauce cool completely before pouring it over the cheesecake because it will continue to become thicker when it cools.
- Step 4: The ‘Loaded’ Assembly Once your cheesecake is fully dried and your sauce been cooled, it’s now time for the grand reveal! Use a knife to gently run across the inside of the tin’s springform to release the cheesecake and then let the clasp go and gently lift it off. Transfer the cheesecake onto the serving dish. Lavishly add the cooled butterscotch sauce on top allowing it to gracefully run across the sides. The fun part is to let your imagination be free by adding toppings! Sprinkle generously on your chocolate shavings, toffee pieces or other yummy ingredients you’ve chosen. If you want a cheesecake that is loaded there’s always more!
- Top Tips for the Perfect Loaded Butterscotch Cheesecake
- We’re here to help you make a cheesecake an absolute success. Follow these guidelines to ensure you’ll get the best results every time.
- Full-fat is a must: Please don’t be attracted by low-fat cream either single or double cream. Full-fat dairy is essential for cheesecakes to be set properly and to create its distinctively creamy and rich texture.
- Room-Temperature Cream Cheese It is impossible to overstate the significance of this! Making use of cream cheese directly from the fridge is the most important reason behind an unruly filling. Allow it to sit on your kitchen counter for a minimum of an hour prior to mixing.
- Chill Chill and Chill Once More: A no-bake cheesecake can be set when it is thoroughly chilled. It’s an essential step that you should not do in a hurry. The overnight chilling process will result in the most firm texture and cleanest slices.
- Customize your HTML0: Think of the base as a blank piece of. Try swapping digestive biscuits for ginger nuts for an ominous, warm note or try shortbread to create an even more buttery base?
- Creative Variations and Customisations
- Although this recipe already makes an amazing dessert, we encourage the use of a bit of creativity to create something unique. If you are a fan of exploring new dessert options, you could get inspiration from other creative desserts. For instance, the delicate texture of the Cloud Cake recipe can inspire a fresh more fluffy and fluffier filling. Also, if you enjoy our mix of fruity and creamy notes and hints of fruit, our tasty blueberry cheesecake swirl cookies Deliciously Easy provide a different recipe to try out the traditional flavour combinations. If you’re looking for an adult-only version you can add a tsp of whisky or dark rum in the sauce of butterscotch or, for a salty sweet variation, add crushed pretzels on top of your dish.
Frequently Asked Questions (FAQ) about Loaded Butterscotch Cheesecake
Could I adapt this into a baked butterscotch cheesecake?
This particular recipe has been created specifically as a no-bake dessert, which sets through chilling. A baked cheesecake is quite different, as it contains eggs and is cooked in a bain-marie, giving it a much denser texture. While you could use these flavours as inspiration, you would need to follow a recipe written for a baked caramel cheesecake or a baked butterscotch version.
How long can I store this cheesecake in the fridge?
Your finished loaded butterscotch cheesecake should last for up to 4 days in the refrigerator. We advise covering it loosely to stop it from picking up any other odours from the fridge. The biscuit base may lose some of its crispness over time, so we feel it’s at its very best within the first two days.
Is it alright to use a shop-bought butterscotch sauce?
Of course! If you’re pressed for time, a high-quality, thick butterscotch or caramel sauce from a jar is a perfectly good substitute. That said, we truly recommend making your own if you can. It takes just a few minutes, and the rich, authentic taste is simply second to none.
My cheesecake isn’t firming up. What went wrong?
This can sometimes happen with no-bake cheesecakes. The most common reasons are not using full-fat ingredients, not allowing enough time for it to chill, or over-whipping the cream, which can cause the mixture to break down. Always use full-fat cream cheese and double cream, and be sure to give it the full chilling time (overnight is safest!) before you worry.
Conclusion: Your New Favourite Showstopper
And there we have it – a complete guide to crafting a Loaded Butterscotch Cheesecake that is genuinely unforgettable. It serves as the ideal centrepiece for a birthday celebration, a magnificent end to a dinner with friends, or simply a delightful treat to share with the people you care about. We are certain you will adore the perfect combination of its crisp base, velvety smooth filling, and luxuriously rich sauce.
So, why not get started? It’s time to gather your ingredients, pop on an apron, and prepare to make the most sensational cheesecake you’ve ever had. We’d love to hear how you get on. Do let us know in the comments how yours turned out and which wonderful toppings you decided to use!


