Lemon Meringue Cheesecake: A Heavenly Recipe
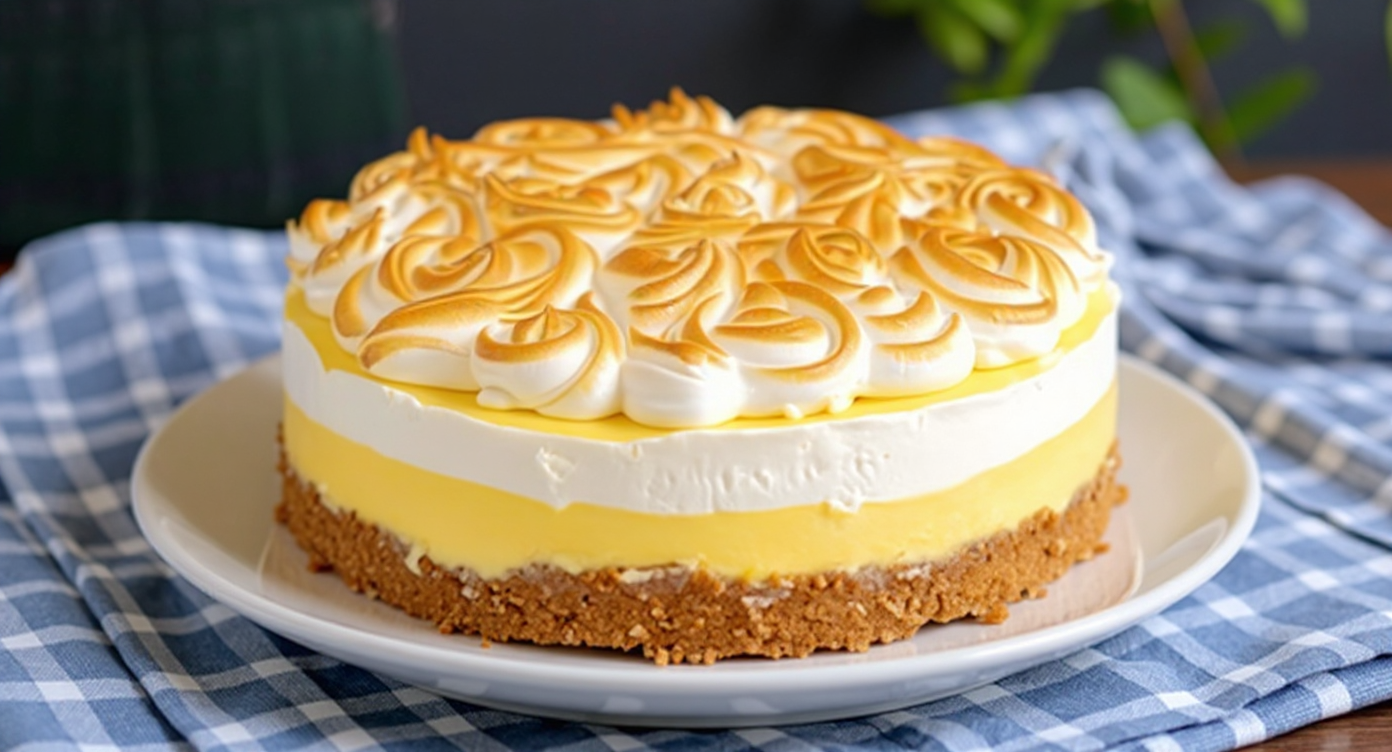
Have you ever faced the delightful quandary of choosing between the zesty charm of a lemon meringue pie and the rich, creamy luxury of a cheesecake? For any dessert enthusiast, it’s a difficult decision. But what if you didn’t have to choose? We are delighted to introduce the dessert hybrid you’ve been dreaming of: the lemon meringue cheesecake. This incredible showstopper unites the best attributes of both beloved classics into one truly unforgettable dessert. It has a crunchy biscuit base, a decadently smooth lemon cheesecake filling, and a glorious topping of light, toasted meringue. Prepare to be utterly captivated.
In this guide, we will accompany you through every stage of creating this masterpiece. We firmly believe that with our clear instructions, any baker can achieve a dessert that looks as if it came from a prestigious patisserie. So, pop on your apron, switch on the oven, and let us begin!
Why You Will Adore This Recipe
Before we delve into the instructions, let’s explore why this recipe truly stands out. We have carefully tested and refined it to ensure a perfect result every single time. Here is what makes it so exceptional:
- The Perfect Flavour Balance: The sweet, buttery crust and the ethereal meringue are the perfect foils for the sharp, citrusy notes of the lemon filling. It is a symphony of flavours that feels both vibrant and wonderfully comforting.
- A Feast for the Eyes: With its magnificent golden-brown meringue peaks, this cheesecake is a guaranteed showstopper. It serves as the ideal centrepiece for a dinner party, a special occasion, or simply as an indulgent weekend bake.
- Sublime Textures: We simply love the textural contrast between the crisp base, the sumptuously creamy cheesecake filling, and the soft, cloud-like meringue. Every single spoonful is an absolute joy.
- Clear, Foolproof Instructions: We have broken the entire process down into simple, easy-to-follow steps, enriched with our own tips and tricks to support you throughout the journey.
Ingredients for Your Lemon Meringue Cheesecake
To get the very best results, we suggest using high-quality ingredients and a digital scale for precise measurements. Gathering all your components before you start, a method known as ‘mise en place’, will help the baking process feel organised and effortless.
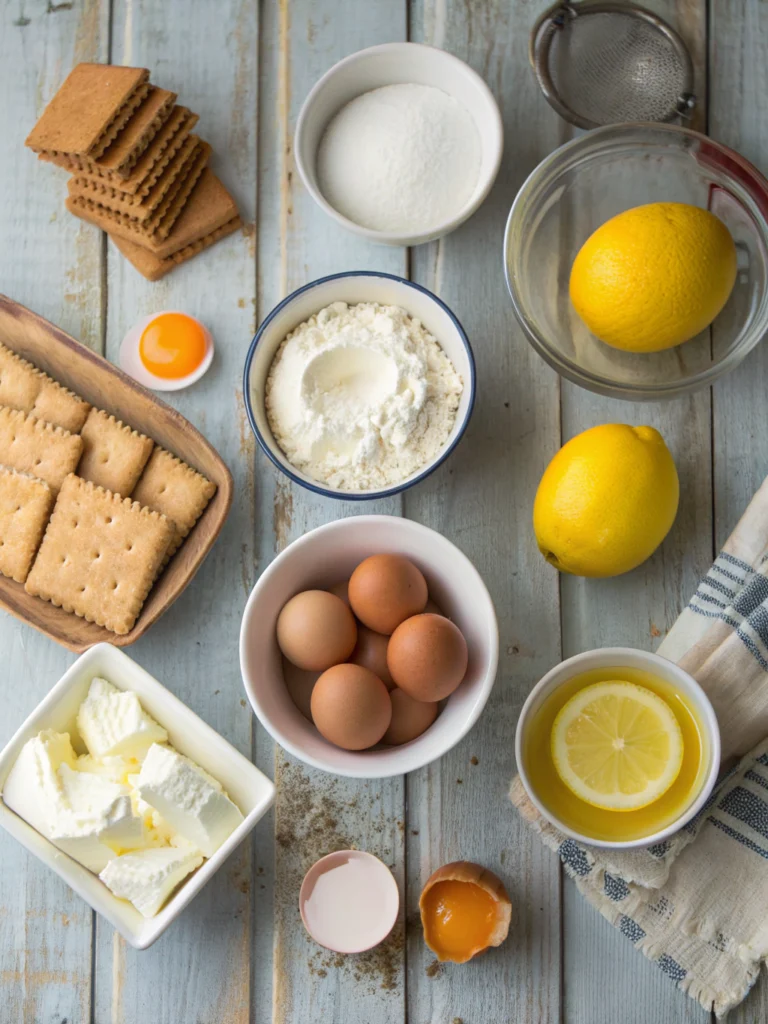
For the Digestive Biscuit Base
- 300g digestive biscuits
- 150g unsalted butter, melted
For the Lemon Cheesecake Filling
- 900g full-fat cream cheese, at room temperature
- 250g caster sugar
- 3 large free-range eggs, at room temperature
- 1 large free-range egg yolk, at room temperature
- 120ml double cream, at room temperature
- Zest of 2 large lemons
- 120ml fresh lemon juice (from 2-3 lemons)
For the Meringue Topping
- 4 large free-range egg whites
- 225g caster sugar
- 1/2 tsp cream of tartar (optional, but helps stabilise the meringue)
Step-by-Step Guide to Baking Perfection
Crafting this dessert is a rewarding journey with three distinct stages: the base, the filling, and finally, the meringue. Follow our detailed instructions, and your reward will be a truly spectacular baked lemon cheesecake. For a helpful visual aid, we have included a video below that demonstrates a very similar technique.https://www.youtube.com/embed/rCg1cW0W2kQ
Part 1: Preparing the Digestive Biscuit Base
- Preheat and Prepare: First things first, set your oven to 170°C (150°C Fan / Gas Mark 3). You’ll need to grease and line the bottom of a 23cm (9-inch) springform cake tin with baking parchment.
- Crush the Biscuits: Place the digestive biscuits in a food processor and pulse until they become fine crumbs. If you don’t have a food processor, you can put them in a sealed food bag and crush them with a rolling pin. It’s a wonderfully satisfying task!
- Combine and Press: Pour the melted butter into the biscuit crumbs and mix until the mixture is fully moistened and resembles damp sand. Tip this into your prepared tin, pressing it down firmly across the base to create a solid and even digestive biscuit base. The back of a spoon or the bottom of a glass is perfect for this.
- Bake the Base: Pop the base into your preheated oven to bake for 10 minutes. This step helps it to become firm and ensures it doesn’t go soggy later. Once it’s baked, put it to one side to cool down completely while you make the filling.
Part 2: Creating the Creamy Cheesecake Filling
- Beat the Cream Cheese: In a large mixing bowl, use an electric mixer on a low speed to beat the room-temperature cream cheese until it is perfectly smooth and has no lumps. It is vital not to overmix, as this can introduce excess air, which may cause the cheesecake to crack later.
- Add Sugar and Eggs: Gently incorporate the caster sugar, mixing only until it is combined. Add the eggs and egg yolk one by one, mixing on a low speed after each addition just until the yolk disappears. Be sure to scrape the sides of the bowl to ensure an even consistency.
- Incorporate Wet Ingredients: Carefully fold in the double cream, lemon zest, and fresh lemon juice. Continue mixing on the lowest speed until the batter is smooth and uniform. The final mixture should be thick, glossy, and have a wonderfully fresh citrus scent.
- Fill the Tin: Pour the luscious cheesecake filling over your cooled biscuit base, and use a spatula to smooth the surface.
Part 3: Baking and Cooling the Cheesecake
- Bake the Cheesecake: Place the tin onto a baking sheet and bake for 50-60 minutes. The cheesecake is done when the outer edges are set, but the very centre still has a slight jiggle. Rest assured, it will continue to set as it cools.
- The Cooling Process (The Secret to No Cracks!): This is the most crucial stage for a flawless, uncracked cheesecake. Turn off the oven, prop the door ajar with a wooden spoon, and allow the cheesecake to cool down gently inside for at least an hour.
- Chill Thoroughly: After its time in the cooling oven, remove the cheesecake and let it cool completely at room temperature. Next, cover it with cling film and transfer it to the fridge for at least 6 hours, although overnight is even better. This extended chilling time is essential for the cheesecake to set perfectly and for the flavours to deepen.
Part 4: Whipping Up the Meringue Topping
- Prepare the Meringue: Just before you are ready to serve, it’s time to make the meringue topping. We use a Swiss meringue method, which is known for being incredibly stable and glossy. Put the egg whites and caster sugar into a spotlessly clean, heatproof bowl and set it over a saucepan of simmering water (a bain-marie). Do not let the bottom of the bowl touch the water.
- Whisk and Heat: Whisk this mixture continuously until the sugar has fully dissolved and it feels warm to the touch (this is around 70°C on a sugar thermometer). You can check by rubbing a little of the mixture between your fingers; it should feel completely smooth, with no graininess.
- Whip to Stiff Peaks: Remove the bowl from the heat. With an electric mixer, start whisking the mixture on high speed, beginning slowly and increasing the pace. Continue to whisk for 8-10 minutes, or until the meringue is beautifully thick, shiny, and holds stiff peaks. If you are using cream of tartar, add it just before you start whisking.
- Decorate the Cheesecake: Spoon or pipe the magnificent meringue all over the top of your chilled cheesecake. You can fashion lovely swirls and peaks using the back of a spoon or a piping bag for a more professional finish.
- Toast the Meringue: Using a kitchen blowtorch, carefully toast the surface of the meringue until the peaks turn a beautiful golden brown. If you do not own a blowtorch, you can put the cheesecake under a hot grill for a minute or two, but you must watch it very closely, as it can burn in a flash!
Our Top Tips for Cheesecake Success
We want your cheesecake-making adventure to be a roaring success. Here are some of the most helpful tips we have picked up along the way:
- Room Temperature is Key: For the smoothest and creamiest possible filling, you must ensure your cream cheese, eggs, and double cream are all at room temperature. This allows them to combine perfectly and helps you avoid lumps.
- Don’t Over-mix: The primary reason for a cracked cheesecake is over-mixing the batter, which whips in too much air. Always mix on a low speed and stop as soon as the ingredients are combined.
- Mastering the Meringue: Make sure your mixing bowl is meticulously clean and entirely free of any grease. Even the tiniest speck of fat can stop your egg whites from whipping up to their full, airy potential. For a deeper look at the science of meringue, BBC Good Food offers an excellent guide on the different varieties and how to perfect them.
- Patience is a Virtue: The slow cooling and extended chilling period are not steps to be skipped if you want the perfect texture. We urge you not to rush this process! A delicate, even bake is a true skill, much like the one required for our feather-light Cloud Cake Recipe.
Frequently Asked Questions
Can I make this lemon cheesecake ahead of time?
Absolutely! The cheesecake base and filling component is actually best made the day before serving, as this gives it plenty of time to chill and fully set. We strongly recommend adding and toasting the meringue topping right before you serve it for the finest texture and appearance.
How do I store leftovers?
You should store any leftover lemon meringue cheesecake in an airtight container in the refrigerator. It will stay delicious for up to 3 days. The meringue may soften a little over time, but it will still be a wonderful treat.
My cheesecake cracked! What went wrong?
Cracks are generally caused by one of three culprits: over-mixing the batter, baking at a temperature that is too high, or cooling the cheesecake too rapidly. Follow our low-speed mixing and gentle cooling instructions to minimise the risk. But please don’t fret—a cracked cheesecake is exactly what the meringue topping is for! It covers any blemish beautifully.
Can I use a different biscuit for the base?
Of course! While digestives are the traditional choice, you could certainly use shortbread for a richer base or even ginger nut biscuits to add a lovely spicy note. The method remains exactly the same.
Conclusion: Your New Favourite Dessert Awaits
So, there you have it—our definitive lemon cheesecake recipe, complete with its stunning, fluffy meringue crown. We are certain this lemon meringue cheesecake is so much more than a dessert; it is an experience. It offers the ideal harmony of tangy and sweet, creamy and crunchy, and is guaranteed to delight your friends and family.
We truly hope you give this recipe a try and discover the pure joy of making such a beautiful treat from scratch. If you enjoyed the vibrant fruit flavour in this cheesecake, we think you will also fall in love with our Blueberry Heaven Cookies The Definitive Recipe For Soft Chewy Perfection.
Did you make our lemon meringue cheesecake? We would be overjoyed to see your creation! Please share a photo and tag us on social media, or leave a comment below to tell us how it went. Happy baking!


