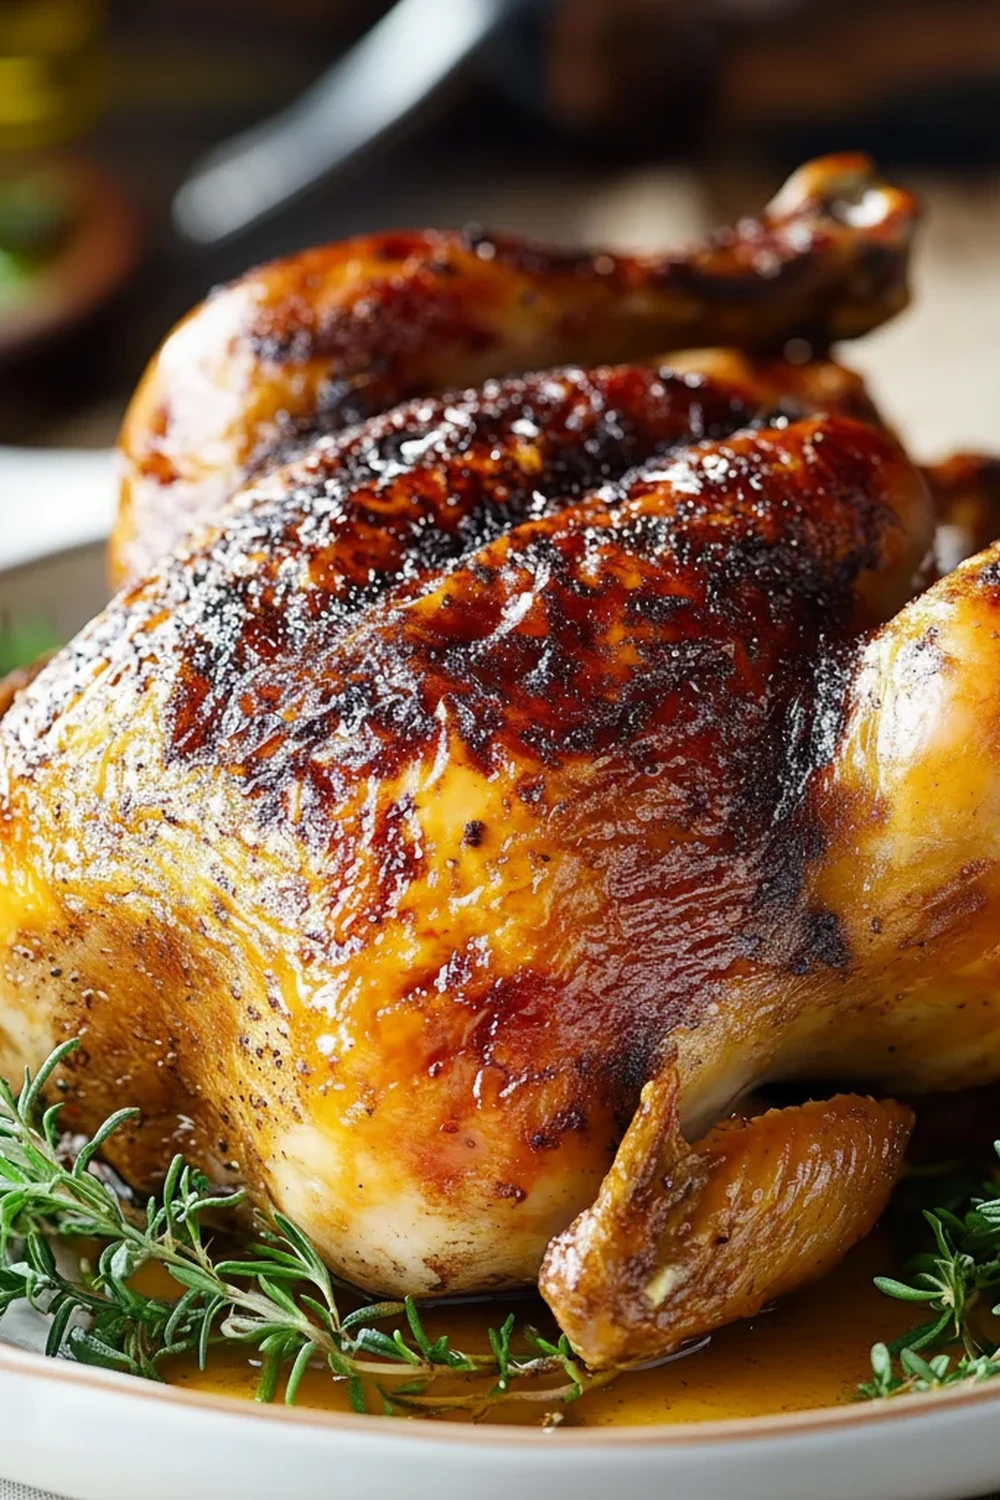
Juicy Rotisserie Chicken Recipe Made at Home
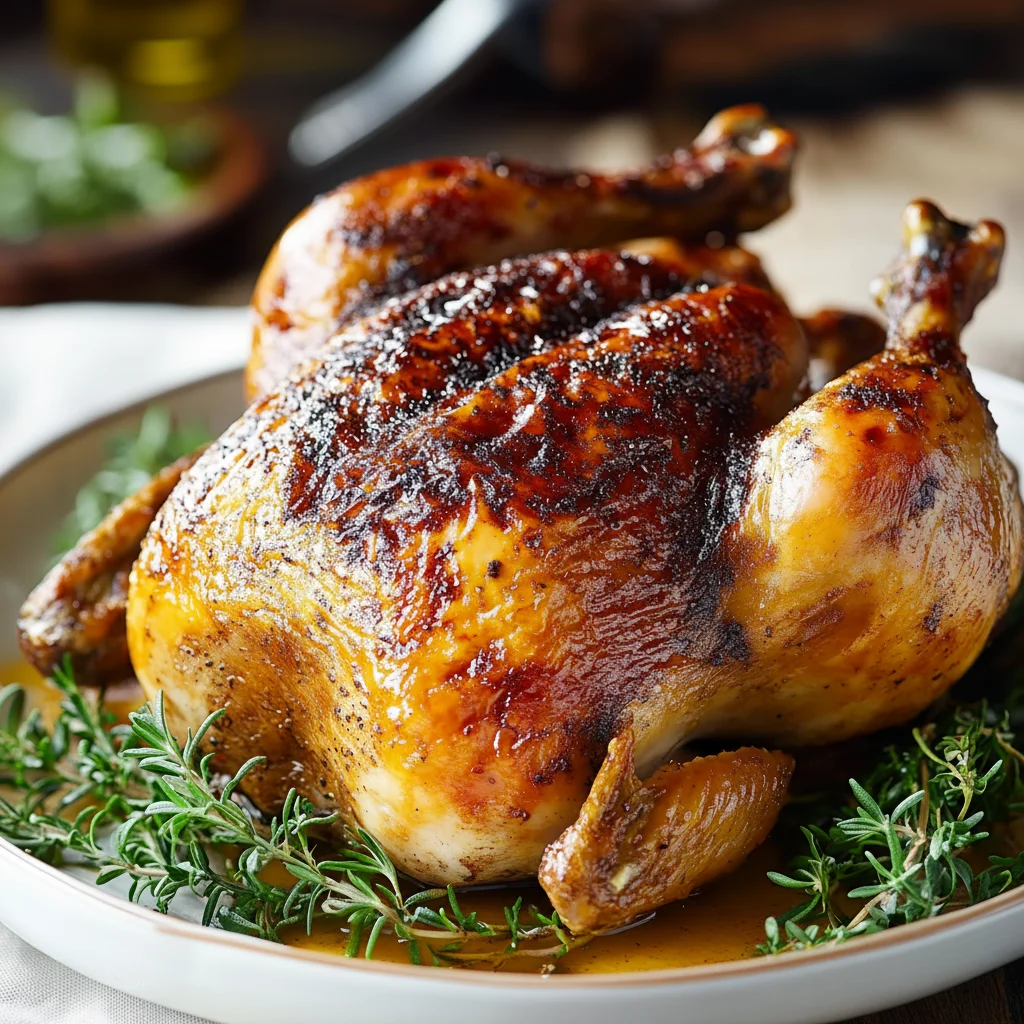
There’s something utterly captivating about a rotisserie chicken. That slow, constant turning, the skin gradually turning a deeper shade of glistening gold, and the aroma that fills the air promising a truly special meal. For years, I believed that kind of perfection was reserved for supermarket delis or specialty shops. I used to struggle with this dish until I discovered this technique; a simple dry brine followed by a flavour-packed herb butter that completely transforms a home-cooked chicken into something spectacular.
This rotisserie chicken recipe is the result of much delicious experimentation in my kitchen. It’s not just about cooking a chicken; it’s about creating an experience. The skin becomes incredibly crisp and crackles under the knife, while the meat underneath remains unbelievably juicy and seasoned all the way through to the bone. This isn’t your average Sunday roast. The constant rotation of the rotisserie means the chicken is continuously basting in its own juices, a method that yields results a standard oven simply can’t replicate.
It’s the kind of main course that works beautifully for a relaxed weekend gathering with friends or a family dinner where you want to present something impressive without being chained to the stove. The active preparation is minimal, leaving you free to enjoy the afternoon while the rotisserie does the mesmerising work. It always gets compliments, and the leftovers are almost as good as the main event.
Recipe Overview
This recipe focuses on a two-step flavouring process: a dry brine to season the meat and draw moisture from the skin, followed by a garlic and fresh herb butter slathered under the skin to baste the chicken as it cooks. The result is a beautifully bronzed bird with succulent meat. I’ve tested this on both gas and charcoal barbecues, and the key is maintaining a steady, indirect heat. Don’t be tempted to skip the resting period – it’s essential for a juicy result.
- Prep Time: 20 minutes (plus 2-24 hours brining time)
- Cook Time: 1 hour 30 minutes
- Total Time: 1 hour 50 minutes (excluding brining)
- Servings: 4-6 people
- Difficulty: Medium
Why You’ll Love This Rotisserie Chicken Recipe
- Genuine Flavour: The salt and sugar brine works its way deep into the meat, ensuring every bite is seasoned. The butter mixture with fresh rosemary and thyme melts during cooking, infusing the breast meat and keeping it wonderfully moist.
- Mostly Hands-Off Cooking: After about 20 minutes of prep, the rotisserie takes over completely, freeing you up from the kitchen for over an hour.
- Flexible Recipe: You can easily change the flavour profile. Swap the rosemary and thyme for smoked paprika, cumin, and a pinch of chilli flakes for a smoky, Spanish-style chicken. Adding lemon zest to the butter also adds a lovely brightness.
- Great for a Sunday Lunch: This is ideal when you want a show-stopping centrepiece for a family meal. The leftovers are also brilliant for making a quick Sticky Chicken Rice Bowls later in the week.
- Family Tested: My kids are always the first to notice the difference. The even cooking means every part of the chicken is tender, from the legs to the breast, and the crispy skin is always the first thing to disappear!
Ingredients You’ll Need
For the best results, start with a good quality, free-range chicken; it really does make a difference to the final taste and texture. I prefer using coarse sea salt, like Maldon, for the brine as it has a clean flavour and dissolves well without making the chicken overly salty.
- 1 whole chicken (approx. 1.8 kg)
- 60g coarse sea salt
- 30g soft light brown sugar
- 1 tsp freshly ground black pepper
- 80g unsalted butter, softened to room temperature
- 4 large cloves garlic, finely minced
- 2 tbsp fresh rosemary, finely chopped
- 2 tbsp fresh thyme leaves, finely chopped
- 1 medium onion, peeled and quartered
- 1 lemon, halved
- Butcher’s twine for trussing
Sara’s Tip: Make sure your butter is properly softened, not melted. It needs to be a paste-like consistency to mix well with the herbs and be spreadable under the skin without tearing it.
How to Make Rotisserie Chicken
The process is straightforward, but the results are magnificent. The key stages are brining, buttering, trussing, and then letting the rotisserie work its magic. Don’t rush these steps, as each one builds a layer of flavour and contributes to the perfect texture.
- Prepare the Dry Brine: In a small bowl, mix together the coarse sea salt, brown sugar, and black pepper.
- Brine the Chicken: Unwrap your chicken and remove any giblets. Pat the chicken thoroughly dry, inside and out, with paper towels. Sprinkle the brine mixture evenly all over the chicken, including inside the cavity. Place the chicken on a wire rack set inside a baking tray and refrigerate, uncovered, for at least 2 hours, or ideally overnight (up to 24 hours). This step is vital for drying out the skin.
- Make the Herb Butter: In another small bowl, mash the softened butter with the minced garlic, chopped rosemary, and thyme until well combined.
- Prep the Chicken: Remove the chicken from the fridge. Gently rinse off the excess brine under cold water and then pat it completely dry again with paper towels. This is a critical step for crispy skin. Carefully slide your fingers between the skin and the breast meat to create a pocket. Push about two-thirds of the herb butter into this pocket, spreading it evenly over the breast meat. Rub the remaining butter all over the outside of the chicken.
- Truss the Chicken: Place the quartered onion and halved lemon inside the chicken’s cavity. Truss the chicken securely with butcher’s twine to keep the wings and legs close to the body. What works best for me is to ensure it’s a tight, compact parcel; this helps it rotate evenly and cook through without any parts burning.
- Set up the Rotisserie: Carefully slide the trussed chicken onto the rotisserie spit, securing it with the forks. Make sure it’s centred and balanced. Prepare your barbecue for indirect cooking at around 180°C (350°F). For a gas barbecue, this usually means leaving the burners directly under the chicken off and using the ones on the sides.
- Cook the Chicken: Place the spit onto the rotisserie motor, place a drip pan with a little water underneath to catch the fat, and turn it on. Close the lid and let the chicken cook for approximately 1 hour and 20-30 minutes.
- Check for Doneness: The chicken is cooked when the juices run clear and an instant-read thermometer inserted into the thickest part of the thigh (avoiding the bone) reads 74°C. For confirmation on safe cooking temperatures, you can check the guidance from the Food Standards Agency.
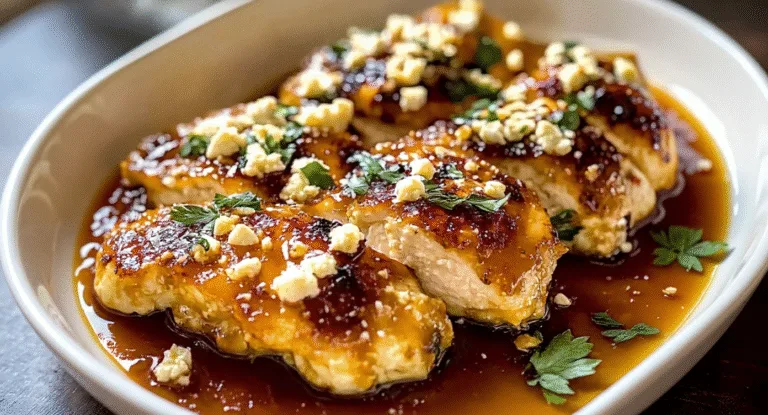
- Rest is Best: Carefully remove the hot spit from the barbecue. Let the chicken rest on the spit for a few minutes before sliding it off onto a carving board. Tent loosely with foil and let it rest for a full 15-20 minutes. This allows the juices to redistribute throughout the meat, guaranteeing a moist result. Carve and serve immediately.
Tips From My Kitchen
- Temperature Control: The key to rotisserie cooking is steady, indirect heat. If you’re using a charcoal barbecue, bank your hot coals on either side of where the chicken will be, leaving the middle empty. This prevents fat from dripping onto the coals and causing flare-ups that can scorch the skin.
- The Secret Step: I learned that the uncovered rest in the fridge during the brining stage is non-negotiable. It seems simple, but this dehydration process is what helps the skin render its fat and turn into that shatteringly crisp, golden shell we’re all after.
- Make-Ahead: You can brine the chicken up to 24 hours in advance. The herb butter can also be prepared and stored in an airtight container in the fridge for up to 3 days, making assembly much quicker on the day.
- Storage: Leftover chicken, once completely cooled, can be stored in an airtight container in the fridge for up to 4 days. The leftover meat is absolutely divine in our Garlic Parmesan Chicken Pasta Recipe the next day.
Equipment You’ll Need
While the rotisserie itself is the star of the show, you will need a few other kitchen essentials to prepare the chicken for its slow spin.
- Large frying pan or skillet
- Sharp knife and cutting board
- Mixing bowls
- Wooden spoon or spatula
Delicious Variations to Try
Once you’ve mastered the basic technique, it’s fun to play around with different flavour combinations. This recipe is a fantastic canvas for your culinary creativity.
- Spicy Version: For a bit of warmth, add 1 tsp of smoked paprika and 1/2 tsp of cayenne pepper to the butter mixture. It gives the skin a beautiful deep red colour and a gentle, smoky heat.
- Vegetarian Option: I stumbled upon this combination by accident, and it’s been a hit ever since. For a vegetarian alternative, you can use the same herb butter on a whole head of cauliflower. Secure it to the spit as best you can and cook until tender and charred on the outside. It’s a surprisingly hearty and delicious centrepiece.
- Different Protein: This method also works wonderfully with a whole duck. You’ll need to cook it for longer to render all the fat, but the result is incredibly crispy skin and rich meat.
What to Serve With Rotisserie Chicken
This chicken is versatile enough to pair with almost anything, but here are a few of my favourite accompaniments that really make it a memorable meal.
- Classic Roast Potatoes: Cook them in the oven or, even better, place them in a tray under the chicken on the barbecue to catch all those delicious drippings as they cook.
- A Crisp Green Salad: A simple salad of mixed leaves, cucumber, and cherry tomatoes with a sharp lemon vinaigrette provides a fresh contrast to the rich chicken.
- Creamy Coleslaw: A homemade coleslaw with a tangy dressing is a great side, especially if you’re serving this as part of a summer barbecue spread.
- Wine Pairing: A lightly oaked Chardonnay has the body to stand up to the buttery herbs, while a French Sauvignon Blanc can cut through the richness.
Frequently Asked Questions
Rotisserie Chicken Recipe
Ingredients
Method
- Prepare the Dry Brine: In a small bowl, mix together the coarse sea salt, brown sugar, and black pepper.
- Brine the Chicken: Unwrap your chicken and remove any giblets. Pat the chicken thoroughly dry, inside and out, with paper towels. Sprinkle the brine mixture evenly all over the chicken, including inside the cavity. Place the chicken on a wire rack set inside a baking tray and refrigerate, uncovered, for at least 2 hours, or ideally overnight (up to 24 hours). This step is vital for drying out the skin.
- Make the Herb Butter: In another small bowl, mash the softened butter with the minced garlic, chopped rosemary, and thyme until well combined.
- Prep the Chicken: Remove the chicken from the fridge. Gently rinse off the excess brine under cold water and then pat it completely dry again with paper towels. This is a critical step for crispy skin. Carefully slide your fingers between the skin and the breast meat to create a pocket. Push about two-thirds of the herb butter into this pocket, spreading it evenly over the breast meat. Rub the remaining butter all over the outside of the chicken.
- Truss the Chicken: Place the quartered onion and halved lemon inside the chicken's cavity. Truss the chicken securely with butcher's twine to keep the wings and legs close to the body. What works best for me is to ensure it's a tight, compact parcel; this helps it rotate evenly and cook through without any parts burning.
- Set up the Rotisserie: Carefully slide the trussed chicken onto the rotisserie spit, securing it with the forks. Make sure it's centred and balanced. Prepare your barbecue for indirect cooking at around 180°C (350°F). For a gas barbecue, this usually means leaving the burners directly under the chicken off and using the ones on the sides.
- Cook the Chicken: Place the spit onto the rotisserie motor, place a drip pan with a little water underneath to catch the fat, and turn it on. Close the lid and let the chicken cook for approximately 1 hour and 20-30 minutes.
- Check for Doneness: The chicken is cooked when the juices run clear and an instant-read thermometer inserted into the thickest part of the thigh (avoiding the bone) reads 74°C. For confirmation on safe cooking temperatures, you can check the guidance from the Food Standards Agency.
- Rest is Best: Carefully remove the hot spit from the barbecue. Let the chicken rest on the spit for a few minutes before sliding it off onto a carving board. Tent loosely with foil and let it rest for a full 15-20 minutes. This allows the juices to redistribute throughout the meat, guaranteeing a moist result. Carve and serve immediately.
Notes
There is nothing quite like carving into a chicken you’ve watched slowly turn to perfection. The crispy, salty skin and flavourful, juicy meat make every moment of preparation worthwhile. I hope you and your family enjoy this rotisserie chicken recipe as much as we do. Let me know how yours turns out in the comments below! Happy cooking,
Sara