Homemade Fire Cider Immune Booster
There’s something deeply satisfying about creating your own wellness tonics at home. As the seasons turn and the air gets a chill, my kitchen transforms into a small apothecary. The spicy, pungent aroma of freshly grated horseradish and ginger fills the air, a sure sign that it’s time to make my annual batch of Homemade Fire Cider. This fiery, tangy elixir has become a staple in our household for giving our systems a bit of a kick, especially during the colder months. My gran used to make a version of this every autumn, and the smell of the ginger and horseradish always takes me back to her cosy kitchen.
This isn’t just a recipe; it’s a ritual. It’s a process of chopping, layering, and patiently waiting as all those powerful ingredients infuse into a golden, potent liquid. What we end up with is a vibrant, unfiltered immune booster that’s alive with flavour and goodness. The combination of spicy, sour, and sweet notes wakes up the senses. It’s a wonderful project for a quiet afternoon, and the final product is a row of beautiful amber jars, ready to be sipped, shot, or drizzled over salads throughout the winter.
This recipe is for anyone looking to connect with traditional folk remedies and take a hands-on approach to their wellness. It’s straightforward to prepare, and the ingredients are all readily available. Once you’ve made your first batch of homemade fire cider, you’ll find it becomes a cherished seasonal tradition, just as it has in my home.
Recipe Overview
This homemade fire cider recipe yields a potent, spicy, and tangy tonic. The process involves a long infusion, which draws out the beneficial compounds from pungent roots, fruits, and herbs into apple cider vinegar. The final taste is sharp and warming from the horseradish and cayenne, with a deep earthiness from turmeric and ginger, brightened by citrus, and finally balanced with the sweetness of raw honey. I’ve found that letting it infuse for the full four weeks really develops a much more complex and rounded flavour.
- Prep Time: 30 minutes
- Infusion Time: 4 weeks
- Total Time: 4 weeks and 30 minutes
- Yields: Approx. 1 litre
- Difficulty: Easy
Why You’ll Love This Homemade Fire Cider
- Robust, Pungent Flavour: This tonic is genuinely powerful. The horseradish provides a sharp, sinus-clearing heat, while the ginger adds a warm, spicy bite that lingers pleasantly. It’s an invigorating experience, not a subtle one.
- Active Prep in 30 Minutes: All the hands-on work of chopping and assembling the jar is done in about half an hour. After that, it’s just a matter of patient waiting and a daily shake.
- Highly Adaptable Recipe: Feel free to add other herbs and spices. I sometimes throw in a sprig of rosemary or a few black peppercorns for extra warmth. You can also adjust the amount of honey to your preferred sweetness.
- Great for Seasonal Wellness: We make a large batch at the start of autumn. Having it on hand is ideal for those days when you feel you need an extra bit of internal warmth and support.
- A Household Staple: I was surprised when my husband, who is usually wary of my ‘potions’, started taking a small spoonful each morning. He says it gives him a real boost to start the day.
Ingredients You’ll Need
The quality of your ingredients really matters here, especially the apple cider vinegar. We are making a health-supportive tonic, so using fresh, organic produce where possible will give you the best result. I always use a raw, unpasteurised apple cider vinegar with “the mother” – Bragg is a reliable brand that’s widely available.
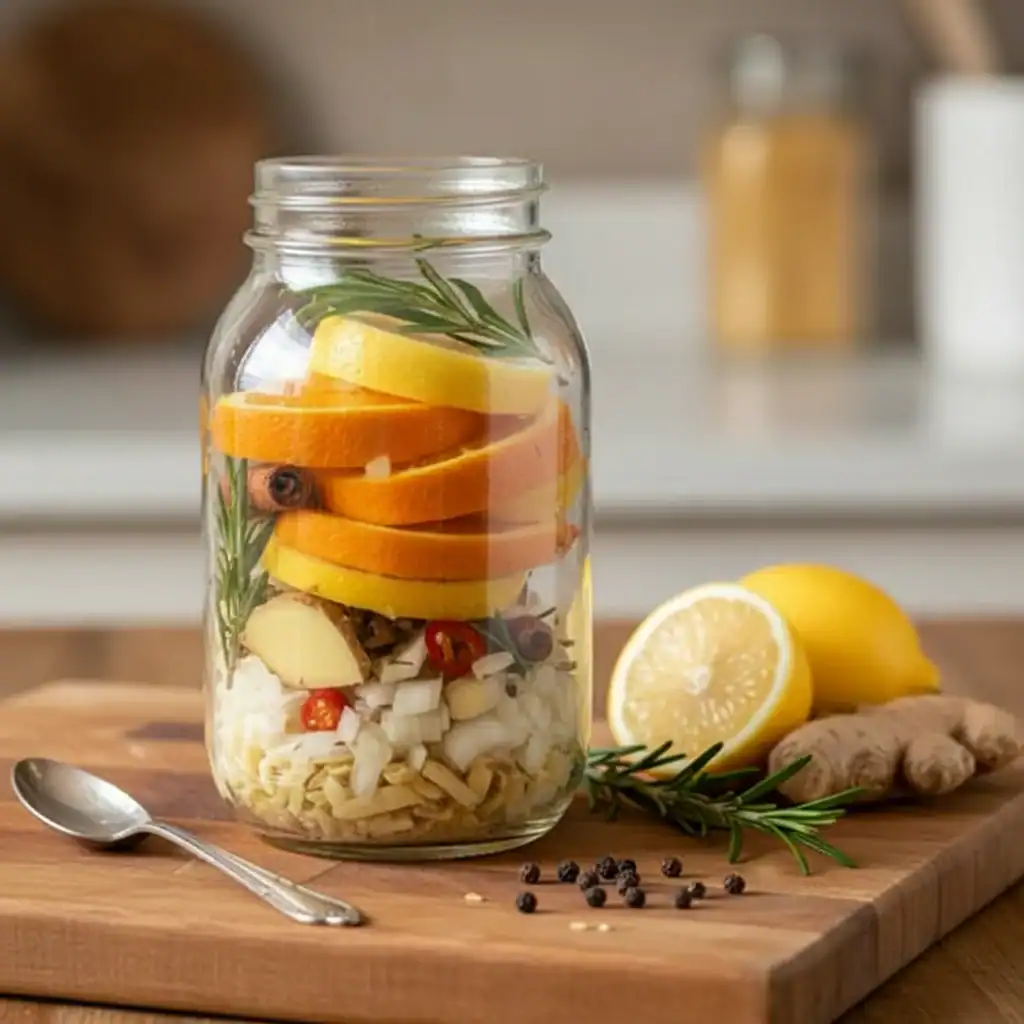
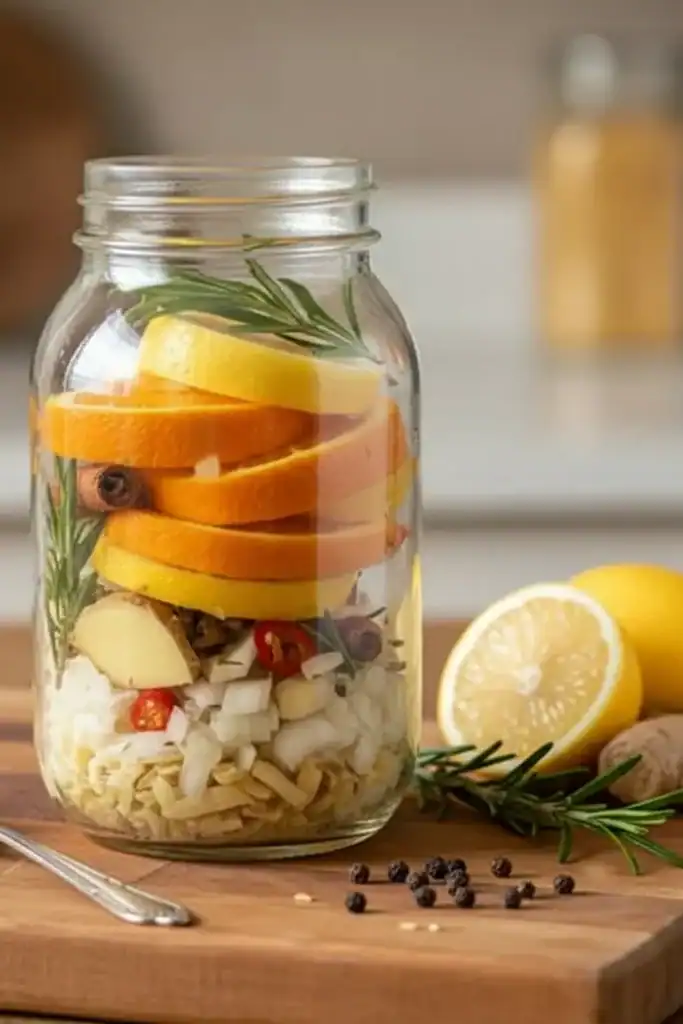
- 1 medium onion (about 200g), coarsely chopped
- 1 head of garlic (about 10-12 cloves), coarsely chopped
- 100g fresh ginger root, grated or finely chopped
- 100g fresh horseradish root, grated or finely chopped
- 50g fresh turmeric root, grated or finely chopped (or 2 tbsp dried turmeric powder)
- 2 medium oranges, washed and sliced into rounds
- 2 lemons, washed and sliced into rounds
- 2-3 small, hot chillies (like bird’s eye), sliced
- 1 tbsp black peppercorns
- 1 tsp cayenne pepper
- A few sprigs of fresh rosemary or thyme (optional)
- Approx. 1 litre raw, unfiltered apple cider vinegar
- 125-250ml raw honey, to taste
Sara’s Tip: Wear gloves when handling the fresh horseradish and chillies! The oils can be very potent and can irritate your skin and eyes. Trust me, I learned that lesson the hard way one year.
How to Make Homemade Fire Cider
The process is more of an assembly job than cooking. The key is to pack everything into the jar tightly and ensure it’s fully submerged in the vinegar to prevent spoilage. Let’s get started.
- Prepare Your Jar: You’ll need a large, clean glass jar with a tight-fitting lid – a 1.5 to 2-litre preserving jar is ideal. Ensure it’s thoroughly washed and dried.
- Chop and Grate: Prepare all your solid ingredients. Coarsely chop the onion and garlic. Grate the ginger, horseradish, and turmeric roots. I find that using the grating attachment on a food processor makes this step much quicker and saves your knuckles. Slice the oranges, lemons, and chillies.
- Layer the Ingredients: Start layering all the chopped and grated ingredients into your jar – the onion, garlic, ginger, horseradish, turmeric, citrus slices, chillies, and any optional herbs. Pack them down lightly as you go.
- Add Spices: Sprinkle the black peppercorns and cayenne pepper over the layered ingredients.
- Pour the Vinegar: Slowly pour the apple cider vinegar over the ingredients in the jar. Pour until everything is completely submerged. You may need to use a spoon to press everything down to release any air bubbles. The ingredients must be covered by at least an inch of vinegar.
- Seal the Jar: If you are using a metal lid, place a piece of parchment paper between the jar and the lid to prevent the vinegar from corroding the metal. Screw the lid on tightly.
- Infuse and Shake: Store the jar in a cool, dark place (like a kitchen cupboard) for 4 weeks. Give the jar a good shake every day, or as often as you remember. This helps the infusion process along.
- Strain the Cider: After 4 weeks, line a sieve or colander with a piece of cheesecloth or muslin and place it over a large bowl or jug. Pour the contents of the jar through it. Gather the corners of the cloth and squeeze firmly to get every last drop of liquid out. You can compost the leftover solids.
- Add Honey: Gently warm the honey if it’s very thick (do not boil it, as this can destroy its beneficial properties). Pour the strained fire cider liquid into a clean bowl and whisk in the raw honey until it’s fully dissolved. Start with 125ml and add more to your personal taste.
- Bottle and Store: Pour the finished homemade fire cider into clean glass bottles or jars with non-metallic lids. It will keep in a cool, dark place for up to a year.
Tips From My Kitchen
- Vinegar Choice is Key: Always use raw, unpasteurised apple cider vinegar that contains “the mother”. This is the cloudy substance you see at the bottom, which is a colony of beneficial bacteria, similar to a kombucha scoby.
- The Secret Step: I learned that giving the jar a vigorous shake every single day for the first week makes a huge difference. It really helps to kickstart the infusion and prevents the ingredients at the top from drying out before they are fully saturated.
- Make-Ahead: The entire point of this recipe is making it ahead! The infusion period is essential. Once strained and bottled, it’s ready to use whenever you need it.
- Storage: Once bottled, your fire cider is shelf-stable and can be stored in a cool, dark cupboard for up to 12 months. Some people prefer to keep it in the fridge, which is also fine, especially if your kitchen is warm.
Equipment You’ll Need
- Large 1.5-2 litre glass preserving jar with a tight-fitting lid
- Sharp knife and cutting board
- Grater or food processor
- Large bowl or jug
- Sieve and cheesecloth (or muslin) for straining
- Whisk
- Clean glass bottles for storage
Common Mistakes to Avoid
- Using a Metal Lid Directly: Vinegar is highly acidic and will react with a metal lid over the long infusion period, causing it to rust and potentially contaminate your cider. Always use a plastic lid or place a barrier of parchment paper under a metal one.
- Ingredients Floating Above the Vinegar: Any ingredients exposed to air can develop mould. Ensure everything is fully submerged. You can use a fermentation weight (a small glass disc) to keep everything pressed down if needed.
- Rushing the Infusion: Patience is crucial. While you’ll get some flavour after a week, the full, potent extraction of compounds from the roots and herbs really needs the full four weeks. Don’t cut it short.
Delicious Variations to Try
Once you have the basic method down, you can customise your fire cider endlessly. Think of this recipe as a starting point for your own creations.
- Extra Herbs: Add other robust herbs like oregano, astragalus root, or echinacea for different properties and flavours.
- Sweeter & Milder: If you find the final product too intense, you can simply increase the amount of honey or dilute your dose with a little water or fruit juice before taking it.
- Use it as a Marinade: The sharp, acidic kick of fire cider works wonderfully as a tenderiser and flavour base for meats. It’s fantastic with chicken. Try using a few tablespoons in the marinade for my Lemon Garlic Chicken for an extra zing.
What to Serve With Homemade Fire Cider
Fire cider is a tonic, not a meal, but it has many culinary uses. It’s a versatile ingredient that can add a powerful kick to your food and drinks.
- As a Wellness Shot: The most common way to take it is as a straight shot of 1-2 tablespoons per day.
- In a Hot Drink: Add a spoonful to a mug of hot water with an extra squeeze of lemon for a warming ‘fire tea’.
- Salad Dressing Base: Whisk one part fire cider with three parts good quality olive oil, a pinch of salt, and a little mustard for a phenomenal vinaigrette.
- In Savoury Dishes: A splash can brighten up soups, stews, or even a simple stir-fry. It can add a unique acidic punch to a hearty dish like a Low Carb Chicken Casserole.
Frequently Asked Questions
Homemade Fire Cider
Ingredients
Method
- Prepare Your Jar: You'll need a large, clean glass jar with a tight-fitting lid – a 1.5 to 2-litre preserving jar is ideal. Ensure it's thoroughly washed and dried.
- Chop and Grate: Prepare all your solid ingredients. Coarsely chop the onion and garlic. Grate the ginger, horseradish, and turmeric roots. I find that using the grating attachment on a food processor makes this step much quicker and saves your knuckles. Slice the oranges, lemons, and chillies.
- Layer the Ingredients: Start layering all the chopped and grated ingredients into your jar – the onion, garlic, ginger, horseradish, turmeric, citrus slices, chillies, and any optional herbs. Pack them down lightly as you go.
- Add Spices: Sprinkle the black peppercorns and cayenne pepper over the layered ingredients.
- Pour the Vinegar: Slowly pour the apple cider vinegar over the ingredients in the jar. Pour until everything is completely submerged. You may need to use a spoon to press everything down to release any air bubbles. The ingredients must be covered by at least an inch of vinegar.
- Seal the Jar: If you are using a metal lid, place a piece of parchment paper between the jar and the lid to prevent the vinegar from corroding the metal. Screw the lid on tightly.
- Infuse and Shake: Store the jar in a cool, dark place (like a kitchen cupboard) for 4 weeks. Give the jar a good shake every day, or as often as you remember. This helps the infusion process along.
- Strain the Cider: After 4 weeks, line a sieve or colander with a piece of cheesecloth or muslin and place it over a large bowl or jug. Pour the contents of the jar through it. Gather the corners of the cloth and squeeze firmly to get every last drop of liquid out. You can compost the leftover solids.
- Add Honey: Gently warm the honey if it's very thick (do not boil it, as this can destroy its beneficial properties). Pour the strained fire cider liquid into a clean bowl and whisk in the raw honey until it's fully dissolved. Start with 125ml and add more to your personal taste.
- Bottle and Store: Pour the finished homemade fire cider into clean glass bottles or jars with non-metallic lids. It will keep in a cool, dark place for up to a year.
Notes
I hope you enjoy the process of making this potent and invigorating Homemade Fire Cider. It’s a wonderful way to feel connected to the seasons and to create something truly nourishing with your own hands. Let me know how your batch turns out in the comments below – I’d love to hear about your own variations!