Gourmet Peanut Butter and Jelly Sandwich Recipe

There are some combinations in the culinary world that just feel written in the stars: salt and vinegar, tea and biscuits, and, of course, the glorious pairing of peanut butter and jelly. It’s a sandwich that many of us grew up with, a staple of school lunchboxes and after-school snacks. But I’m here to tell you that this humble creation has so much more to offer. We’re not just slapping some spreads on bread today; we’re creating the ultimate grilled Peanut Butter and Jelly Sandwich, a version that transforms the classic into a warm, gooey, and utterly satisfying meal. I stumbled upon this grilled version during a university late-night study session, and it’s been my go-to for a comforting lunch ever since.
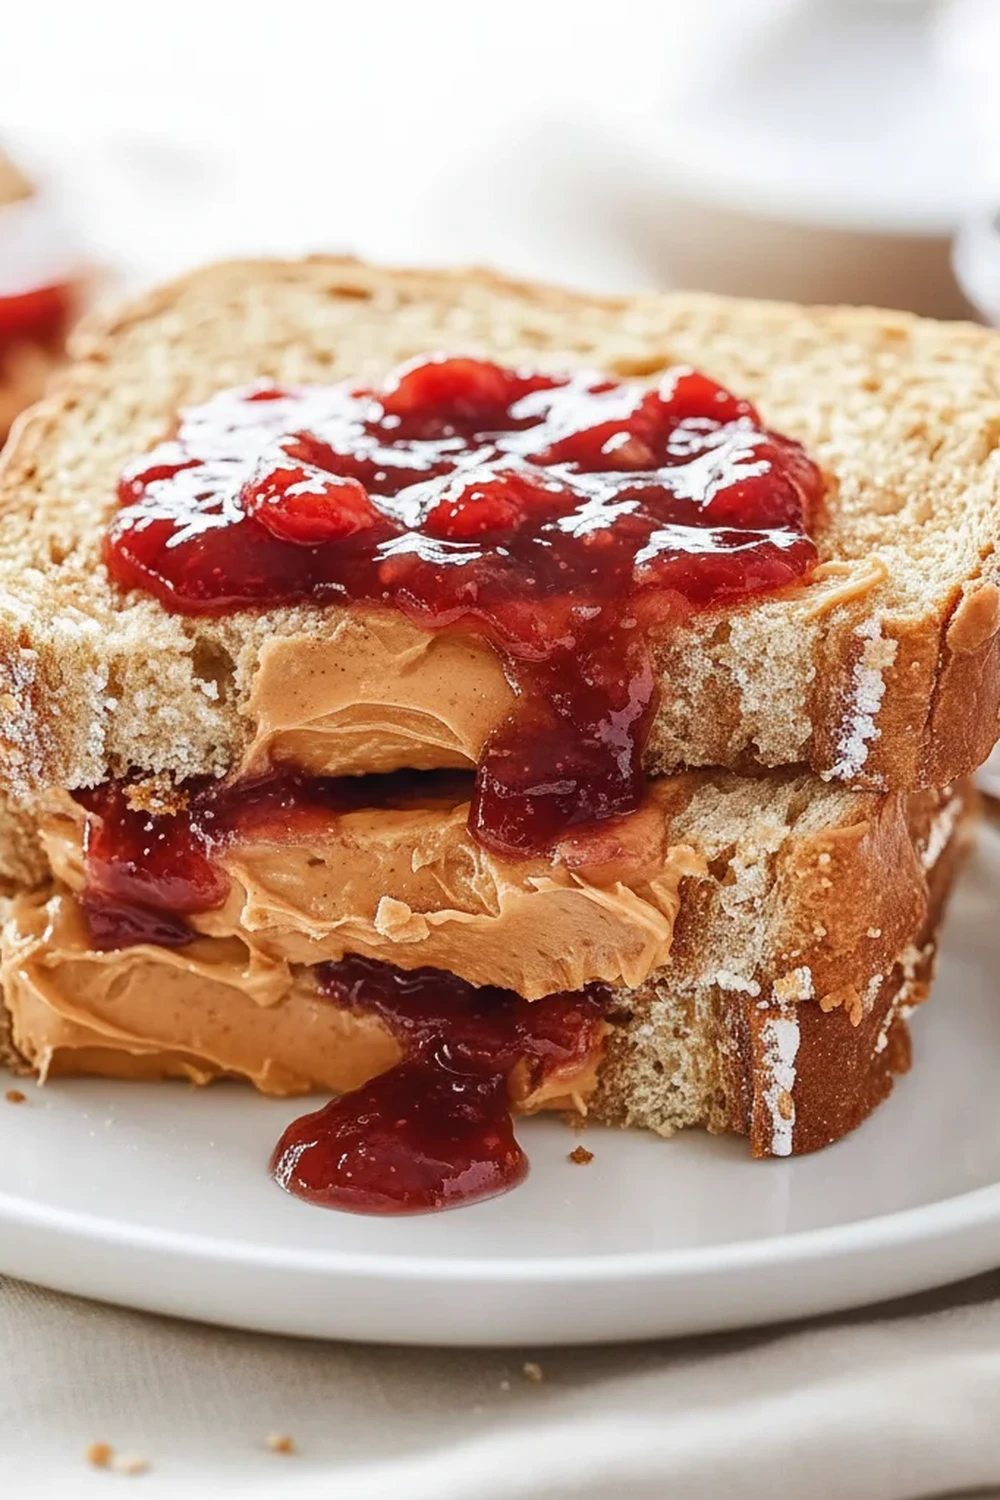
What makes this particular peanut butter and jelly sandwich recipe so special is the texture. By grilling it in a little butter, the bread becomes incredibly crisp and golden, with a rich, savoury flavour that perfectly complements the sweet jam and salty peanut butter. The fillings get warm and melt together just slightly, creating a core that is beautifully soft and luscious. It’s a delightful contrast of crunchy exterior and molten interior that elevates the entire experience from a simple snack to something truly special.
This recipe is for anyone looking to rediscover a childhood favourite with a more grown-up twist. It works beautifully for a speedy weekday lunch, a comforting weekend treat, or even a late-night snack when you need something genuinely satisfying. It’s straightforward to make, using ingredients you almost certainly have in your cupboard right now. Let’s get the pan on and create something wonderful.
Recipe Overview
This recipe guide will walk you through creating a perfectly grilled peanut butter and jelly sandwich. Expect a crisp, buttery exterior giving way to a warm, melting centre of salty, creamy peanut butter and sweet, fruity jam. During testing, I found that pressing the sandwich down gently with a spatula for the first 30 seconds of cooking helps create an even, golden-brown crust.
- Prep Time: 5 minutes
- Cook Time: 6-8 minutes
- Total Time: Approximately 15 minutes
- Servings: 1 sandwich
- Difficulty: Easy
Why You’ll Love This Peanut Butter and Jelly Sandwich Recipe
- Sublime Texture and Flavour: The salty butter crisps up the bread to a perfect crunch, which contrasts beautifully with the warm, gooey peanut butter and the slightly tart sweetness of the jam. It’s a harmonious blend of salty, sweet, and savoury.
- Ready in Under 15 Minutes: From gathering your ingredients to plating up, this whole process is wonderfully efficient, making it a brilliant choice for a satisfying lunch without the fuss.
- Entirely Customisable: This recipe is a fantastic starting point. You can swap smooth peanut butter for crunchy, use artisan sourdough instead of white bread, or experiment with different jams like fig or apricot.
- Ideal for a Cosy Lunch: This sandwich is just the ticket for a chilly afternoon or when you’re craving something warm and restorative. It also makes for a fantastic weekend brunch item alongside a cup of coffee.
- Family Tested: This elevated version always gets compliments in my house. My husband, who usually dismisses sandwiches as ‘not a real meal’, asked for another one immediately!
Ingredients You’ll Need
The beauty of this recipe lies in its simplicity, but the quality of your ingredients will truly make it shine. I always opt for a good quality, thick-cut bread that can stand up to the grilling process. For the peanut butter, I’m partial to a brand like ManiLife, which has a deep roasted flavour, but your favourite will work wonderfully.
- 2 slices of thick-cut white bread or sourdough
- 30g (about 2 tablespoons) smooth or crunchy peanut butter
- 25g (about 1.5 tablespoons) strawberry or raspberry jam (or jelly)
- 15g (about 1 tablespoon) salted butter, softened to room temperature
- A tiny pinch of sea salt flakes (optional)
Sara’s Tip: Ensure your butter is properly softened. If it’s too cold, it will tear the bread when you try to spread it. If you’re in a hurry, you can grate cold butter onto the bread slices before placing them in the pan.
How to Make This Peanut Butter and Jelly Sandwich Recipe
The process is very straightforward, but paying attention to the heat of your pan is the key to achieving that perfect golden crust without burning the bread. We’re aiming for a gentle, even heat.
- Prep Your Bread: Lay your two slices of bread on a clean work surface or chopping board.
- Spread the Fillings: Spread the peanut butter evenly over one slice of bread, going right to the edges. On the other slice, spread your jam. What works best for me is creating a small ‘dam’ of peanut butter around the edge of the jam slice to keep it from spilling out in the pan.
- Assemble the Sandwich: Carefully place the two slices together to form your sandwich. Press down gently to secure it.
- Butter the Outside: Using a butter knife, spread half of the softened butter (about 7-8g) over the top surface of the sandwich. Make sure you get an even layer that covers the entire slice.
- Begin Grilling: Place a non-stick frying pan over a medium-low heat. Carefully place the sandwich in the pan, buttered-side down.
- Butter the Other Side: While the first side is cooking, spread the remaining softened butter over the upward-facing side of the sandwich.
- Cook to Perfection: Let the sandwich cook for 3-4 minutes on the first side, until the bread is a deep golden brown and crisp. You can check by gently lifting a corner with a spatula.
- Flip and Finish: Carefully flip the sandwich over using a spatula. Cook for another 3-4 minutes on the second side, until it’s equally golden and the fillings are warm and melted. I like to press down gently with the spatula for a few seconds after flipping.
- Serve Immediately: Remove the sandwich from the pan, slice it in half diagonally (it just tastes better that way!), and serve immediately while it’s warm and gooey. A tiny sprinkle of sea salt flakes on top can really make the flavours pop.
Tips From My Kitchen
- Temperature Control is Key: The biggest mistake is using a heat that’s too high. A medium-low heat allows the bread to toast slowly and evenly, giving the cheese inside time to get gloriously melty without the outside burning.
- The Secret Step: For an extra layer of flavour and to prevent a soggy bottom, I learned that creating a thin peanut butter ‘barrier’ on both slices of bread before adding the jam works wonders. The fat in the peanut butter helps to repel the moisture from the jam.
- Make-Ahead: While this sandwich is best enjoyed fresh, you can assemble it (without buttering the outside) up to an hour in advance. Wrap it in cling film and keep it at room temperature until you’re ready to grill.
- Storage: Honestly, this is one recipe that doesn’t do well with leftovers. It will lose its crispness upon refrigeration. If you must, you can store it in an airtight container in the fridge for a day and reheat it in a dry frying pan or an air fryer to try and revive the crunch.
Common Mistakes to Avoid
- Using Too Much Heat: A scorched exterior with a cold centre is the result of a pan that’s too hot. Keep the flame on medium-low for a gentle, even cook that perfectly melts the interior while crisping the bread.
- Using Thin Bread: Your standard sliced loaf might not hold up to the fillings and the grilling process. Opt for a sturdy, thick-cut bread like bloomer, sourdough, or brioche that can contain the melted centre without falling apart.
- Overfilling the Sandwich: It’s tempting to load up on peanut butter and jam, but too much filling will ooze out the sides, making a mess in your pan and causing it to burn. A balanced ratio is key.
Delicious Variations to Try
Once you’ve mastered the classic, this recipe is a brilliant base for experimentation. Here are a few variations we love in my house:
- The ‘Elvis’ Inspired: Add a few slices of ripe banana and a sprinkle of cinnamon to the sandwich before grilling. For a truly decadent version, add a slice or two of cooked bacon.
- Nut Butter Twist: Swap the peanut butter for almond butter, cashew butter, or even a chocolate-hazelnut spread for a different flavour profile.
- Fruity and Fancy: Instead of standard jam, try using fig preserves, apricot jam, or a sharp orange marmalade. A thin layer of cream cheese alongside the jam also adds a wonderful tangy flavour.
What to Serve With Your Peanut Butter and Jelly Sandwich
While this grilled sandwich is a satisfying meal on its own, a few simple pairings can round it out beautifully. If you’re planning lunches for the week, you could follow this up with other straightforward ideas like my Bruschetta Chicken or some flavour-packed Sticky Chicken Rice Bowls.
- A Simple Soup: A small bowl of creamy tomato soup is a classic partner. Its acidity cuts through the richness of the sandwich wonderfully.
- Crisps and Pickles: A handful of good quality sea salt crisps and a sharp dill pickle on the side provide a great crunchy and tangy contrast.
- A Glass of Cold Milk: Sometimes, the simplest pairings are the best. A tall glass of cold milk is the perfect nostalgic and refreshing drink to wash it all down.
Frequently Asked Questions
Grilled Peanut Butter and Jelly Sandwich
Ingredients
Method
- Prep Your Bread: Lay your two slices of bread on a clean work surface or chopping board.
- Spread the Fillings: Spread the peanut butter evenly over one slice of bread, going right to the edges. On the other slice, spread your jam. What works best for me is creating a small 'dam' of peanut butter around the edge of the jam slice to keep it from spilling out in the pan.
- Assemble the Sandwich: Carefully place the two slices together to form your sandwich. Press down gently to secure it.
- Butter the Outside: Using a butter knife, spread half of the softened butter (about 7-8g) over the top surface of the sandwich. Make sure you get an even layer that covers the entire slice.
- Begin Grilling: Place a non-stick frying pan over a medium-low heat. Carefully place the sandwich in the pan, buttered-side down.
- Butter the Other Side: While the first side is cooking, spread the remaining softened butter over the upward-facing side of the sandwich.
- Cook to Perfection: Let the sandwich cook for 3-4 minutes on the first side, until the bread is a deep golden brown and crisp. You can check by gently lifting a corner with a spatula.
- Flip and Finish: Carefully flip the sandwich over using a spatula. Cook for another 3-4 minutes on the second side, until it’s equally golden and the fillings are warm and melted. I like to press down gently with the spatula for a few seconds after flipping.
- Serve Immediately: Remove the sandwich from the pan, slice it in half diagonally (it just tastes better that way!), and serve immediately while it’s warm and gooey. A tiny sprinkle of sea salt flakes on top can really make the flavours pop.
Notes
I do hope you’ll give this elevated version of a Peanut Butter and Jelly Sandwich a try. It’s proof that sometimes the most familiar foods can be made new and exciting again with just a little extra care. It’s a recipe that never fails to bring a smile to my face, and I hope it does the same for you. Let me know in the comments how yours turns out!
Happy cooking,
Sara Gomez