Gluten Free Pancakes Fluffy Breakfast
There’s a special kind of magic to a slow weekend morning, punctuated by the gentle sizzle of batter hitting a hot pan. For years, I struggled to recreate that magic after switching to a gluten-free diet. The pancakes were often dense, a bit gritty, or just didn’t have that satisfying fluffiness I craved. That all changed when I finally landed on this recipe. I’ve been making these gluten free pancakes for over 3 years, and they never disappoint; they are genuinely light, airy, and so flavourful that no one ever guesses they’re free from gluten.
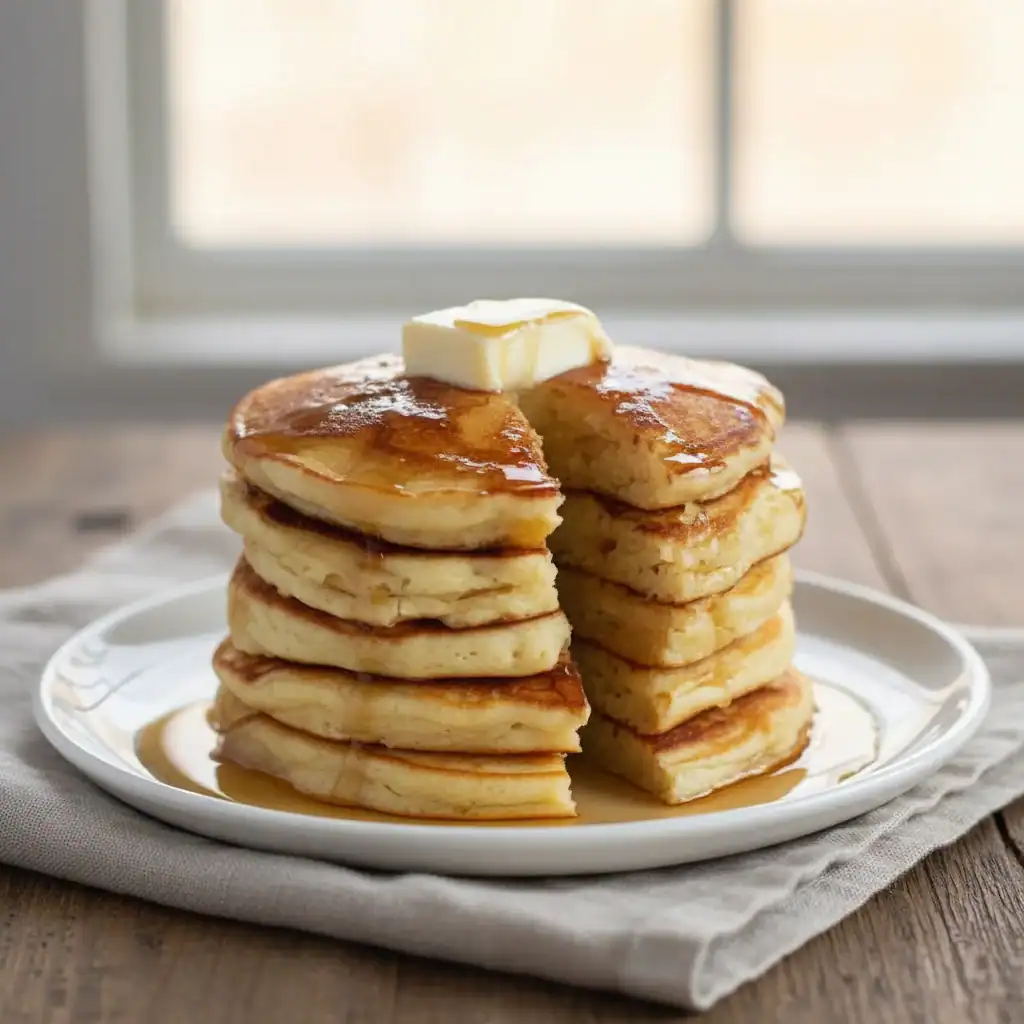
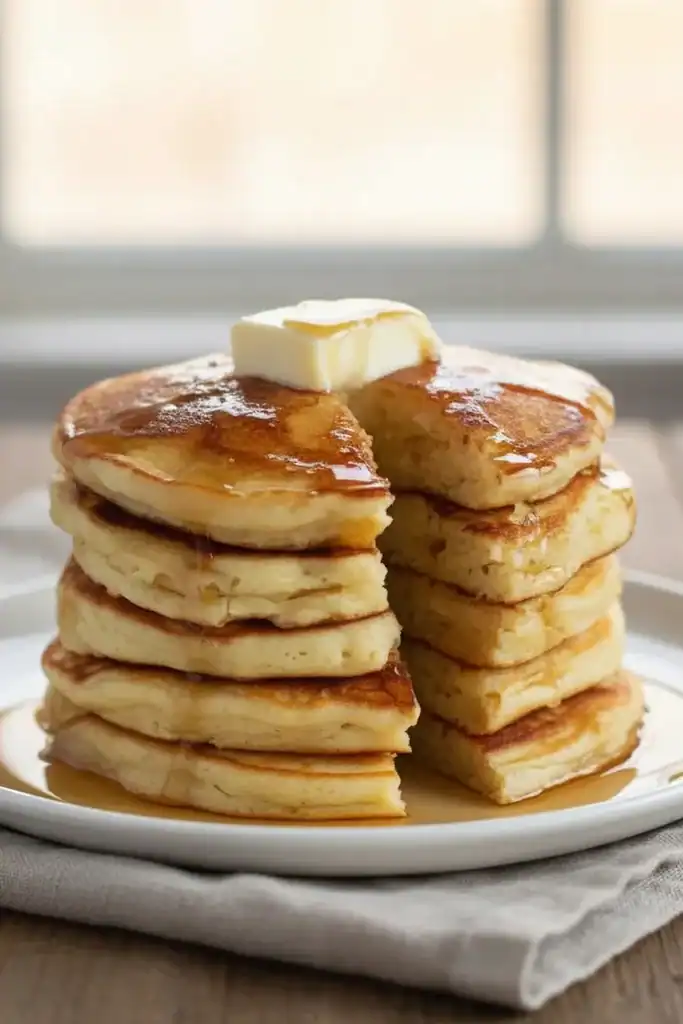
What makes this particular recipe so special is the texture. We use a combination of buttermilk and a good quality gluten-free flour blend which works together to create a tender crumb and a beautiful rise. They puff up gloriously in the pan, developing golden, slightly crisp edges while the inside remains pillowy soft. The flavour is subtle and comforting, with a gentle tang from the buttermilk and a whisper of vanilla, making them the perfect canvas for a knob of melting butter and a generous pour of maple syrup.
This recipe is for anyone who believes that dietary requirements shouldn’t mean compromising on taste or texture. It works beautifully for a lazy Sunday brunch, a special breakfast treat for the family, or even a comforting ‘breakfast for dinner’ situation. After a week of making wholesome meals like my popular Lemon Garlic Chicken, this feels like a well-deserved indulgence.
Recipe Overview
This recipe delivers a stack of classic, American-style gluten free pancakes that are impressively fluffy and tender. The flavour is rich and slightly tangy, thanks to the buttermilk, which also helps to create that wonderfully soft texture. The key is allowing the batter to rest for just five minutes; I’ve tested it without resting, and the difference is remarkable—this short pause allows the gluten-free flours to fully absorb the liquid, resulting in a much better rise and a smoother consistency.
- Prep Time: 10 minutes
- Cook Time: 15 minutes
- Total Time: 25 minutes
- Servings: Makes 8-10 pancakes (serves 3-4 people)
- Difficulty: Easy
Why You’ll Love These Gluten Free Pancakes
- Authentic Pancake Texture: These aren’t dense or heavy. They are genuinely light and airy with a lovely, soft crumb, completely avoiding the gritty texture that can plague some gluten-free bakes.
- Ready in Under 30 Minutes: The batter comes together in a few minutes, and the cooking is swift. You can have a warm stack on the table in about 25 minutes, making it ideal for hungry mornings.
- A Truly Flexible Recipe: The base recipe is wonderful as it is, but it’s also easy to adapt. You can stir through a handful of chocolate chips, fresh blueberries, or add a teaspoon of cinnamon to the dry ingredients for a different twist.
- Great for a Weekend Brunch: This is my go-to when we have guests for the weekend. It feels like a special treat, and everyone seems to love this recipe, whether they eat gluten-free or not.
- Family Tested and Approved: My children are my toughest critics, and they adore these pancakes. They consistently choose them over regular ones, which I consider the highest form of praise!
Ingredients You’ll Need
The quality of your gluten-free flour blend really matters here. I get consistently great results with Doves Farm Freee Plain White Flour blend, as it contains a balanced mix of flours and xanthan gum which helps provide structure. If you use a different blend, ensure it contains a binder like xanthan or guar gum.
- 200g gluten-free plain flour blend (one that contains xanthan gum)
- 2 tbsp caster sugar
- 2 tsp baking powder
- ½ tsp bicarbonate of soda
- ¼ tsp salt
- 280ml buttermilk
- 1 large free-range egg, lightly beaten
- 30g unsalted butter, melted, plus extra for the pan
- 1 tsp vanilla extract
Sara’s Tip: If you don’t have buttermilk, you can easily make your own! Simply add 1 tablespoon of lemon juice or white vinegar to 280ml of whole milk, give it a quick stir, and let it sit for 5-10 minutes until it looks slightly curdled. It works just as well.
How to Make Gluten Free Pancakes
The process for making these pancakes is very straightforward. The most important step is not to over-mix the batter and to give it that short but essential resting time. This ensures the flours hydrate properly for the fluffiest result.
- Combine Dry Ingredients: In a large mixing bowl, add the gluten-free flour, caster sugar, baking powder, bicarbonate of soda, and salt. Use a whisk to combine them thoroughly, which helps distribute the raising agents evenly.
- Mix Wet Ingredients: In a separate jug or bowl, whisk together the buttermilk, the lightly beaten egg, the melted butter, and the vanilla extract until just combined.
- Create the Batter: Pour the wet ingredients into the bowl with the dry ingredients. Use the whisk to mix them together until they are just incorporated. Be careful not to over-mix; a few small lumps in the batter are perfectly fine.
- Rest the Batter: This is a crucial step! Let the batter stand at room temperature for 5-10 minutes. What works best for me is using this time to get my pan ready and gather my toppings. You’ll notice the batter thickens slightly as it rests.
- Heat Your Pan: Place a large, non-stick frying pan or griddle over a medium heat. Once it’s hot, add a small knob of butter and let it melt and sizzle, swirling it to coat the base of the pan.
- Cook the Pancakes: Ladle about 2-3 tablespoons of batter per pancake into the hot pan, leaving some space between each one. Cook for 2-3 minutes on the first side, or until you see small bubbles appearing on the surface and the edges look set.
- Flip and Finish: Carefully flip the pancakes using a thin spatula and cook for another 1-2 minutes on the other side, until they are golden brown and cooked through.
- Keep Warm and Serve: Transfer the cooked pancakes to a plate and keep them warm (you can place them in a low oven) while you cook the remaining batter, adding a little more butter to the pan for each batch. Serve immediately with your favourite toppings.
Tips From My Kitchen
- Master Your Temperature Control: The pan should be at a steady medium heat. If it’s too hot, the outside of the pancakes will burn before the inside is cooked. Too cool, and they won’t get that lovely golden colour or fluffy rise. A small test pancake can help you find the sweet spot.
- The Secret to Tenderness: I learned that vigorously mixing the batter is a sure way to get tough pancakes, even without gluten. Gently folding the wet and dry ingredients until just combined is the key. Lumps are your friend!
- Make-Ahead Method: You can mix the dry ingredients together and store them in an airtight container for weeks. When you’re ready for pancakes, just add the wet ingredients, rest the batter, and cook. This makes morning prep even faster.
- Storing and Reheating: Leftover pancakes can be stored in an airtight container in the fridge for up to 3 days. To reheat, you can pop them in the toaster for a minute, or warm them in a dry frying pan. They also freeze beautifully between layers of greaseproof paper.
Common Mistakes to Avoid
- Overcrowding the pan: It’s tempting to fit as many pancakes in the pan as possible, but this lowers the temperature and causes them to steam rather than fry. They won’t brown properly and can end up with a soggy texture. Cook in batches of two or three for the best results.
- Having the heat too high: A common error is a pan that’s smoking hot. This will cook the exterior far too quickly, leaving you with a raw, gummy centre. A consistent, medium heat is essential for cooking them all the way through.
- Skipping the rest time: With gluten-free flours, this step is non-negotiable. It allows the starches in the flour to absorb the liquid, which is critical for achieving a soft, fluffy texture and preventing any grittiness. Don’t skip it!
Delicious Variations to Try
While the classic pancake is hard to beat, it’s always fun to experiment. Here are a few variations that work wonderfully with this gluten-free pancake recipe.
- Chocolate Chip Pancakes: After ladling the batter into the pan, scatter a tablespoon of your favourite chocolate chips over the top of each pancake before flipping.
- Vegan & Dairy-Free Option: This recipe adapts well. Use a flax egg (1 tbsp ground flaxseed + 3 tbsp water), swap the buttermilk for a plant-based version (as described in my tip above, using almond or soya milk), and use dairy-free butter or coconut oil.
- Fruity Pancakes: Gently fold about 100g of fresh blueberries or sliced banana into the batter just before cooking for pockets of juicy fruit throughout. If you’re looking for other fruit-inspired meal ideas, my Bruschetta Chicken is a fantastic savoury option.
What to Serve With Gluten Free Pancakes
The beauty of pancakes lies in the toppings! You can keep it simple or go all out. Here are some of our favourite combinations.
- The Classic Stack: You simply cannot go wrong with a generous knob of salted butter melting over the warm stack, finished with a liberal drizzle of pure maple syrup.
- Fresh and Fruity: A handful of fresh raspberries and blueberries, a dollop of thick Greek yoghurt, and a drizzle of honey offers a lovely balance of sweetness and tang.
- Weekend Indulgence: For a more decadent treat, try sliced bananas, a spoonful of Nutella or chocolate sauce, and a sprinkle of chopped toasted nuts. For a savoury dinner later, my Sticky Chicken Rice Bowls would be a great contrast.
- Drink Pairing: A freshly brewed coffee or a strong cup of tea is the ideal companion. For children (and adults!), a glass of cold milk or fresh orange juice works perfectly.
Frequently Asked Questions
Gluten Free Pancakes
Ingredients
Method
- Combine Dry Ingredients: In a large mixing bowl, add the gluten-free flour, caster sugar, baking powder, bicarbonate of soda, and salt. Use a whisk to combine them thoroughly, which helps distribute the raising agents evenly.
- Mix Wet Ingredients: In a separate jug or bowl, whisk together the buttermilk, the lightly beaten egg, the melted butter, and the vanilla extract until just combined.
- Create the Batter: Pour the wet ingredients into the bowl with the dry ingredients. Use the whisk to mix them together until they are just incorporated. Be careful not to over-mix; a few small lumps in the batter are perfectly fine.
- Rest the Batter: This is a crucial step! Let the batter stand at room temperature for 5-10 minutes. What works best for me is using this time to get my pan ready and gather my toppings. You'll notice the batter thickens slightly as it rests.
- Heat Your Pan: Place a large, non-stick frying pan or griddle over a medium heat. Once it's hot, add a small knob of butter and let it melt and sizzle, swirling it to coat the base of the pan.
- Cook the Pancakes: Ladle about 2-3 tablespoons of batter per pancake into the hot pan, leaving some space between each one. Cook for 2-3 minutes on the first side, or until you see small bubbles appearing on the surface and the edges look set.
- Flip and Finish: Carefully flip the pancakes using a thin spatula and cook for another 1-2 minutes on the other side, until they are golden brown and cooked through.
- Keep Warm and Serve: Transfer the cooked pancakes to a plate and keep them warm (you can place them in a low oven) while you cook the remaining batter, adding a little more butter to the pan for each batch. Serve immediately with your favourite toppings.
Notes
I truly hope you and your family enjoy this recipe for gluten free pancakes as much as we do. They are a staple in our home for a reason and proof that eating gluten-free can be absolutely delicious. I’d love to hear how they turn out for you, so please feel free to leave a comment below with your favourite toppings! Happy cooking! – Sara


