Fudgy & Easy Turtle Brownies From Scratch
Do you ever find yourself fantasising about the perfect brownie? We’re talking about a truly decadent bake, one that’s impossibly gooey and so bursting with flavour that it makes the world pause for a moment. A confection that beautifully blends the intensity of dark chocolate with luscious streams of caramel and the wonderful bite of toasted pecans. It’s the kind of dessert that forges new memories and turns any ordinary day into a celebration.
Well, your fantasy is about to become a reality! We are here to prove that this supreme indulgence is not just within reach, but is also remarkably straightforward to whip up in your own kitchen. Let’s move beyond bland box mixes and their disappointing results. We will walk you through, step by step, the process of baking the most magnificent and easy turtle brownies from scratch. Get ready to be crowned the baking champion of your home.
What Exactly Are Turtle Brownies?
Before we roll up our sleeves and get baking, let’s explore what gives these brownies their special status. The name “Turtle” is a nod to the classic American confectionery, Turtle sweets, which famously combine pecans and caramel all enrobed in chocolate. Our recipe honours that iconic trio and elevates it to an entirely new plane of deliciousness.
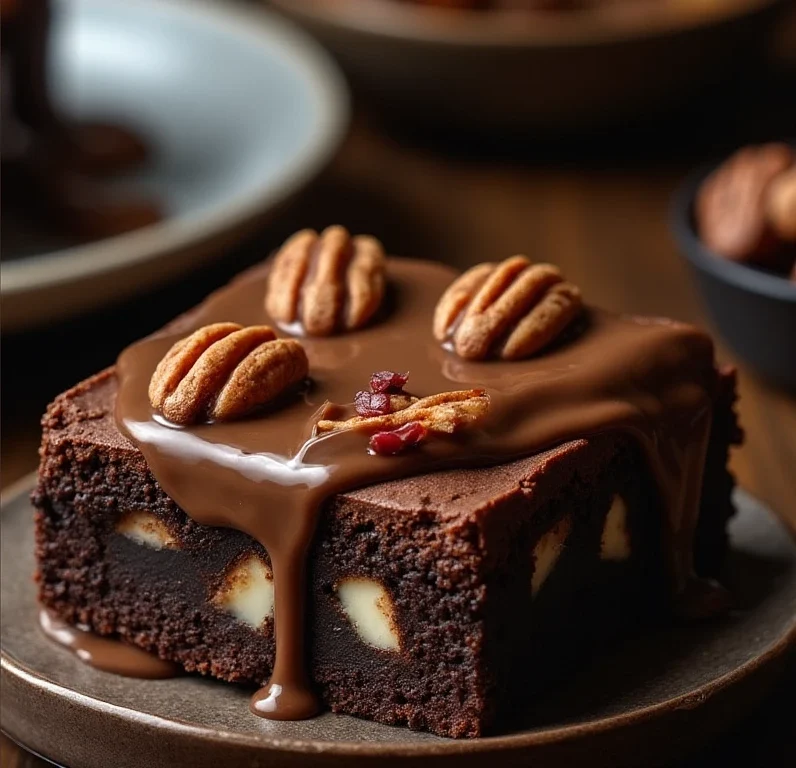
Picture this: a foundation of deep, dark, and intensely fudgy brownie, crafted with real chocolate for an unparalleled taste. This base is then crowned with a lavish, gooey blanket of molten caramel, which is then scattered with perfectly toasted pecans for a delightful nutty crunch. To complete the masterpiece, we add the remaining brownie batter on top, which creates a stunning marbled finish with pockets of caramel peeking through. They are a true symphony of texture and flavour, and making them from scratch gives us complete control over quality, ensuring we strike the perfect sweet-and-salty balance.
Why You’ll Adore This Homemade Brownie Recipe
We’re well aware that the internet is filled with countless brownie recipes, but we are confident that this one is a true treasure. It’s our go-to recipe whenever we need a bake that is guaranteed to impress. Here is why we’re certain you will fall for it as well:
- Incredibly Fudgy Texture: These are the complete antithesis of dry, cake-like brownies. By using melted chocolate and a carefully measured amount of flour, we achieve a dense, moist, and wonderfully gooey brownies recipe that is simply divine.
- The Perfect Flavour Combination: The harmony between rich chocolate, sweet-salty caramel, and earthy pecans is sublime. Every single bite offers a complex and deeply satisfying experience.
- Surprisingly Simple to Make: While the layered appearance looks incredibly sophisticated, we have streamlined the method into steps that are simple to follow. You won’t need any specialised gadgets or expert baking knowledge!
- Wow-Factor Guaranteed: Whether you are taking them along to a potluck, presenting them as a dessert, or simply indulging yourself, these turtle brownies are always a hit. They are as visually stunning as they are delicious.
Essential Ingredients for Your Turtle Brownies
We believe the foundation of any brilliant bake is the calibre of its ingredients. For the most exceptional flavour and texture, we advocate using high-quality components, particularly for the chocolate. Here is a breakdown of what we will need for each layer.
For the Fudgy Brownie Base:
- Unsalted Butter: This imparts richness, flavour, and contributes to that all-important fudgy consistency.
- Dark Chocolate: We suggest a quality bar with 60-70% cocoa solids for a profound, complex chocolate taste that avoids being overly sweet.
- Caster Sugar & Light Brown Sugar: Using both yields the best texture. Caster sugar helps form that signature shiny, crackly crust, while brown sugar adds moisture and a subtle caramel note.
- Eggs: Essential for binding the batter, providing structure, and adding richness. Always use large, free-range eggs that are at room temperature.
- Vanilla Extract: A vital component that deepens and complements all the other flavours in the bake.
- Plain Flour: We use just enough to provide structure to the brownies, preventing them from becoming too cakey.
- Unsweetened Cocoa Powder: This introduces an additional layer of intense chocolate flavour.
- Salt: Just a small pinch is needed to balance the sweetness and intensify the chocolate notes.
For the Gooey Caramel Pecan Layer:
- Soft Caramels: To keep this recipe wonderfully simple, we opt for shop-bought soft, chewy caramels. Unwrapping them takes a moment, but it’s far quicker than preparing caramel from scratch.
- Double Cream: This is gently melted with the caramels to form a smooth, pourable, and utterly glorious gooey sauce.
- Pecans: The star of the show! We highly recommend toasting them beforehand to enhance their fantastic flavour and satisfying crunch.
- Flaky Sea Salt: A generous pinch stirred through the caramel sauce beautifully cuts through the sweetness and elevates the entire dessert.
Step-by-Step Instructions: Making Easy Turtle Brownies from Scratch
Are you ready to begin your baking adventure? Let’s get started. By following these steps with care, you’ll be rewarded with the most decadent brownies you can imagine.
- Preparation is Key: To begin, preheat your oven to 180°C (160°C Fan / Gas Mark 4). Grease and line a 9×9 inch (23×23 cm) square baking tin with parchment paper, allowing it to overhang on two sides. This creates a “sling” that will make lifting the brownies out later a breeze. Arrange your pecans on a baking sheet and toast them in the oven for 5-7 minutes, or until they become fragrant. Watch them carefully to ensure they don’t burn! Let them cool before roughly chopping them.
- Create the Fudgy Brownie Batter: In a medium-sized, heatproof bowl placed over a saucepan of simmering water (a bain-marie), melt the butter with the chopped dark chocolate. Stir the mixture until it is completely smooth, then take it off the heat to cool slightly. Into the cooled chocolate, whisk in the caster sugar and light brown sugar. Next, add the eggs one by one, whisking thoroughly after each, before stirring in the vanilla extract.
- Combine Dry and Wet Ingredients: In a separate bowl, sift the plain flour, cocoa powder, and salt together. Using a spatula, gently fold these dry ingredients into the wet chocolate mixture. Take care not to overmix; you should stop as soon as the flour streaks disappear. Overmixing will develop the gluten and result in tougher brownies.
- Assemble the First Layer: Pour approximately half of the brownie batter into your prepared tin. Use an offset spatula or the back of a spoon to guide it into an even layer that reaches every corner.
- Prepare the Caramel-Pecan Filling: In a small saucepan set over a low heat, melt the unwrapped soft caramels with the double cream. Stir constantly until the caramels have fully dissolved and the sauce is perfectly smooth. Take the pan off the heat and stir in your chopped, toasted pecans along with a generous pinch of flaky sea salt.
- Layer Up! Gently pour the warm caramel-pecan mixture over the brownie batter in the tin. Spread it out carefully, ensuring you leave a small border around the edges of the tin.
- Add the Final Brownie Layer: Spoon dollops of the remaining brownie batter across the caramel layer. You do not need to cover it fully; it is lovely to see some of the caramel peeking through. With a knife or a skewer, gently swirl the top batter into the caramel to create a beautiful marbled pattern. Finish by sprinkling a few more chopped pecans and another touch of sea salt over the top.
- Bake to Perfection: Place in the oven and bake for 30-35 minutes. The edges should look set, while the centre should retain a slight wobble. If you insert a skewer into the middle, it should emerge with moist, fudgy crumbs, not wet batter. For these chocolate caramel brownies, it is always better to slightly underbake them than to overbake.
- The All-Important Cooling: We know this is the most challenging part! You must allow the brownies to cool entirely in the tin, first on a wire rack at room temperature, and then in the fridge for at least one hour. This step is crucial for the caramel to set properly, which is what allows you to cut neat, attractive slices. If you rush this stage, you’ll have a gooey (though still delicious) mess.
Watch and Learn: A Visual Guide to Making Turtle Brownies
Sometimes, a visual demonstration makes all the difference! To help you picture every stage of the recipe, we’ve sourced an excellent video tutorial that shows you how to make perfect turtle brownies from scratch. Seeing the techniques for layering and swirling can be especially useful if it’s your first time.https://www.youtube.com/embed/S2Y2d5aYtps
Pro Tips for the Best Turtle Brownies Every Time
We have baked these brownies more times than we can count, and we’ve gathered a few handy tricks over the years. Keep these pointers in mind to achieve flawless results.
- Don’t Overbake: We simply cannot say this enough. The secret to a truly fudgy texture is a centre that is slightly underbaked. The brownies will continue to cook and firm up from the residual heat as they are left to cool.
- Use Quality Ingredients: The final taste of your pecan brownies is profoundly influenced by the quality of your chocolate and cocoa powder. It really is worth spending a little more for a deeper, more gratifying flavour.
- Toast Your Nuts: Please don’t be tempted to skip this step! Toasting pecans significantly intensifies their nutty taste and gives them a superior crunch. For an excellent tutorial on this, have a look at this article on how to toast nuts from King Arthur Baking.
- The Parchment Paper Sling: Creating that overhang with your parchment paper is a total game-changer. It enables you to lift the entire slab of brownies from the tin with minimal effort once they have cooled.
- Patience is a Virtue (Especially for Slicing): To get those perfect, clean-cut squares, it is absolutely essential that they are chilled first. Use a large, sharp knife, and for impeccably clean slices, run the blade under hot water and wipe it dry before each cut.
Customisations and Variations
While we happen to think this recipe for homemade brownies is sheer perfection as is, it also serves as a brilliant canvas for your own creativity. Here are some of our favourite ideas:
- Nut Swaps: If pecans aren’t your thing, walnuts or even toasted almonds would make a wonderful and delicious alternative.
- Chocolate Choices: Consider adding a cupful of milk chocolate or white chocolate chips into the batter for extra pockets of melted goodness. If you enjoy the classic pairing of coconut and chocolate, you might also love our Almond Joy Cookie Recipe.
- Spice it Up: A teaspoon of espresso powder added to the brownie batter will enhance the chocolate flavour beautifully, while a pinch of cinnamon can introduce a lovely, warming spice.
Storage and Make-Ahead Instructions
These brownies are so delightful they probably won’t be around for very long, but should you find yourself with leftovers, here is the best way to store them:
- At Room Temperature: Keep the brownies in an airtight container at room temperature, where they will stay fresh for up to 4 days.
- In the Freezer: For longer-term storage, they freeze exceptionally well. We suggest slicing them first, then wrapping each brownie individually in cling film before placing them in a freezer-safe bag. They can be frozen for up to 3 months. Just thaw them at room temperature when you’re ready to enjoy one.
Frequently Asked Questions (FAQ)
Can I use a box brownie mix for this recipe?
While you certainly can, we find the flavour and texture won’t be as rich or fudgy as when you make them from scratch. If you’re pressed for time, you can prepare a 9×9 inch tin of box mix brownies following the packet instructions. However, be sure to follow our layering method: bake half the batter, add the caramel-pecan layer, top with the rest of the batter, and then bake until done.
Why did my caramel layer sink to the bottom?
This typically occurs when the bottom layer of brownie batter isn’t sufficiently set before the heavy caramel filling is added. That initial short bake time is vital for building a stable base. Make sure the first layer is just set on top before you pour over the caramel.
What’s the best way to cut turtle brownies cleanly?
The secret here is twofold: they must be completely cool, and you need a hot knife. The brownies need to be thoroughly chilled – a couple of hours in the fridge works perfectly. Then, take a large, sharp chef’s knife. Run its blade under hot water from the tap, quickly wipe it dry with a tea towel, and then make a single, clean slice. Repeat this process of heating and wiping the knife for every single cut. It requires a little extra effort, but it’s well worth it for those professional-looking squares.
Can I make these brownies gluten-free?
Yes! This recipe can be easily adapted to be gluten-free. All you need to do is substitute the plain flour with a high-quality, 1-to-1 gluten-free baking flour blend that includes xanthan gum. The remainder of the recipe stays exactly the same.
Conclusion: Your New Favourite Indulgent Treat
And there we have it—your complete guide to creating the most decadent, fudgy, and downright delicious turtle brownies from the comfort of your own kitchen. We’ve demonstrated that making something truly spectacular doesn’t need to be difficult. With excellent ingredients and a little bit of patience (especially when it comes to cooling!), you can easily master these amazing bakes.
The pure joy of pulling a tin of these warm, chocolate-scented brownies from the oven is surpassed only by the delight of sharing them with the people you care about. We are so excited for you to have that experience. We would be thrilled to see your own creations, so please don’t hesitate to leave a comment below to let us know how you got on!
And if this recipe has put you in the mood for more wonderful baking adventures, why not try our famous Blueberry Heaven Cookies The Definitive Recipe For Soft Chewy Perfection next? Happy baking!


