Fruity Pebbles Cheesecake Tacos: A Fun and Flavourful Recipe
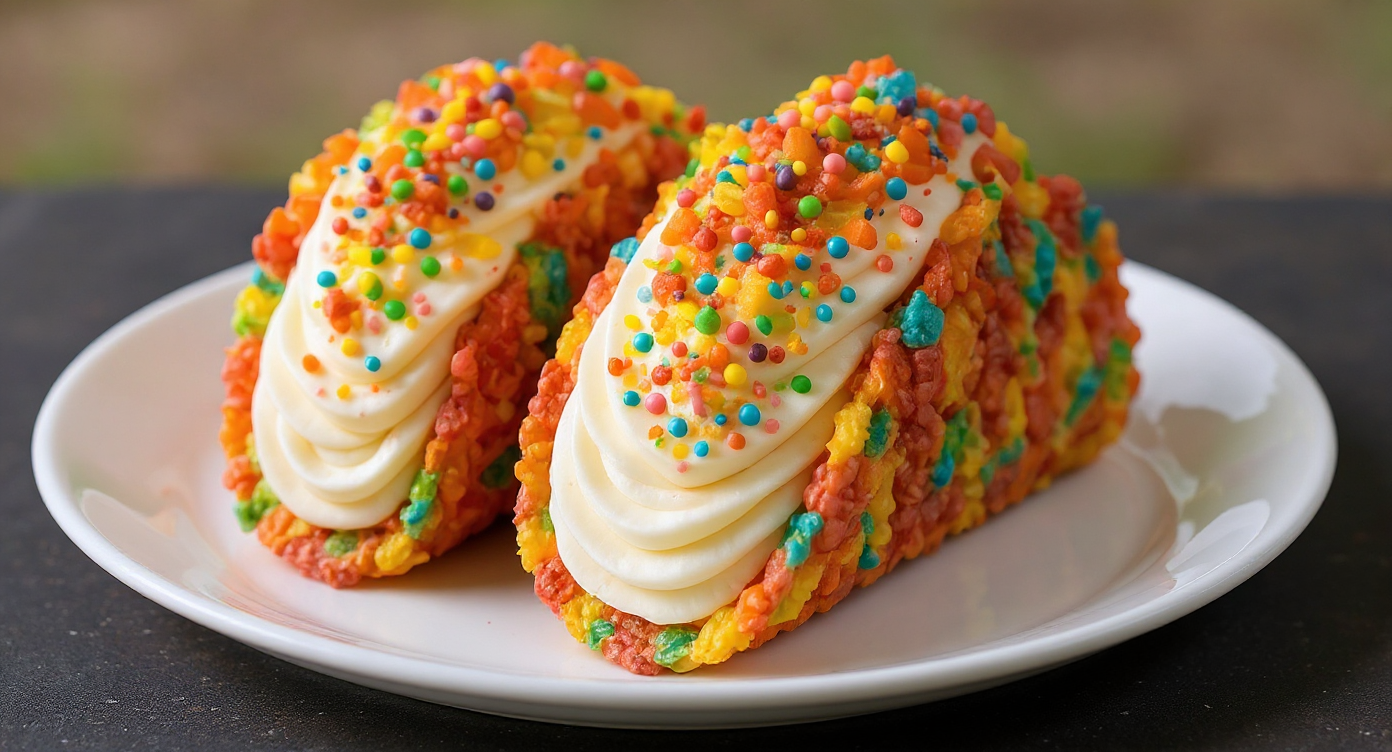
Are you on the hunt for a dessert that radiates colour, evokes fond memories, and offers a divinely creamy texture? A treat that is just as enjoyable to create as it is to eat? If this sounds like what you’re after, we have the ideal recipe waiting for you. Prepare to unite a cherished breakfast cereal from your childhood with the sophisticated tang of cheesecake, all in a fun, easy-to-hold taco. We are, of course, referring to the spectacular Fruity Pebbles Cheesecake Tacos!
This vivid dessert has taken social media by storm, and for good reason. It masterfully combines a crunchy, sweet, multicoloured cereal shell with a decadent, velvety no-bake cheesecake filling. It is a wonderfully playful creation that captivates everyone from children to adults, positioning it as the perfect showstopper for parties, family get-togethers, or even a simple weeknight when you fancy a little lift. Come along with us as we walk you through each straightforward step to craft these memorable treats right in your own home.
What Exactly Are Fruity Pebbles Cheesecake Tacos?
Picture a traditional crispy cereal bar, but in place of standard puffed rice, we incorporate the legendary, rainbow-hued Fruity Pebbles cereal. We then shape this wonderfully sticky and sweet concoction into a taco shell form. After it cools and sets into a perfectly crisp container, we load it generously with a rich and creamy no-bake cheesecake filling. The outcome is a fantastic interplay of textures and tastes. You experience the recognisable fruity crispness of the shell, which gives way to the cool, zesty smoothness of the cheesecake. It’s a genuinely creative and tasty spin on multiple classic desserts, all conveniently combined into one handheld delight.
Why You’ll Absolutely Love This Recipe
We are quite certain this will soon be one of your go-to creative dessert ideas. Aside from its amazing flavour and stunning visual appeal, there are numerous reasons to become completely smitten with this recipe:
- No-Bake Brilliance: You won’t need to switch on your oven for a single moment! This makes it a superb dessert for the warmer seasons, or any time you want a hassle-free treat without the lengthy bake and cool-down periods of a conventional cheesecake.
- A Feast for the Eyes: Let’s be candid, these tacos are gorgeous. The lively, multicoloured shells are exceptionally photogenic and are sure to impress anyone you serve them to. They are an instant party success!
- Childhood Nostalgia in Every Bite: The unmistakable taste of Fruity Pebbles cereal has the power to take you right back to blissful childhood mornings. Sharing these with your nearest and dearest is a lovely way to spread a bit of joy and nostalgia.
- Surprisingly Simple to Make: Although they look rather impressive, the actual process is remarkably simple. We have broken down each stage into clear, manageable steps, making it an ideal recipe for bakers of every experience level.
Essential Ingredients and Equipment
Before we begin, let’s get our equipment and ingredients in order. The list is remarkably concise, and you probably have a lot of these things in your cupboards already. We have divided the ingredients for the shells and the filling to ensure everything is clear and organised.
For the Fruity Pebbles Taco Shells
- Butter: We use 4 tablespoons (about 55g) of unsalted butter to melt with the marshmallows.
- Mini Marshmallows: You will need one 280g bag. Mini marshmallows melt more quickly and evenly than larger ones.
- Fruity Pebbles Cereal: The star of the show! We need 6 cups (about 170g) to get that signature crunch and colour.
For the No-Bake Cheesecake Filling
- Full-Fat Cream Cheese: Two 225g blocks, softened to room temperature. This is crucial for a smooth, lump-free filling.
- Icing Sugar: 1 cup (about 120g), sifted to remove any lumps.
- Double Cream: 1 cup (240ml), very cold. This helps it whip up to create a light, airy texture.
- Vanilla Extract: 1 teaspoon for a classic, aromatic flavour.
Essential Kitchen Tools
- A large, non-stick saucepan
- A large mixing bowl
- A silicone spatula
- An electric hand mixer or stand mixer
- A taco shell mould, or a straightforward DIY option (which we will detail further on!)
- A piping bag with a star nozzle (this is optional, used for a more decorative look)
Step-by-Step Guide to Making Fruity Pebbles Cheesecake Tacos
And now, for the most enjoyable part! Follow our comprehensive instructions to craft your very own batch of these wonderful Fruity Pebbles treats. Do bear in mind that you’ll need to work swiftly when forming the shells, as the marshmallow mixture starts to firm up as it loses heat.
- Prepare Your Workspace and Moulds: If using a taco mould, lightly grease it with butter or a neutral cooking oil spray. If you don’t have one, don’t fret! You can create the taco shape by draping squares of baking parchment over the spine of a book or the rear of a muffin tray. Ensure the parchment is well-greased.
- Melt the Marshmallow Mixture: In your large saucepan over a low heat, melt the butter. Once it has completely liquefied, add the whole bag of mini marshmallows. Stir constantly with your spatula until the marshmallows have fully melted and the mixture is silky smooth. Take it off the heat straight away to prevent it from catching.
- Combine with Cereal: Tip the Fruity Pebbles cereal into the molten marshmallow. Swiftly but gently, fold everything together until all the cereal is evenly coated.
- Shape the Taco Shells: This stage requires you to be quick! Grease your hands with a small amount of butter or oil to stop the mixture sticking. Take a portion of the warm cereal mix (around 1/4 to 1/3 of a cup) and flatten it into a thin, even circle on a sheet of greased parchment. Gently lift the circle and lay it over your prepared taco mould or homemade shaper. Press it lightly into the taco form. Continue with the rest of the mixture.
- Let the Shells Cool: Leave the shells to cool completely at room temperature for a minimum of 30-45 minutes. They will become firm and crisp as they set.
- Whip Up the Cheesecake Filling: While the shells are cooling, we can prepare our easy no-bake cheesecake recipe. In a large bowl, use an electric mixer to beat the softened cream cheese until it is perfectly smooth and creamy. Mix in the sifted icing sugar and vanilla extract, beating again until thoroughly combined.
- Fold in the Cream: In a separate, chilled bowl, whip the cold double cream until it forms stiff peaks. Take care not to overmix it. Gently fold about a third of this whipped cream into the cream cheese base to lighten it. Then, incorporate the rest of the whipped cream, folding until it is just combined and no white streaks are visible. For additional guidance on getting the ideal texture, you can consult expert resources like this one from BBC Good Food on making no-bake cheesecakes.
- Assemble Your Tacos: Once the shells have firmed up, carefully take them out of their moulds. Put your cheesecake filling into a piping bag fitted with a star nozzle (or just use a spoon). Pipe or spoon a generous amount of filling into each Fruity Pebbles taco shell.
- Chill and Serve: For the optimal flavour and texture, put the assembled tacos into the fridge to chill for at least 30 minutes. This helps the filling to set a little more firmly. Right before serving, you could garnish them with an extra sprinkle of Fruity Pebbles for more colour and crunch!
Pro Tips for Perfect Dessert Tacos Every Time
We are keen for your Fruity Pebbles Cheesecake Tacos to be a spectacular success. Bear these straightforward tips in mind to sidestep common issues and guarantee a perfect outcome.
- Grease, Grease, Grease: The marshmallow concoction is extraordinarily sticky. The secret to a tidy and stress-free shaping experience is to liberally grease your hands, spatula, and moulds.
- Don’t Press Too Hard: When folding the cereal into the marshmallows, be gentle. If you end up crushing the cereal, you will lose some of that lovely colour and distinctive crunch.
- Room Temperature is Key: For the filling, it is non-negotiable that your cream cheese is at room temperature. Chilled cream cheese will lead to a lumpy filling that no amount of beating can rescue.
- Chill the Filling Before Piping: If your kitchen is on the warmer side, the cheesecake filling may become a little soft. Placing it in the fridge for 15-20 minutes before piping can make it significantly easier to manage.
Fun Variations to Try
One of the finest qualities of this recipe is its versatility. After you have perfected the fundamental version, we encourage you to get creative! Here are several ideas to spark inspiration for your next creation:
Different Cereals
There’s no need to restrict yourself to just Fruity Pebbles! This method is wonderfully effective with a variety of other cereals. Consider making shells with:
- Cocoa Pebbles or Cocoa Krispies: For a rich, chocolatey shell that pairs beautifully with the tangy filling.
- Cinnamon Toast Crunch: For a warm, spiced shell that’s perfect for autumn.
- Lucky Charms: For a fun twist, just be mindful of the marshmallow charms!
Creative Fillings
While the no-bake cheesecake filling is a classic choice, you can easily exchange it for other tempting alternatives. You could try a light chocolate mousse, a fresh strawberry-flavoured cream, or even a simple scoop of vanilla ice cream for a ready-made ice cream taco. The whimsical spirit of this dessert is much like how we explore flavours in our Tasty Blueberry Cheesecake Swirl Cookies Delicious Easy, where traditional cheesecake is given an exciting new twist.
Toppings Galore
Elevate your tacos with an array of toppings! A light drizzle of melted white chocolate, a scattering of colourful sprinkles, a spoonful of whipped cream, or a few fresh berries can introduce an extra dimension of taste and aesthetic charm.
Storing Your Fruity Pebbles Cheesecake Tacos
For the best possible crunch, these dessert tacos are ideally eaten on the day they are prepared. Should you have any remaining, they can be kept in an airtight container in the fridge for up to two days. Please note that the cereal shells will slowly lose their crispness as they absorb moisture from the filling, so enjoying them fresh is paramount!
Frequently Asked Questions (FAQ)
Can I make the Fruity Pebbles taco shells ahead of time?
Of course! The shells can be prepared up to 24 hours beforehand. Once they have completely cooled and hardened, store them in a single layer inside an airtight container at room temperature. Add the filling just before you are ready to serve them.
My marshmallow mixture was too sticky to handle. What went wrong?
This is a very frequent problem! It typically suggests that your hands or utensils were not sufficiently greased. Be generous with the butter or cooking spray. It is also possible that the ratio of marshmallows to cereal was slightly incorrect. If it feels overly sticky, you could try incorporating a little more cereal in your next attempt.
Is there a substitute for mini marshmallows?
You can certainly use larger marshmallows, but they will require more time to melt. Alternatively, you could use an equivalent measure of marshmallow fluff (creme), although the final texture of the shells might be a little softer and chewier, rather than crisp.
Can I make this a gluten-free dessert taco?
Yes, you can. In many places, Post Fruity Pebbles cereal is labelled gluten-free, but it is always wise to check the packaging to confirm. You will also need to select marshmallows that are certified gluten-free, as certain brands include gluten-based ingredients. By making these two substitutions, you can easily craft a delicious gluten-free dessert taco.
A Dessert That’s as Fun to Make as It Is to Eat
And there you are—our complete guide to making the most cheerful, vibrant, and tasty Fruity Pebbles Cheesecake Tacos. This recipe demonstrates that a dessert doesn’t need to be complex to be truly sensational. It is an ideal fusion of nostalgic tastes, enjoyable textures, and simple, pure joy, all encased in a crispy taco shell.
So, why hesitate? Pick up a box of cereal and prepare to make a dessert that everyone will be talking about! We would be delighted to see your wonderful results, so do feel free to post about your experience or any inventive variations you attempt in the comments section. For more enjoyable and distinctive sweet recipes, why not have a look at our guide for Blueberry Heaven Cookies The Definitive Recipe For Soft Chewy Perfection?

