Decadent Salted Caramel Apple Pie Cheesecake
The Ultimate Decadent Salted Caramel Apple Pie Cheesecake
Do you ever find yourself caught in a sweet predicament, unable to decide between the comforting, spiced allure of an apple pie and the decadent creaminess of a classic cheesecake? It’s a common dessert crossroads. One offers a taste of rustic, fruity nostalgia, while the other promises pure, velvety sophistication. But what if we told you there’s no need to choose? We’ve developed the perfect hybrid, merging these two dessert legends into one spectacular dish. Allow us to introduce our Decadent Salted Caramel Apple Pie Cheesecake.
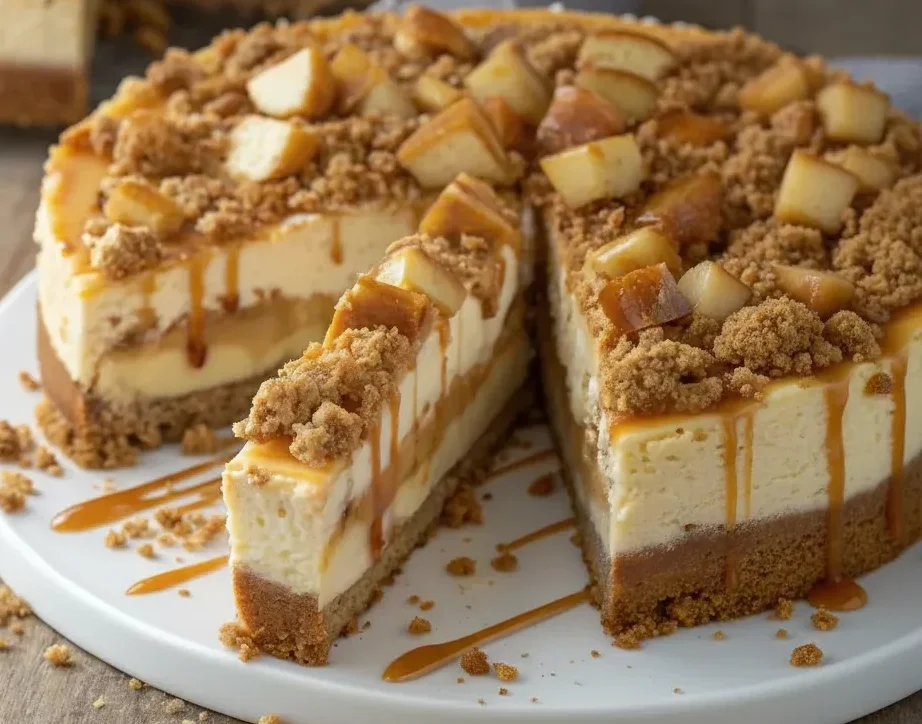
This creation is far more than just a recipe; it’s a truly memorable culinary journey. It begins with a crisp, buttery biscuit base, setting the stage for the silkiest, most luxurious vanilla cheesecake filling imaginable. On top, we layer tender, cinnamon-infused apples that evoke the heart of a home-baked apple pie. The grand finale? A lavish drizzle of homemade salted caramel sauce, which elegantly cascades down the sides, cutting through the sweetness with a delightful saline kick. This is the showstopping dessert you have been dreaming of, and we are here to walk you through each step to guarantee a flawless result.
Why You’ll Love This Recipe
- A Perfect Fusion of Classics: It brilliantly marries the velvety texture of a cheesecake with the warm, spiced notes of a traditional apple pie. You get to enjoy two beloved desserts in every single mouthful!
- A Guaranteed Showstopper: With its beautifully defined layers and glossy caramel finish, this cheesecake is a feast for the eyes. It is certain to wow your friends and family at any celebration.
- Complex Layers of Flavour: From the crunchy foundation and smooth filling to the sweet spiced apples and rich salted caramel, each component contributes a unique taste and texture that come together in perfect harmony.
- The Ideal Autumnal Indulgence: This is the definitive Fall cheesecake recipe, embodying all the cosy, comforting flavours of the season. It’s a wonderful treat for Bonfire Night, Christmas, or any crisp evening.
Ingredients
- Digestive biscuits
- Unsalted butter
- Full-fat cream cheese
- Caster sugar
- Large eggs
- Large egg yolk
- Soured cream
- Vanilla extract
- Bramley or Granny Smith apples
- Light brown soft sugar
- Ground cinnamon
- Ground nutmeg
- Lemon juice
- Salted butter
- Double cream
- Flaky sea salt
To make this recipe straightforward, we have organised the ingredients into four key sections: the base, the cheesecake filling, the apple topping, and the salted caramel sauce. For the filling, using high-quality ingredients at room temperature is crucial for achieving that signature silky-smooth consistency.
- For the Biscuit Base:
- 300g Digestive biscuits, finely crushed
- 150g unsalted butter, melted
- For the Cheesecake Filling:
- 900g full-fat cream cheese, at room temperature
- 250g caster sugar
- 3 large eggs, at room temperature
- 1 large egg yolk, at room temperature
- 200g soured cream, at room temperature
- 1 tbsp cornflour
- 2 tsp vanilla extract
- For the Spiced Apple Topping:
- 3 medium Bramley or Granny Smith apples, peeled, cored, and diced
- 50g light brown soft sugar
- 1 tsp ground cinnamon
- ¼ tsp ground nutmeg
- 1 tbsp lemon juice
- 30g unsalted butter
- For the Salted Caramel Sauce:
- 200g caster sugar
- 90g salted butter, cubed and at room temperature
- 120ml double cream, at room temperature
- 1 tsp flaky sea salt
Step-by-Step Guide to Perfection
Crafting this masterpiece is an immensely satisfying process. We have divided it into clear, manageable stages. Follow these instructions carefully, and you will be rewarded with an impeccable creamy apple pie cheesecake.
Step 1: Prepare the Buttery Biscuit Base
- Preheat your oven to 170°C (160°C Fan / Gas Mark 3). Lightly grease a 23cm (9-inch) springform tin and line the bottom with baking parchment.
- In a bowl, mix the finely crushed Digestive biscuits with the melted butter until the crumbs are thoroughly coated and have the consistency of damp sand.
- Transfer the mixture into the prepared tin. Press it down firmly and evenly across the bottom and slightly up the sides. We find that using the flat base of a drinking glass helps to achieve a solid, even layer.
- Bake for 10-12 minutes, or until it turns a light golden brown. Remove from the oven and set aside to cool fully as you get on with the filling.
Step 2: Create the Luscious Cheesecake Filling
The key to a flawless cheesecake lies in using room temperature ingredients and being careful not to over-mix. This will help you avoid lumps and prevent the surface from cracking.
- In a large bowl, use an electric mixer on a low setting to beat the cream cheese until it is perfectly smooth and free of any lumps, which should take around 2 minutes.
- Slowly incorporate the caster sugar and cornflour, mixing just until they are combined. Remember to scrape down the sides of the bowl to ensure everything is mixed in.
- Add the eggs and egg yolk one by one, mixing on low speed until each is just incorporated. Introducing too much air at this point by over-mixing can lead to cracks.
- To finish, gently fold in the soured cream and vanilla extract until the batter is smooth and consistent. Pour this filling over your cooled biscuit base and level the top with a spatula.
Step 3: Bake Using a Water Bath
Using a water bath (bain-marie) is vital for baking an even, crack-free cheesecake. It introduces steam into the oven, creating a humid atmosphere that allows the cheesecake to cook gently.
- Tightly wrap the exterior of your springform tin with two layers of heavy-duty aluminium foil to make it completely watertight.
- Sit the wrapped tin inside a larger roasting pan. Carefully pour boiling water into the roasting pan so that it comes about halfway up the sides of the cheesecake tin.
- Gently place the entire setup into the preheated oven. Bake for 60-70 minutes. The cheesecake is done when the edges look set, but the centre retains a slight wobble.
- Switch off the oven and prop the door ajar with a wooden spoon. Allow the cheesecake to cool down gradually inside the oven for one hour. This slow cooling is another crucial step in preventing cracks. For a more in-depth look at this method, you can explore this excellent guide on how to use a water bath for cheesecake.
- Take the cheesecake out of the water bath, remove the foil, and allow it to cool completely to room temperature on a wire rack. Afterwards, cover it with cling film and place it in the fridge to chill for a minimum of 6 hours, or ideally, overnight.
Preparing the Toppings: Spiced Apples and Salted Caramel
It is these final touches that elevate a wonderful cheesecake into a truly unforgettable apple cheesecake dessert. You can easily make these components while the cheesecake is chilling.
The Cinnamon Spiced Apples
- In a medium-sized saucepan, mix together the diced apples, light brown sugar, cinnamon, nutmeg, and lemon juice.
- Cook this mixture over a medium heat, stirring from time to time, for about 8-10 minutes, or until the apples have softened but still retain some bite.
- Add the butter and stir until it has fully melted and coated the apples. Take the pan off the heat and let the apple mixture cool down completely before spooning it over the cheesecake.
The Perfect Salted Caramel Sauce
- Spread the caster sugar in an even layer across the bottom of a clean, heavy-based saucepan. Place it over a medium-low heat and let the sugar melt and turn to caramel without stirring. You can gently swirl the pan now and then to promote even cooking.
- Once the sugar transforms into a deep amber liquid, take it off the heat immediately and carefully add the salted butter, whisking as you go. Be aware that the mixture will bubble up quite fiercely.
- Gently pour in the double cream, continuing to whisk constantly until you have a smooth sauce. Please be cautious, as the caramel will be extremely hot.
- Finally, stir in the flaky sea salt. Let the sauce cool for 15-20 minutes; it will continue to thicken as its temperature drops.
Assembling Your Caramel Apple Masterpiece
When your cheesecake is perfectly chilled and your toppings have cooled, it’s time for the most rewarding part. This is where the magic comes together, creating the ultimate caramel apple dessert.
- Gently run a thin palette knife around the inside edge of the tin before you release the springform clasp.
- Evenly spoon the cooled, spiced apple topping over the surface of your chilled cheesecake.
- Be generous with the salted caramel sauce, drizzling it over the apples and allowing it to drip attractively down the sides.
- For the optimal taste and texture, we suggest letting the assembled cheesecake rest in the fridge for about 30 minutes before you slice and serve it.
This dessert serves as the perfect finale to any lovely meal. Whether you’ve just enjoyed a savoury dish like our Lemon Garlic Chicken or a hearty bowl of our Garlic Parmesan Chicken Pasta Recipe, this cheesecake delivers a truly impressive conclusion that will have everyone talking.
FAQ
A Dessert to Remember
And there you have it—our comprehensive guide to creating the most sensational Decadent Salted Caramel Apple Pie Cheesecake you will ever have the pleasure of tasting. While it may seem like an undertaking, each step is thoroughly worth the reward when you finally take that first, blissful bite. The harmony between the crunchy base, creamy filling, tender spiced apples, and luscious salted caramel is a combination that is simply divine.
We believe baking should be a delightful experience, and this recipe is crafted to be both enjoyable and fulfilling. So, it’s time to don your apron, assemble your ingredients, and prepare to bake a dessert that will be fondly remembered long after the final crumb has been savoured. We would be thrilled to see your beautiful creations! Please feel free to tag us on social media or leave a comment below to share how yours turned out.
Recipe Card
Ingredients
- For the Biscuit Base:
- 300g Digestive biscuits, finely crushed
- 150g unsalted butter, melted
- For the Cheesecake Filling:
- 900g full-fat cream cheese, at room temperature
- 250g caster sugar
- 3 large eggs, at room temperature
- 1 large egg yolk, at room temperature
- 200g soured cream, at room temperature
- 1 tbsp cornflour
- 2 tsp vanilla extract
- For the Spiced Apple Topping:
- 3 medium Bramley or Granny Smith apples, peeled, cored, and diced
- 50g light brown soft sugar
- 1 tsp ground cinnamon
- ¼ tsp ground nutmeg
- 1 tbsp lemon juice
- 30g unsalted butter
- For the Salted Caramel Sauce:
- 200g caster sugar
- 90g salted butter, cubed and at room temperature
- 120ml double cream, at room temperature
- 1 tsp flaky sea salt
Instructions
- Make the Base: Preheat oven to 170°C (160°C Fan). Mix crushed biscuits with melted butter and press firmly into a 23cm springform tin. Bake for 10-12 minutes and let cool completely.
- Prepare the Filling: Beat cream cheese until smooth. Mix in sugar and cornflour. On low speed, add eggs and yolk one at a time. Fold in soured cream and vanilla. Pour filling over the cooled base.
- Bake in Water Bath: Wrap the tin in two layers of foil and place in a larger roasting pan. Pour boiling water halfway up the sides of the tin. Bake for 60-70 minutes, until the edges are set but the centre has a slight wobble.
- Cool Slowly & Chill: Turn off the oven, prop the door open, and let the cheesecake cool inside for 1 hour. Then, cool to room temperature on a wire rack. Cover and chill in the fridge for at least 6 hours, preferably overnight.
- Make the Apple Topping: In a saucepan, cook diced apples, brown sugar, spices, and lemon juice for 8-10 minutes until tender. Stir in butter until melted. Allow to cool completely.
- Create the Caramel Sauce: Melt caster sugar in a heavy-based saucepan over medium-low heat until it becomes an amber liquid. Whisk in the butter, then the double cream. Stir in the sea salt. Let cool for 15-20 minutes to thicken.
- Assemble and Serve: Spoon the cooled spiced apples over the chilled cheesecake. Drizzle generously with the salted caramel sauce. Allow to set in the fridge for 30 minutes before slicing and serving.


