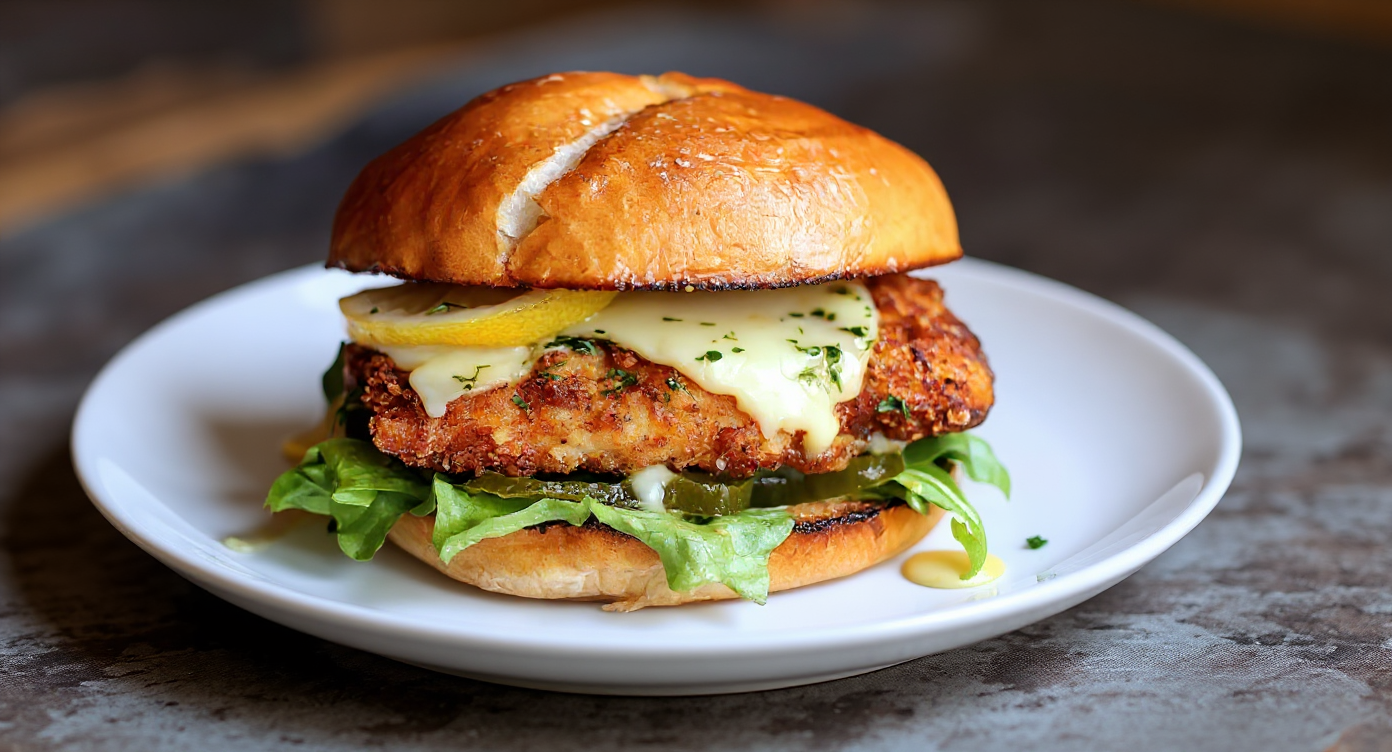
Crispy Lemon Pepper Chicken Sandwich
Are you on the hunt for a lunch or dinner that truly sings with flavour? Perhaps something to break the routine, offering a delightful crunch and a vibrant, zesty taste? Well, your search ends here.
We firmly believe that a brilliant sandwich is a work of art, and our recipe for the definitive crispy lemon pepper chicken sandwich is just that. It strikes the perfect chord between succulent, juicy chicken, a wonderfully crisp coating, and the bright, tangy notes of lemon and pepper that will have you captivated from the very first bite. Put aside thoughts of disappointing takeaways; we’re here to guide you in creating a sandwich of gourmet quality right in your own kitchen.
Why This Sandwich is a Game-Changer
Before we get to the recipe itself, let’s explore what sets this apart from any other chicken sandwich you might have tried. We have refined this method through careful testing to guarantee it’s not only straightforward but also utterly delicious. This is more than a simple meal; it’s a culinary occasion.
- A Symphony of Flavour: The marriage of sharp lemon and freshly cracked black pepper is a timeless classic. We’ve balanced these elements with precision, allowing the zesty kick to shine through without overshadowing the savoury chicken.
- Incredible Texture: We understand that the secret to an unforgettable fried chicken sandwich lies in its crunch. Our unique double-dredging method yields a craggy, exceptionally crisp coating that maintains its texture, even when paired with our creamy lemon aioli.
- Wonderfully Juicy Chicken: Serving dry chicken is a culinary misstep we simply will not make. Our process, involving a simple marinade and precise cooking, ensures a moist and tender chicken fillet every single time.
- Effortlessly Customisable: We provide you with a stellar base recipe, but we also encourage you to make it uniquely yours. Whether you fancy adding a slice of cheese or some spicy pickles, you can adapt this sandwich into your own personal masterpiece. For another superb handheld meal, our Bang Bang Chicken Sliders are always a huge hit.
The Key Ingredients for Your Sandwich
Assembling the finest components is the foundational step towards achieving sandwich excellence. We have organised the list into three clear sections: the chicken, the sauce, and the final build. A truly great homemade chicken sandwich always begins with high-quality ingredients.
For the Zesty Lemon Pepper Chicken
- Chicken: 2 large skinless, boneless chicken breasts (around 200g each).
- Marinade: 250ml buttermilk (or you can use whole milk with 1 tbsp of lemon juice added).
- Flour Mixture: 150g plain flour, 50g cornflour.
- Seasoning: 2 tbsp lemon pepper seasoning, 1 tsp smoked paprika, 1 tsp garlic powder, 1 tsp salt.
- Egg Wash: 2 large free-range eggs.
- Oil: Approximately 1 litre of a neutral oil for frying, like vegetable or sunflower oil.
For the Tangy Lemon Aioli
- Base: 150g of a good-quality mayonnaise.
- Flavour: 1-2 cloves of garlic (finely minced), the zest of 1 lemon, 1 tbsp of fresh lemon juice.
- Seasoning: A generous pinch of freshly cracked black pepper.
For Assembling the Sandwich
- Buns: 4 soft brioche buns.
- Greens: Crisp iceberg or romaine lettuce.
- Toppings: Sliced beefsteak tomatoes and sliced gherkins.
Step-by-Step Guide to the Perfect Crispy Lemon Pepper Chicken Sandwich
Now, let’s get to the best bit! Simply follow our clear, easy-to-understand instructions to construct the best fried chicken sandwich you have ever tasted. We will be with you for every part of the process.
Prepare the Chicken
First things first, we must ensure the chicken has a uniform thickness for quick and even cooking. Place a chicken breast between two sheets of baking parchment or inside a food-safe bag. With a rolling pin or meat mallet, gently flatten it to about 1.5cm (just over half an inch) thick throughout. Do the same with the second breast, then cut each one in half horizontally to make four fillets. Pop these fillets into a shallow dish, pour over the buttermilk to submerge them, then cover and chill for at least 30 minutes, or up to 4 hours. This step works wonders to tenderise the meat.
Create the Breading Station
A little organisation goes a long way here. Arrange three shallow dishes. Into the first, combine the plain flour, cornflour, lemon pepper seasoning, smoked paprika, garlic powder, and salt, mixing well. In the second dish, whisk the two eggs with a tablespoon of water for your egg wash. The third dish can remain empty for now; we’ll get to that shortly.
Make the Tangy Lemon Aioli
Whilst the chicken is marinating, you can whip up the delectable sauce. This couldn’t be easier. In a small bowl, simply mix the mayonnaise, minced garlic, lemon zest, lemon juice, and black pepper. Stir until fully combined, then cover and place it in the fridge so the flavours can mingle and develop.
Dredge and Coat the Chicken
Remove the chicken fillets from the buttermilk, allowing any excess to drip away. Dredge a fillet in the seasoned flour mix, making sure it gets a complete coating. Shake off any surplus flour, then dip it into the egg wash, covering it entirely. Finally, return it to the flour mixture for its second coating. Be sure to press the flour on firmly to build up a thick, textured crust. This double-dredging technique is the key to an exceptionally crisp result. Set the coated fillet on a wire rack and repeat with the others.
Fry to Golden Perfection
Pour your oil into a large, heavy-bottomed pan or a Dutch oven to a depth of about 4cm (1.5 inches). Heat the oil over a medium-high heat until it gets to 175°C (350°F). If you are without a thermometer, test the oil by dropping in a small crumb of the breading; it’s ready when it sizzles energetically. Gently place two chicken fillets into the hot oil, taking care not to overcrowd the pan. Fry for 3-5 minutes on each side, until the chicken is a rich golden brown and cooked all the way through. The internal temperature should be 74°C (165°F). For advice on safe poultry handling, we always suggest referring to official sources like the UK Food Standards Agency.
Assemble Your Masterpiece
Once cooked, transfer the chicken from the oil to a clean wire rack to let any excess oil drain off. Immediately sprinkle with a touch more salt and lemon pepper seasoning. Lightly toast the inside of the brioche buns, either in a dry frying pan or under the grill. For assembly, spread a generous amount of lemon aioli on both halves of the bun. On the bottom bun, place a leaf of crisp lettuce, your magnificent chicken fillet, a couple of tomato slices, and your gherkins. Add the top bun, and get ready for an absolutely glorious sandwich experience.
Tips and Tricks for a Flawless Lemon Pepper Chicken Recipe
Having made this recipe countless times, we’ve gathered a few essential tips that will take your sandwich from simply good to truly unforgettable.
- The Power of Cornflour: It might be tempting to omit the cornflour from the coating, but we urge you not to. It is the magic ingredient that inhibits gluten development, which gives you a lighter, crispier coating that avoids becoming tough. It’s a method we also employ to achieve the perfect texture on our Crispy Parmesan Chicken.
- Maintain Your Oil Temperature: Keeping the oil at a steady temperature is crucial. If the oil is too cool, the chicken will become greasy by absorbing too much of it. If it’s too hot, the coating will scorch before the chicken is cooked. Always allow the oil to return to the correct temperature between batches.
- Rest the Chicken (Briefly): Allowing the fried chicken to rest on a wire rack for a few minutes before you build the sandwich lets the juices redistribute within the meat, guaranteeing every mouthful is succulent and tender.
- Don’t Under-Season: This sandwich is defined by its bold flavours. Be liberal with the lemon pepper seasoning, both within the coating and as a final flourish over the hot, freshly cooked chicken.
Frequently Asked Questions (FAQ)
Can I make this crispy lemon pepper chicken sandwich in an air fryer?
Of course! To make this in an air fryer, first preheat it to 200°C (400°F). Prepare and coat the chicken exactly as instructed. Once coated, generously spritz the fillets on both sides with cooking oil spray. Arrange them in the air fryer basket in a single layer and cook for 15-20 minutes, flipping them over halfway, until they are golden and thoroughly cooked.
How can I make my own lemon pepper seasoning?
It’s surprisingly simple! For a basic homemade blend, finely zest two large lemons and spread the zest onto a plate to dry out for an hour or two. Afterwards, combine 3 tablespoons of the dried zest with 3 tablespoons of coarsely cracked black pepper and 2 tablespoons of sea salt. For added complexity, you could also mix in a teaspoon each of garlic and onion powder.
What’s the best way to store and reheat leftovers?
For the best outcome, keep the different components in separate airtight containers in the refrigerator for up to two days. To reheat the chicken and restore its crispiness, put it on a wire rack in an oven preheated to 200°C (400°F) for 10-15 minutes, or pop it in an air fryer for 5-7 minutes.
Can I use chicken thighs instead of breasts?
Absolutely. Boneless, skinless chicken thighs are a wonderful substitute, as they are naturally juicier and have more flavour. They can be a little uneven in shape, so you may not need to flatten them, and they might need an extra minute or two of cooking time to be cooked through.
Your New Favourite Sandwich Awaits
And there we have it—our complete guide to crafting a genuinely sensational zesty chicken burger experience in your own home. This crispy lemon pepper chicken sandwich is far more than a set of instructions; it is a celebration of flavour, texture, and the simple pleasure of creating something delicious yourself. The bright, zesty character combined with that satisfying crunch makes this a surefire hit for family meals, weekend lunches, or any time you fancy a tasty treat.
We are incredibly excited for you to give this recipe a go and are confident it will become a cherished staple in your home. When you try it, please do let us know how you get on in the comments section below. We always enjoy hearing about your kitchen successes!