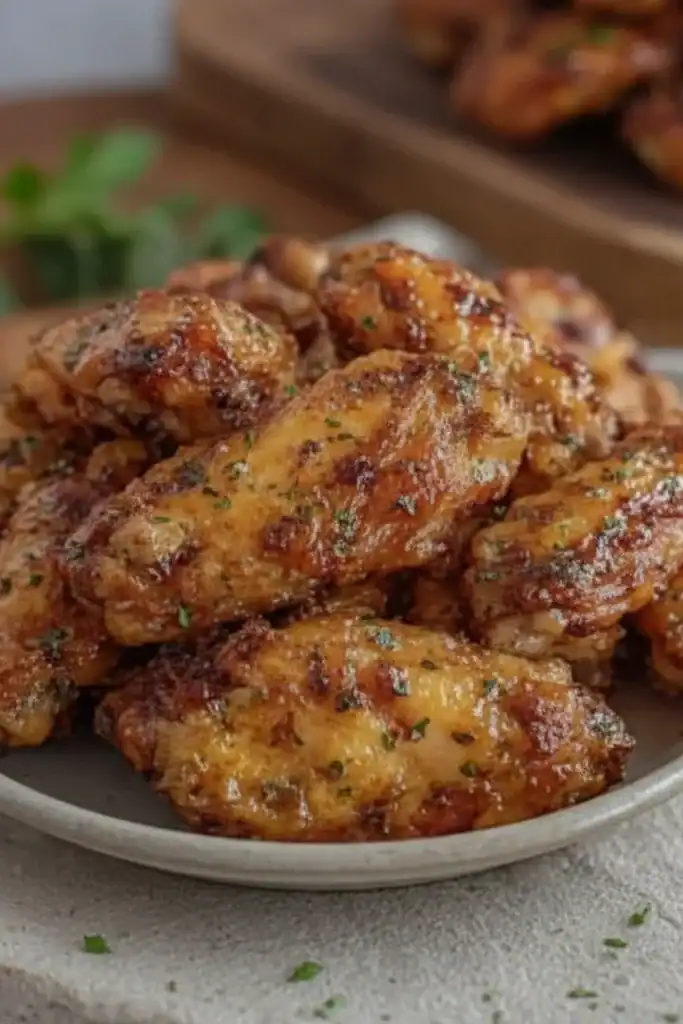
Crispy Air Fryer Chicken Wings

There’s something deeply satisfying about a truly crispy chicken wing. Not just cooked, but audibly crunchy, with juicy, tender meat inside. For years, I believed that level of crispiness was only achievable with a deep-fat fryer, a method I’m not always keen on for a weeknight meal. I used to struggle with this dish until I discovered the magic of combining a specific dry rub with the intense, circulating heat of an air fryer. The result is astonishingly good – all the crunch without the fuss.
This recipe for Crispy Air Fryer Chicken Wings delivers that deep-fried texture we all crave, but with a fraction of the oil and effort. The skin becomes shatteringly crisp, seasoned with a simple yet savoury blend of smoked paprika and garlic that perfumes the whole kitchen as it cooks. This is my go-to recipe when I need something that feels like a treat but comes together in a flash. It works beautifully for a family film night, a casual Saturday lunch, or when you have friends over to watch the match.
Recipe Overview
This method focuses on one crucial goal: achieving the crispiest possible skin on your chicken wings using the air fryer. We use a secret ingredient – baking powder – which helps to draw out moisture and creates a wonderfully textured, golden-brown surface. The flavour is a classic savoury profile with a hint of smoke. I’ve tested this with and without the baking powder, and the difference is truly night and day; it’s the key to that irresistible crunch.
- Prep Time: 10 minutes
- Cook Time: 25 minutes
- Total Time: 35 minutes
- Servings: 4 people
- Difficulty: Easy
Why You’ll Love These Crispy Air Fryer Chicken Wings
- Unbelievably Crispy Skin: The combination of patting the wings completely dry and coating them in baking powder results in a skin that is audibly crunchy and golden, mimicking a deep-fried texture.
- Ready in Under 40 Minutes: From the fridge to the table, this entire recipe is straightforward to make and is ready in about 35 minutes, making it ideal for a last-minute dinner or snack.
- A Versatile Base Recipe: These wings are delicious as is, but you can also toss them in your favourite sauce after cooking. Try a classic buffalo, a sticky barbecue, or even the sauce from our Sweet Chili Chicken Recipe.
- Great for Casual Gatherings: They are a fantastic choice for a relaxed evening with family or for serving as an appetiser when friends pop over. They disappear from the plate very quickly!
- Family Tested: This recipe always gets compliments in my house. My husband, who is a huge wing fanatic, now prefers these to any takeaway version.
Ingredients You’ll Need
The beauty of this recipe is its simplicity. You likely have most of these spices in your cupboard already. I always recommend using a good quality smoked paprika, like a Spanish Pimentón de la Vera, as it provides a deep, smoky flavour that really elevates the wings.
- 1 kg fresh chicken wings, separated into drumettes and flats, wingtips removed
- 1 tbsp olive oil
- 2 tsp baking powder (make sure it’s aluminium-free and NOT bicarbonate of soda)
- 1 ½ tsp coarse sea salt
- 1 tsp freshly ground black pepper
- 2 tsp smoked paprika
- 1 tsp garlic powder
- 1 tsp onion powder
- Optional: Your favourite dipping sauce (blue cheese or ranch dressing works well)
Sara’s Tip: Do not skip the baking powder! It raises the pH level of the chicken skin, which allows it to get much browner and crispier. It’s a scientific trick that makes a huge difference. You can read more about the science behind it on sites like Serious Eats.
How to Make Crispy Air Fryer Chicken Wings
The process is very straightforward. The most important step is ensuring the wings are as dry as possible before you start. This is non-negotiable for achieving that super crispy skin we’re after.
- Prepare the Wings: Start by patting your chicken wings completely dry with kitchen roll. Press down firmly to absorb as much moisture as possible. This is the most crucial step for crispy skin. Place the dry wings in a large mixing bowl.
- Oil the Wings: Drizzle the wings with 1 tablespoon of olive oil and toss them with your hands or tongs until they are all lightly and evenly coated.
- Mix the Dry Rub: In a separate small bowl, combine the baking powder, salt, pepper, smoked paprika, garlic powder, and onion powder. Whisk them together until they are thoroughly mixed.
- Coat the Chicken: Sprinkle the dry rub mixture over the oiled wings. Toss everything together really well until every single wing is evenly coated in the seasoning. Don’t be shy here; make sure they are fully covered.
- Arrange in Air Fryer: Place the seasoned wings in the air fryer basket in a single layer. It is vital not to overcrowd the basket. If needed, cook them in two batches. Overcrowding will cause them to steam instead of crisping up.
- First Cook: Air fry the wings at 180°C (160°C fan) for 15 minutes. This initial lower-temperature cook helps to render the fat from under the skin.
- Flip and Crisp: After 15 minutes, open the air fryer, and using tongs, flip each wing over. What works best for me is giving the basket a good shake too. Increase the temperature to 200°C (180°C fan) and cook for a further 10-12 minutes, or until the wings are deep golden brown and the skin is visibly crispy.
- Rest and Serve: Carefully remove the wings from the air fryer and let them rest on a wire rack for a couple of minutes. This allows the crust to set. Serve immediately with your favourite dipping sauces.
Tips From My Kitchen
- Temperature is Key: The two-stage cooking process is deliberate. The initial lower temperature renders the fat, and the final blast of high heat is what makes the skin blister and crisp. Don’t be tempted to start on high heat from the beginning.
- The Secret is Dryness: I learned that no amount of seasoning or heat can make wet skin crispy. Before I started being meticulous about drying the wings with kitchen roll, my results were always a bit soggy. Take that extra minute – it’s worth it.
- Make-Ahead Rub: You can mix the dry rub ingredients in a larger batch and store it in an airtight jar for up to 6 months. This makes prep time even faster for future wing cravings.
- Storage: If you have leftovers (which is rare in my house!), store them in an airtight container in the fridge for up to 3 days. To reheat, pop them back in the air fryer at 190°C for 4-5 minutes to bring back some of the crispness.
Equipment You’ll Need
You don’t need much for this recipe, but having the right tools makes the process smoother.
- Air Fryer: Any model will work, but a basket-style one is ideal for this recipe.
- Large Mixing Bowl: For tossing the wings and seasoning without making a mess.
- Kitchen Roll: Essential for drying the wings.
- Tongs: For safely flipping and removing the hot wings.
Common Mistakes to Avoid
- Overcrowding the Basket: This is the number one mistake. Air frying works by circulating hot air around the food. If the wings are piled on top of each other, the air can’t circulate, and they will steam. Cook in batches if your air fryer is small.
- Not Drying the Wings: As mentioned, moisture is the enemy of crispiness. Skipping the drying step will result in disappointingly soft skin.
- Forgetting to Flip: Flipping the wings ensures that both sides get direct exposure to the hot air, leading to an even, all-over crunch. Don’t skip it!
What to Serve With Crispy Air Fryer Chicken Wings
These wings are fantastic on their own, but they also pair wonderfully with a few simple sides to make a more complete meal.
- Celery and Carrot Sticks: The classic pairing. The cool, crisp crunch of the vegetables is a refreshing contrast to the rich, savoury wings, especially with a blue cheese dip.
- A Simple Green Salad: A lightly dressed salad with a vinaigrette provides a nice acidic balance to the richness of the chicken. It keeps the meal feeling light. For another chicken idea, try our Bruschetta Chicken which also pairs well with a fresh salad.
- Drink Pairing: A cold, crisp lager or a pale ale cuts through the fat and complements the smoky spices beautifully. For a non-alcoholic option, a sharp, sparkling lemonade works a treat.
Frequently Asked Questions
Crispy Air Fryer Chicken Wings
Ingredients
Method
- Prepare the Wings: Start by patting your chicken wings completely dry with kitchen roll. Press down firmly to absorb as much moisture as possible. This is the most crucial step for crispy skin. Place the dry wings in a large mixing bowl.
- Oil the Wings: Drizzle the wings with 1 tablespoon of olive oil and toss them with your hands or tongs until they are all lightly and evenly coated.
- Mix the Dry Rub: In a separate small bowl, combine the baking powder, salt, pepper, smoked paprika, garlic powder, and onion powder. Whisk them together until they are thoroughly mixed.
- Coat the Chicken: Sprinkle the dry rub mixture over the oiled wings. Toss everything together really well until every single wing is evenly coated in the seasoning. Don't be shy here; make sure they are fully covered.
- Arrange in Air Fryer: Place the seasoned wings in the air fryer basket in a single layer. It is vital not to overcrowd the basket. If needed, cook them in two batches. Overcrowding will cause them to steam instead of crisping up.
- First Cook: Air fry the wings at 180°C (160°C fan) for 15 minutes. This initial lower-temperature cook helps to render the fat from under the skin.
- Flip and Crisp: After 15 minutes, open the air fryer, and using tongs, flip each wing over. What works best for me is giving the basket a good shake too. Increase the temperature to 200°C (180°C fan) and cook for a further 10-12 minutes, or until the wings are deep golden brown and the skin is visibly crispy.
- Rest and Serve: Carefully remove the wings from the air fryer and let them rest on a wire rack for a couple of minutes. This allows the crust to set. Serve immediately with your favourite dipping sauces.
Notes
I really hope you give these Crispy Air Fryer Chicken Wings a try. They have completely changed how we do ‘wing night’ at home, and I’m confident you’ll love them too. Let me know how they turn out for you in the comments below – I always love hearing about your kitchen adventures! Happy cooking, Sara.