Crafting Cookies and Cream Cheesecake Deep Fried Oreos
Have you ever imagined a sweet treat so wonderfully indulgent it seems like something you could only find at a vibrant summer fair? A confection that marries the classic snap of an Oreo with the creamy richness of cheesecake, all wrapped in a golden-fried coating? We’re thrilled to confirm that this dessert fantasy is wonderfully real, and you can bring it to life right in your own kitchen. We are, of course, talking about the magnificent cookies and cream cheesecake deep fried oreos, and this is our definitive guide to creating them.
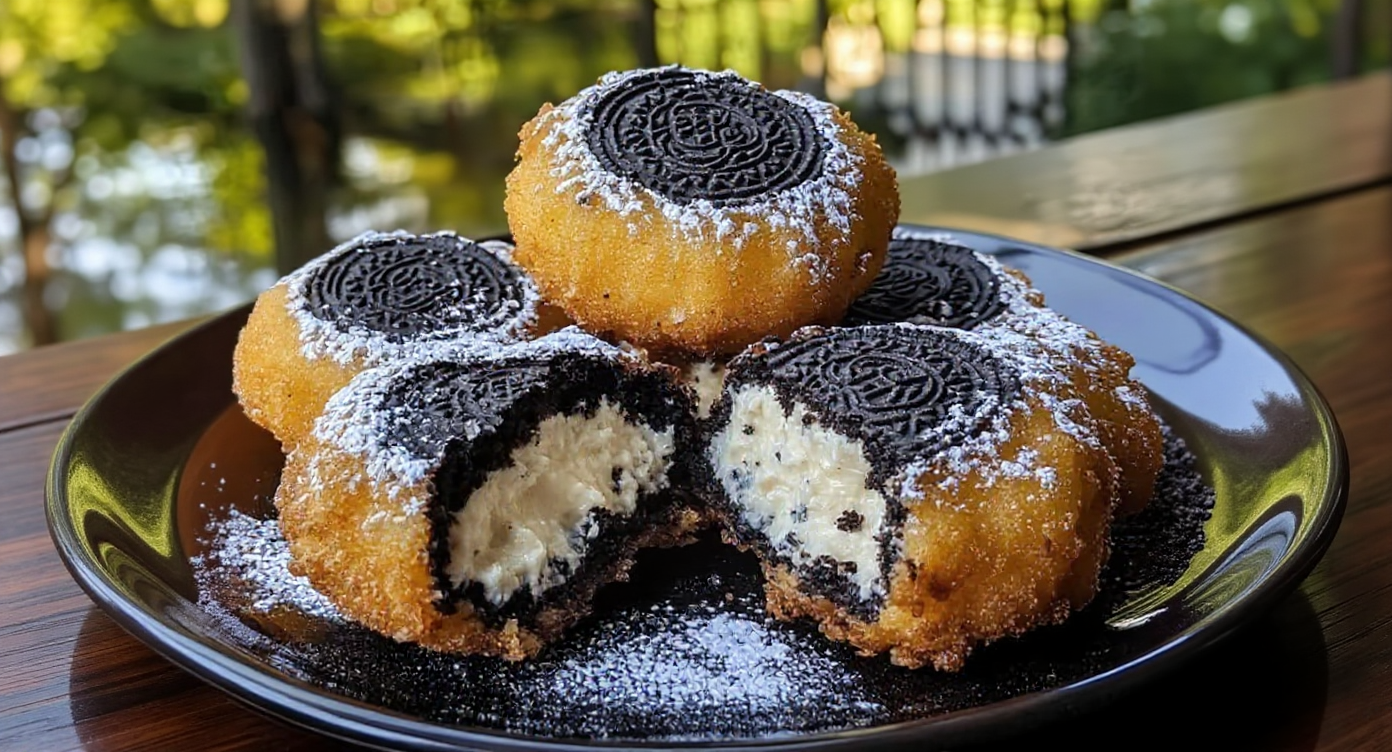
This is far more than your average fried treat; it’s a full-blown dessert experience. Picture this: you bite through a warm, pillowy batter, revealing a molten layer of cookies and cream cheesecake that gives way to the familiar chocolatey biscuit at its centre. It’s a delightful medley of textures and flavours that is sure to leave you, and anyone lucky enough to share them, absolutely amazed. Right then, let’s get our aprons on and bring a taste of the funfair into our homes.
What Exactly Are Cookies and Cream Cheesecake Deep Fried Oreos?
Fundamentally, this dessert is a glorious evolution of the much-loved deep-fried Oreo. While the original is a fantastic treat on its own, we’re always looking to elevate the experience. We begin with a classic Oreo biscuit and wrap it completely in a decadent, homemade cookies and cream cheesecake filling. This delightful parcel is then frozen until solid, dipped into a light and sweet batter, and finally fried to a crisp, golden-brown finish.
The true transformation occurs in the hot oil. As the batter cooks into a protective, doughnut-like casing, the heat inside warms the Oreo and melts the cheesecake filling into an utterly luscious, gooey layer. It represents the perfect harmony of a treasured biscuit, a timeless dessert, and a funfair classic. This is more than a simple recipe; it’s an exercise in pure, delicious indulgence.
Gathering Your Ingredients: The Keys to Perfection
Before we dive into our frying adventure, we must first assemble our components. Sourcing high-quality ingredients will have a noticeable impact on the final result, particularly with the cheesecake filling. Here is everything we are going to need.
For the Cheesecake Filling
- 225g (8oz) full-fat cream cheese, softened to room temperature
- 60g (1/3 cup) granulated sugar
- 1 teaspoon of vanilla extract
- 6-8 Oreo biscuits, finely crushed into crumbs
For Assembly and Frying
- 1 packet of original Oreo biscuits (you’ll need about 24)
- 190g (1.5 cups) plain flour or a pre-made pancake mix
- 1 tablespoon of granulated sugar (if using plain flour)
- 2 teaspoons of baking powder (if using plain flour)
- A pinch of salt
- 1 large egg
- 180ml (3/4 cup) of milk
- 1 litre (approx. 4 cups) of neutral oil for frying (such as vegetable, canola, or sunflower oil)
- Icing sugar, for dusting (optional)
- Chocolate or caramel sauce, for drizzling (optional)
For the best results, we always advise using full-fat cream cheese. It lends a superior flavour and achieves the firm consistency needed to ensure the filling stays perfectly moulded around the Oreo. Using cream cheese that has been brought to room temperature is also key to achieving a silky-smooth filling without any lumps.
Step-by-Step Guide to the Ultimate Deep Fried Treat
Are you ready to create some dessert magic? We have organised the entire process into straightforward, easy-to-follow stages. Stick with us, and you’ll soon be enjoying a slice of dessert paradise.
Step 1: Crafting the Cookies and Cream Cheesecake Filling
To start, we’ll prepare the star of the show in a medium-sized bowl. Add the softened cream cheese, granulated sugar, and vanilla extract. Using an electric or stand mixer on a medium setting, beat these ingredients until the mixture becomes wonderfully smooth and creamy. Try to avoid over-mixing, as this can cause the filling to become too runny. Once you have a smooth base, gently fold in the crushed Oreo crumbs with a spatula until they’re evenly incorporated. The final consistency should be thick enough to spread easily.
Step 2: Assembling Your Oreo Bombs
Here, we will build the foundation of our cheesecake filling for oreos. This part can get a little messy, but the reward is more than worth it!
- Line a baking sheet with greaseproof paper to stop the cheesecake balls from sticking.
- Scoop about a tablespoon of the cheesecake mixture and flatten it slightly in your palm.
- Position a whole Oreo biscuit right in the middle.
- Gently enclose the Oreo with the cheesecake filling, using your hands to shape it into a neat, smooth ball that completely covers the biscuit.
- Set the finished ball onto your prepared baking sheet and continue this process with the rest of the Oreos and filling.
- After all the Oreo bombs are formed, transfer the baking sheet to the freezer for a minimum of 2 hours, though overnight is ideal. This step is non-negotiable! Freezing them solid is crucial to prevent the cheesecake from melting and seeping out as soon as it enters the hot oil.
Step 3: Preparing the Batter and Frying Station
Once you are ready to begin frying, it’s time to get our station in order. In one bowl, whisk together the flour, sugar (if using), baking powder, and salt. In another, smaller bowl, beat the egg and milk. Now, pour the wet mixture into the dry ingredients and stir until they are just incorporated. A few lumps are absolutely fine; over-working the batter can make it tough. You’re aiming for a consistency like thick pancake batter that can generously coat a spoon. This is vital for achieving the perfect batter consistency.
Next, pour the oil into a deep, heavy-based pan or a deep fat fryer, ensuring the oil is around 2-3 inches deep. Warm the oil over a medium-high heat until it gets to 180°C (350°F). A kitchen thermometer is the most reliable tool for this. If you don’t have one, you can check the oil’s readiness by dropping in a tiny bit of batter. If it sizzles instantly and turns golden in about a minute, you are all set. For more frying safety tips, we suggest consulting an expert resource, like this guide on how to deep fry safely from BBC Good Food.
Step 4: The Golden Fry
And now for the grand finale! Working swiftly, retrieve a few of the frozen cheesecake Oreo balls from your freezer. Submerge each one in the batter, making sure it gets an even coating. Lift it out with a fork or tongs, letting any surplus batter drip away. Gently place the coated ball into the hot oil. It’s important not to crowd the pan, so we suggest frying just 3-4 at once to maintain a consistent oil temperature.
Fry for about 2-3 minutes, carefully turning them midway through, until they are a magnificent golden brown on all sides. When they’re ready, use a slotted spoon to lift them out of the oil and transfer them to a wire rack or a plate lined with kitchen roll to drain off any excess oil. Continue this process until all the frozen Oreo balls are fried.
Pro Tips for Fairground-Worthy Results
Hoping to guarantee your deep-fried Oreos are nothing short of spectacular? Here are some of our most trusted tips:
- Embrace the Chill: The more solidly frozen your cheesecake balls are, the more effectively they’ll keep their shape while frying. Resist any urge to shorten the freezing time.
- Do a Batter Test: Before committing your first Oreo bomb, fry a small drop of batter on its own. This allows you to confirm the oil temperature and preview how the batter will cook.
- Serve Straight Away: These delights are at their peak when served hot and fresh from the fryer. The interplay between the crisp, warm exterior and the soft, molten centre is what makes them truly unforgettable.
- Experiment with Toppings: While a simple dusting of icing sugar is a lovely touch, feel free to be more adventurous. A drizzle of chocolate sauce, a spoonful of whipped cream, or even a scoop of vanilla ice cream can elevate this dessert to a whole new level.
Variations and Creative Twists
After you have perfected the classic deep fried oreos recipe, why not let your creativity shine? The options are virtually limitless. Consider using different Oreo varieties, such as mint, golden, or peanut butter, for an interesting new take. You could also add a touch of peppermint or almond extract to the cheesecake filling for an additional flavour dimension. If you love experimenting with cookie-based treats, we believe you will also fall for our Tasty Blueberry Cheesecake Swirl Cookies Delicious Easy. For lovers of classic flavour combinations, our Almond Joy Cookie Recipe is another wonderful creation to explore.
Frequently Asked Questions (FAQ)
Can I make these in an air fryer?
Although deep frying yields that authentic, crispy texture, an air fryer version is possible. The result will be different—closer to a baked good than a crisp doughnut. If you’d like to try, prepare and freeze the Oreo balls as instructed. Give the battered balls a liberal spray of cooking oil and arrange them in the air fryer basket, ensuring they don’t overlap. Air fry at 190°C (375°F) for 6-8 minutes, turning them over halfway, until they are golden.
How do I store leftovers?
These are unquestionably best when eaten fresh. Should you have any left over, they can be kept in an airtight container in the fridge for up to two days. To warm them up, we suggest using an oven or air fryer set to 180°C (350°F) for several minutes, which will help restore their crispness. We would advise against using a microwave, as it will likely make them soft.
Can I make the cheesecake-coated Oreos ahead of time?
Of course! This is a fantastic method for getting ahead with party preparations. You can form the cheesecake Oreo balls and keep them in a sealed container in the freezer for as long as a month. Whenever you fancy a treat, you can fry them straight from frozen, with no defrosting required.
My cheesecake filling was too soft to handle. What did I do wrong?
This issue typically arises from one of two things: the cream cheese was overly warm and soft to begin with, or it was mixed for too long, which whips in excess air. Make sure your cream cheese is soft enough to mix but still cool. If the mixture still seems too loose, pop it in the fridge for 30 minutes before you start wrapping the Oreos. This should help it firm up nicely.
Conclusion: Your New Favourite Indulgence
Creating fairground desserts like these cookies and cream cheesecake deep fried Oreos at home is an incredibly satisfying endeavour. It is an enjoyable, interactive recipe that produces a stunningly delicious outcome. That initial taste of the warm, crisp batter giving way to the molten cheesecake is a moment of pure bliss that is certain to impress everyone.
We truly hope you give this recipe a go and discover your inner dessert-making champion. Feel free to play around with different flavours and toppings to truly make this recipe your own.
Have you attempted to make these before? Perhaps you have some special tips or inventive variations you would like to share? Please let us know in the comments section below! And if you make them, please remember to tag us in your pictures on social media—we would be absolutely delighted to see your amazing creations!


