Easy Chicken Kiev Recipe: A Classic Made Simple

Have you ever imagined slicing into a crisp, golden chicken breast to reveal a molten centre of garlic and herb butter? For many, Chicken Kiev seems like a sophisticated dish best left to restaurants or enjoyed as a supermarket ready-meal. The process can appear daunting, fiddly, and perhaps a little too ambitious for a weeknight. However, we’re here to show you that creating this spectacular classic at home is not only possible but surprisingly simple. With our foolproof guide, we’ll strip away the complexity, leaving you with a delicious and straightforward Easy Chicken Kiev recipe. Prepare to welcome this once-intimidating dish into your regular meal rotation.
What Makes Our Chicken Kiev Recipe So Easy?
The real trick to simplifying this recipe lies in our refined technique. Many classic methods require you to pound chicken breasts thin, a task that can be messy and often results in an unevenly cooked piece of meat. We sidestep this altogether. Our approach involves cutting a neat pocket into the side of a thick chicken breast, which forms the perfect cavity for our flavourful garlic butter. This makes sealing the chicken far simpler and helps prevent any of the butter from escaping. What’s more, we favour baking the chicken in the oven. After a brief pan-sear to achieve that irresistible golden crust, the oven takes over. This method guarantees the chicken is cooked through to perfection, freeing you up to prepare your sides. It’s a cleaner, more dependable way to craft a stunning homemade chicken kiev time after time.
Ingredients for Your Perfect Easy Chicken Kiev
To begin, we’ll need a selection of simple, good-quality ingredients. The beauty of this dish is rooted in its simplicity, so using the freshest components will truly elevate the final taste. Here is the list of what you will require:
- For the Garlic Butter:
- 100g unsalted butter, softened
- 3-4 large garlic cloves, minced
- A large handful of fresh flat-leaf parsley, finely chopped
- Zest of 1 lemon
- A generous pinch of sea salt and freshly ground black pepper
- For the Chicken:
- 4 large, skinless, boneless chicken breasts (around 200g each)
- 75g plain flour
- 2 large free-range eggs, beaten
- 150g Panko breadcrumbs (or other coarse breadcrumbs)
- 1 teaspoon smoked paprika (optional, for colour and flavour)
- Salt and pepper to season
- 2-3 tablespoons of vegetable or sunflower oil, for frying
We strongly suggest using Panko breadcrumbs if they are available to you. Their unique coarse and airy structure yields an incredibly light and crispy chicken recipe that maintains its satisfying crunch long after leaving the oven.
Step-by-Step Instructions: How to Make Easy Chicken Kiev
Now, let’s get to the best bit! We have organised the entire method into clear, easy-to-follow stages. Simply follow our lead, and you will be presenting a culinary triumph before you know it.
1. Preparing the Garlic Butter
The butter is the very essence of a magnificent Chicken Kiev. Nailing this first part is fundamental to a successful outcome.
- In a small mixing bowl, combine the softened unsalted butter with the minced garlic, chopped parsley, lemon zest, salt, and pepper.
- Stir everything together until all the ingredients are thoroughly incorporated. The aroma will be absolutely divine! Should you have any leftover garlic butter, it tastes wonderful with pasta, and this The Ultimate Garlic Butter Chicken Parmesan Pasta Recipe is an excellent recipe to try.
- Transfer the butter mixture onto a sheet of cling film or baking parchment. Shape it into a compact log, roughly 2-3cm in diameter, and twist the ends to seal it tightly.
- Pop the butter log into the freezer for a minimum of 30 minutes, or the fridge for an hour, until it is completely firm. This step is vital – solid, cold butter is significantly easier to work with and is far less prone to melting out during the cooking process.
2. Stuffing the Chicken
This is where our straightforward “pocket” technique proves its worth. It is much less complicated than it sounds.
- Lay a chicken breast flat on a chopping board. Using a small, sharp knife, carefully slice a deep pocket into the thickest part of the breast. Take care not to cut through to the other side.
- Take your garlic butter out of the freezer and slice it into four evenly sized discs.
- Gently push one disc of the chilled butter into the pocket you created in each chicken breast.
- Press the opening of the pocket together firmly to enclose the butter inside. Use your fingertips to pinch the seam closed. If you have any concerns about it opening up, you can secure it with a cocktail stick (just be sure to take it out before serving!).
3. Breading the Chicken (The ‘Pané’ Station)
This classic three-part process is essential for achieving that iconic crispy coating.
- Arrange three shallow dishes. In the first, put the plain flour seasoned with a pinch of salt and pepper.
- In the second dish, beat the eggs with a small dash of milk or water.
- In the third dish, mix the Panko breadcrumbs with the smoked paprika (if you’re using it), along with another pinch of salt and pepper.
- Take a stuffed chicken breast and coat it thoroughly in the seasoned flour, making sure to shake off any excess.
- Next, submerge it in the beaten egg mixture, ensuring it is completely covered.
- Finally, press it firmly into the Panko breadcrumbs until the entire surface has a thick, even coating. Set the breaded chicken on a clean plate.
- Do the same for the remaining chicken breasts. For an even more robust coating, you can place the breaded chicken in the refrigerator to chill for 20-30 minutes before you start cooking.
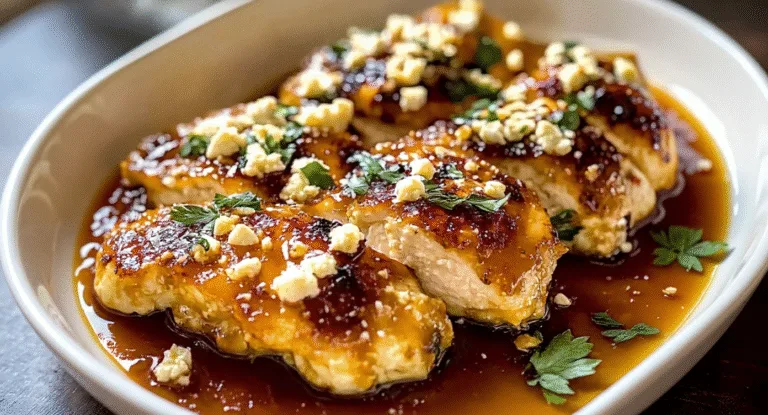
4. Cooking Your Oven-Baked Chicken Kiev to Perfection
We employ a combination of pan-frying and oven-baking to get the ideal result: a crunchy outside and a succulent, fully cooked inside.
- Preheat your oven to 200°C (180°C Fan/Gas Mark 6).
- Heat the oil in a large, oven-safe frying pan over a medium-high heat.
- Gently lay the breaded chicken breasts in the hot pan. Fry them for 2-3 minutes per side, until they turn a lovely golden-brown colour. This stage is crucial for building colour and texture.
- Place the entire pan into the preheated oven (or transfer the chicken to a baking tray if your pan is not oven-safe).
- Bake for 20-25 minutes, or until the chicken is cooked through and its juices run clear. If you use a meat thermometer, it should register 74°C (165°F) in the thickest section of the chicken. The oven-baking technique is a superb way to get a crisp result, similar to this The Ultimate Crispy Baked Shrimp Recipe So Easy.
- Allow the chicken to rest for a couple of minutes after taking it out of the oven. This helps the juices to settle back into the meat and the butter to firm up slightly before you make that first exciting cut.
Top Tips for Flawless Chicken Kiev
- Chill, Chill, Chill: We cannot overstate this. Ensuring the garlic butter is frozen solid is the single most important secret to stopping it from leaking while it cooks. Chilling the breaded chicken also helps the coating stick firmly.
- Don’t Overstuff: As tempting as it might be, avoid packing too much butter into the chicken. One well-sized disc is all that’s needed to create that wonderful buttery cascade.
- Seal the Deal: Check that the pocket is sealed as tightly as you can manage. A secure closure is your greatest asset in preventing a buttery mess on your baking tray.
- Know Your Oven: Every oven behaves a little differently. We suggest using a meat thermometer to ensure your chicken is cooked to perfection without becoming dry.
Frequently Asked Questions (FAQ)
Can I use chicken thighs instead of breasts?
While chicken breasts are the traditional choice because of their thickness and consistent shape, you can certainly try using boneless, skinless chicken thighs. They are a bit more challenging to stuff, so you might need to flatten them slightly with a rolling pin to create a more suitable surface to wrap around the butter.
How can I make this recipe gluten-free?
Very easily! Just substitute the plain flour with a good-quality gluten-free all-purpose flour mix, and use gluten-free Panko or similar coarse gluten-free breadcrumbs for the outer layer. The final result will be equally crispy and just as tasty.
Why did my garlic butter leak out?
This is the most frequent problem people encounter, and it typically stems from one of two issues: either the butter was not sufficiently cold when placed inside the chicken, or the pocket was not sealed correctly. Always make sure the butter is frozen solid and press the edges of the pocket together very firmly.
Can I make Easy Chicken Kiev in an air fryer?
Yes, you absolutely can! To cook them in an air fryer, preheat it to 190°C (375°F). Lightly spray the basket and the chicken kievs with oil, then cook for 15-20 minutes. Remember to flip them over halfway through the cooking time to ensure they are golden and cooked through.
Can I prepare these in advance?
Of course. You can get the chicken kievs ready right up to the breading stage, then cover them and keep them in the fridge for up to 24 hours. They also freeze wonderfully. Just place the uncooked, breaded kievs on a tray in the freezer until solid, then move them to a freezer-safe bag. You can cook them straight from frozen, but you will need to add about 15-20 minutes to the baking time.
What to Serve With Your Masterpiece
Our oven-baked chicken kiev serves as a wonderfully adaptable centrepiece for a meal. We particularly enjoy serving it with:
- Creamy mashed potatoes, which are perfect for soaking up all that delicious garlic butter chicken sauce.
- A side of steamed green beans or a fresh, simple salad of rocket and parmesan.
- A fresh wedge of lemon to squeeze over the top, which provides a lovely acidity to cut through the richness.
If you’re interested in the captivating history of this dish, with its disputed origins across Ukraine, Russia, and France, we recommend this superb article from History Today.
Conclusion: Your New Favourite Dinner Awaits
So, there we have it – a genuinely easy Chicken Kiev recipe that excels in flavour, texture, and that crucial “wow” factor, all without the usual stress. By following our straightforward steps, you can confidently present a meal that tastes as if it has been prepared in a top restaurant, but comes straight from your own kitchen. It is the ideal dish for a special celebration, a weekend indulgence, or any evening when you fancy treating yourself (and your loved ones!).
We would be thrilled to see your culinary creations! Please give this recipe a go and share how it turned out in the comments section below. We’d also appreciate it if you could rate the recipe and tell us what you decided to serve with it!