Deliciously Simple Cheese Wraps: Your Go-To Low-Carb Recipe!
Are you searching for a delicious, satisfying alternative to traditional bread or carb-heavy tortillas? Do you dream of a versatile wrap that’s not only incredibly tasty but also super easy to whip up at home? Well, look no further! We’re here to introduce you to the wonderful world of cheese wraps – a game-changer for your meals, whether you’re following a specific diet or simply craving something new and exciting.
What Exactly Are Cheese Wraps?
Simply put, cheese wraps are thin, flexible (or sometimes delightfully crispy!) “tortillas” made almost entirely from cheese. Imagine your favourite cheese, melted down and transformed into a pliable sheet, ready to be filled with all sorts of delicious goodies. They are a brilliant invention, especially popular within the keto and low-carb communities, but honestly, they’re a treat for anyone who loves cheese. We find they offer a unique texture and a rich flavour that plain flour tortillas just can’t match. They are naturally gluten-free, making them an excellent choice for those with gluten sensitivities too.
Why We Love Cheese Wraps (And You Will Too!)
There are so many reasons to fall in love with cheese wraps, and we’re excited to share why they’ve become a staple in our kitchens.
The Health Angle: Perfect for Keto and Low-Carb Lifestyles
One of the biggest draws of cheese wraps is their suitability for specific dietary approaches. If you’re following a ketogenic diet, you’ll be pleased to know these are fantastic keto cheese wraps. They are naturally very low in carbohydrates, high in fat, and provide a moderate amount of protein, fitting perfectly into keto macros. Similarly, for anyone looking to reduce their carb intake, these low carb wraps are a lifesaver, allowing you to enjoy wrap-style meals without the carb load of traditional options.
Taste and Texture: A Cheesy Delight
Let’s be honest, the taste is a huge factor! Depending on the cheese you use and how long you cook them, cheese wraps can range from soft and chewy to wonderfully crispy around the edges with a slightly softer centre. The intense, savoury flavour of the cheese itself makes every bite a joy. We love that rich, umami punch they deliver.
Simplicity: So Easy to Make!
You might think something this good must be complicated, but that couldn’t be further from the truth. Making homemade cheese wraps is incredibly straightforward. With just a few simple steps, you can have fresh wraps ready in minutes. It’s one of those recipes that offers maximum reward for minimal effort – our favourite kind!
Customisation: Endless Possibilities
The beauty of cheese wraps lies in their versatility. Not only can you experiment with different types of cheese and seasonings for the wrap itself, but the filling options are virtually limitless. From breakfast scrambles to hearty lunch fillings and savoury dinner combinations, cheese wraps provide the perfect canvas for your culinary creativity.
Gathering Your Ingredients for Perfect Cheese Wraps
One of the best things about making cheese wraps is the incredibly short ingredient list. You might already have everything you need!
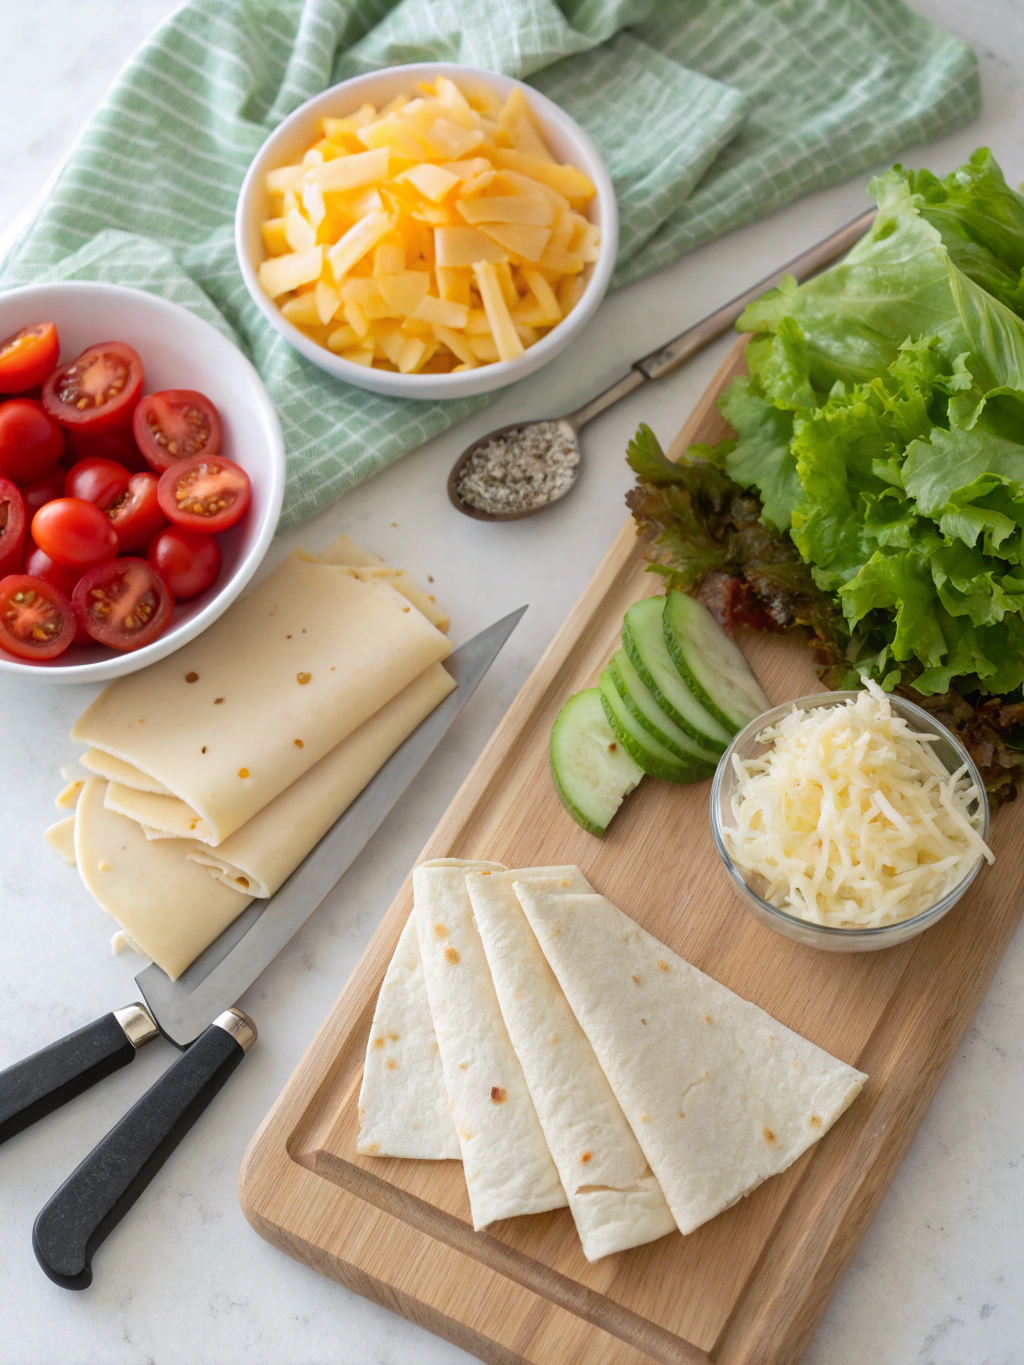
The Star of the Show: Choosing Your Cheese
The cheese is, unsurprisingly, the most important ingredient. The type of cheese you choose will determine the flavour and texture of your wraps.
- Cheddar: A popular choice, offering a good melt and a classic cheesy flavour. Medium or mature cheddar works well.
- Provolone: Melts beautifully and has a mild, slightly sweet flavour. It creates very pliable wraps.
- Monterey Jack: Another excellent melter with a mild, buttery taste.
- Mozzarella (low-moisture): Good for a chewier wrap with a classic pizza-like flavour. Ensure it’s low-moisture, as fresh mozzarella has too much water.
- Parmesan: While it can be used on its own for very crispy, lace-like wraps (often called frico), we like to add a tablespoon or two to other cheeses for an extra flavour kick and crispiness.
- Cheese Slices: Pre-sliced cheese (like provolone or mild cheddar slices) can also be used. Simply arrange them to melt together.
We generally recommend grating your own cheese from a block. Pre-shredded cheese often contains anti-caking agents like potato starch or cellulose, which can sometimes affect how smoothly the cheese melts and can add a tiny amount of carbs.
Optional Flavour Enhancers
While plain cheese wraps are delicious, you can easily jazz them up with a few additions:
- Dried Herbs: A pinch of dried oregano, Italian seasoning, or parsley can add a lovely aromatic touch.
- Spices: Garlic powder, onion powder, smoked paprika, or a tiny dash of cayenne pepper for some heat can elevate the flavour.
- Seeds: Sesame seeds, poppy seeds, or even everything bagel seasoning sprinkled on top before baking add texture and taste.
How to Make Cheese Wraps: Our Step-by-Step Guide
We’re going to focus on the oven-baked method as we find it gives consistent results and allows you to make multiple wraps at once. It’s a fantastic easy cheese wraps recipe for beginners.
Essential Equipment
- Baking tray (a large, flat one is best)
- Parchment paper (this is crucial – do not skip it!)
- Spatula (a thin, flexible one works well)
- Measuring cup or scales (for portioning cheese)
The Oven-Baked Method for Delicious Cheese Wraps
- Preheat Your Oven: Set your oven to 180-200°C (350-400°F). We find around 190°C (375°F) works well for most cheeses, but you might need to experiment slightly.
- Prepare Your Baking Tray: Line your baking tray with parchment paper. Make sure the parchment paper lies flat. This prevents sticking and makes cleanup a breeze.
- Portion Your Cheese: For each wrap, you’ll need about 50-70g (around 1/2 to 3/4 cup) of shredded cheese, depending on how large and thick you want your wrap. Create thin, even circles of cheese on the parchment paper, about 15-20cm (6-8 inches) in diameter. Leave some space between each circle as the cheese will spread as it melts.
- Add Seasonings (Optional): If you’re using any herbs or spices, sprinkle them evenly over the cheese circles now.
- Bake: Place the baking tray in the preheated oven. Bake for 5-8 minutes. The exact time will depend on your oven and the type of cheese. You’re looking for the cheese to be fully melted, bubbly, and the edges to be turning golden brown and slightly crispy. If you want softer wraps, bake for a shorter time. For crispy cheese wraps, let the edges get a bit darker.
- Cool and Shape (Optional): Remove the baking tray from the oven. Let the cheese wraps cool on the parchment paper for a minute or two. They will be very hot and fragile straight out of the oven.
- For flat wraps: Once they are cool enough to handle but still pliable, carefully peel them off the parchment paper using a spatula. Place them on a wire rack to cool completely.
- For taco shells: While still warm and pliable, you can drape them over the handle of a wooden spoon or between the cups of an upside-down muffin tin to create a taco shape. They will crisp up as they cool.
The Stovetop (Pan-Fried) Method
If you only want to make one or two wraps, the stovetop method is quicker:
- Heat Your Pan: Place a non-stick frying pan over medium heat. You don’t usually need any oil, especially with full-fat cheese.
- Add Cheese: Sprinkle your desired amount of cheese in a thin, even circle in the hot pan.
- Cook: Cook for 2-4 minutes, or until the cheese is melted, bubbly, and the edges are starting to crisp. You’ll see the oil separate from the cheese.
- Remove and Cool: Carefully slide the cheese wrap onto a plate lined with parchment paper or directly onto a cooling rack. Let it cool slightly before using.
Watch How It’s Done: Making Perfect Cheese Wraps
Sometimes, seeing is believing! We’ve found a fantastic, beginner-friendly video that shows you just how easy it is to make keto cheese wraps. This quick tutorial by The Keto King demonstrates the stovetop method beautifully.
Tips and Tricks for the Best Homemade Cheese Wraps
We’ve made our fair share of cheese wraps, and here are some tips we’ve learned along the way:
- Don’t Overcrowd: Whether baking or pan-frying, give your cheese circles space to spread.
- Watch Closely: Cheese can go from perfectly melted to burnt very quickly. Keep a close eye on them, especially during your first few attempts.
- Parchment Paper is Key: We can’t stress this enough for the oven method. For the stovetop, a good quality non-stick pan is essential.
- Cool Slightly Before Handling: They are very delicate when hot. A minute or two of cooling makes them much easier to move without tearing.
- Thickness Matters: Thinner layers of cheese will result in crispier, more delicate wraps. Slightly thicker layers will give you a chewier, more robust wrap.
- Blot Excess Grease: Some cheeses release more oil than others. If you find your wraps are a bit greasy, you can gently blot them with a paper towel once they’ve cooled slightly.
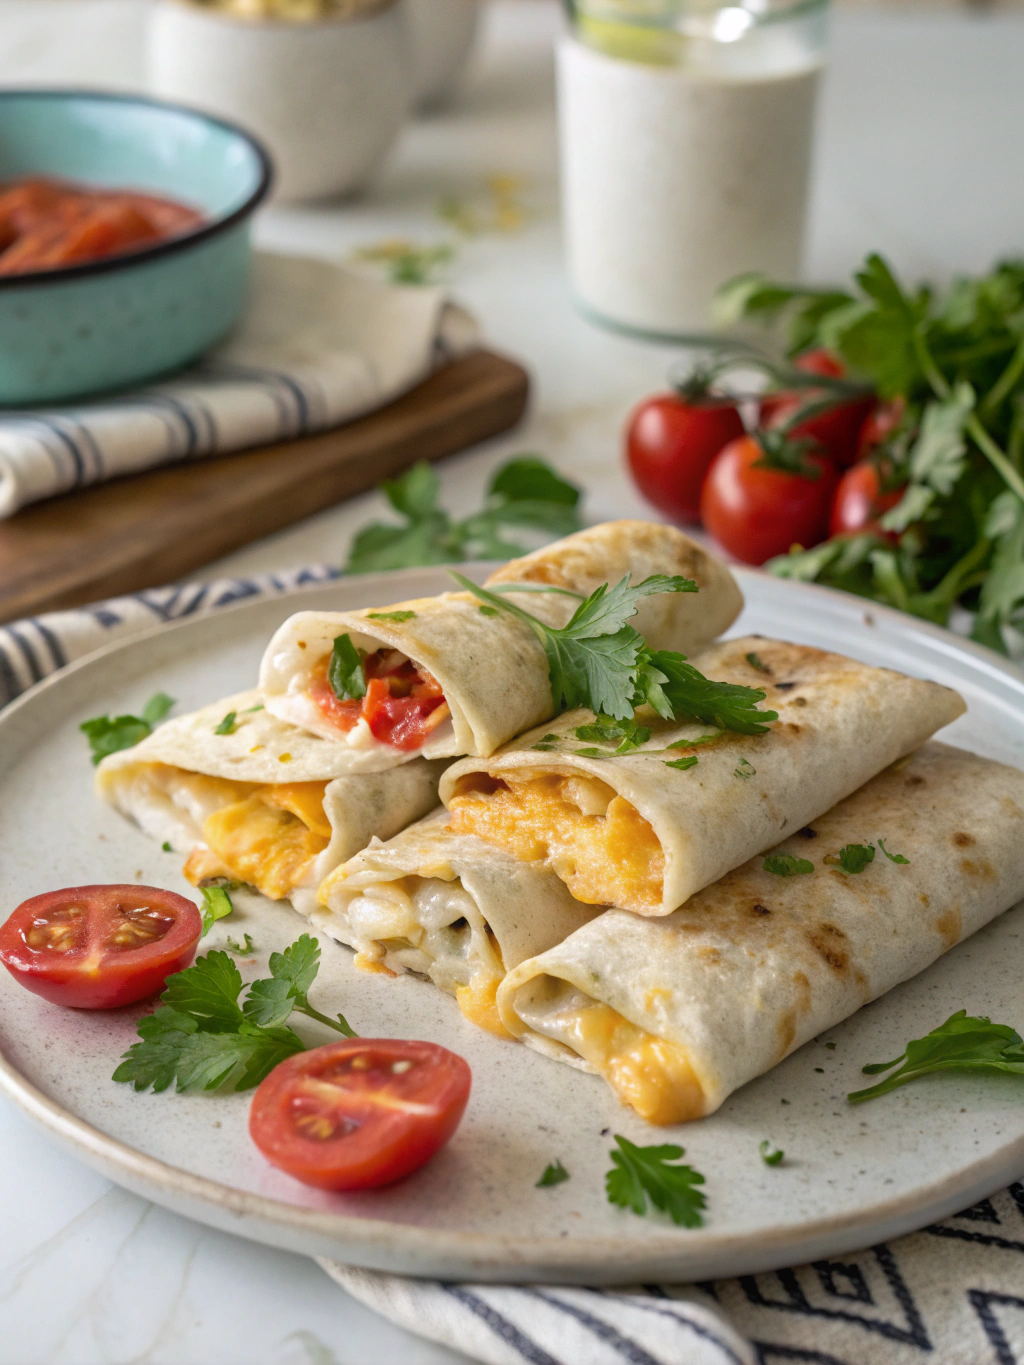
Filling Ideas for Your Delicious Cheese Wraps
Now for the fun part – filling your creations! Cheese wraps are incredibly versatile. Here are some of our favourite ideas:
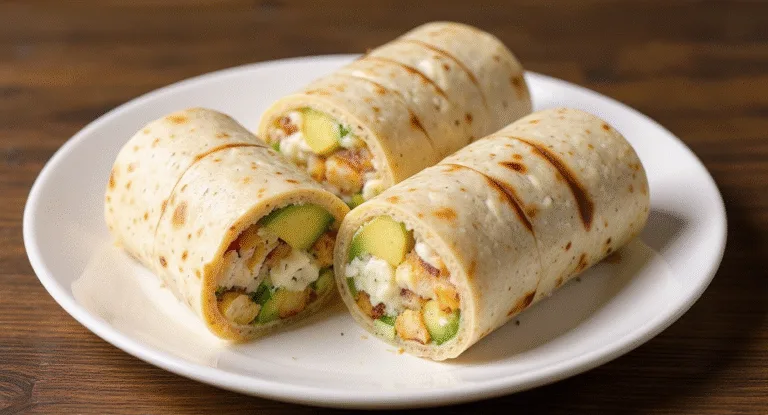
- Breakfast Wraps: Scrambled eggs, cooked bacon or sausage, avocado slices, and a dollop of salsa.
- Lunch Wraps:
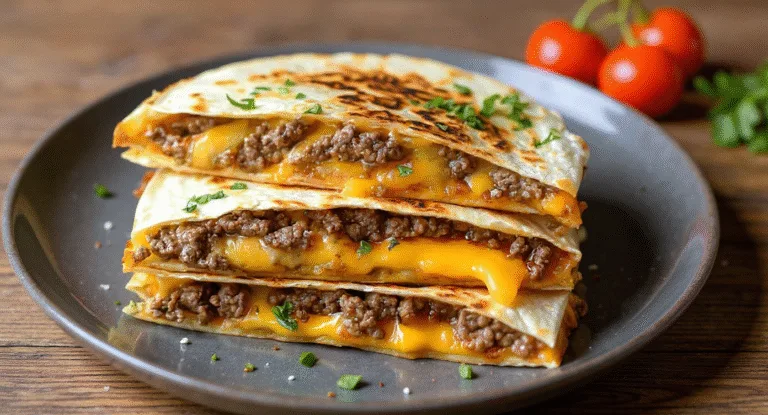
- Deli meats like turkey or ham, sliced cheese (yes, more cheese!), lettuce, tomato, and mayonnaise or mustard.
- A flavourful chicken salad. If you’re looking for inspiration, our Chicken Salad Chick Grape Salad Recipe makes an excellent filling.
- Tuna salad with crisp cucumber and celery.
- Dinner Wraps:
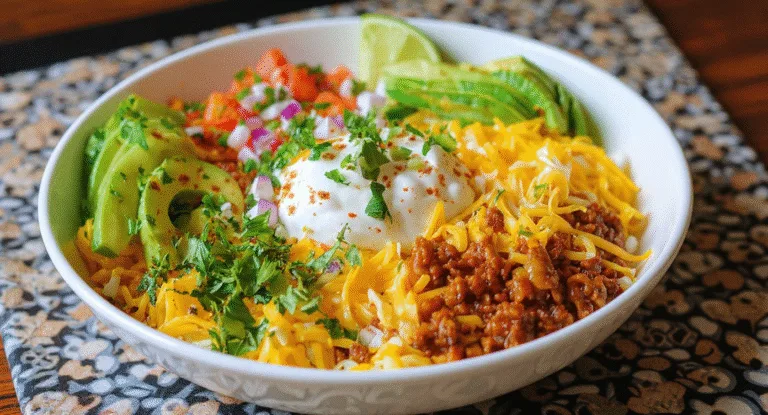
- Taco-seasoned ground beef or chicken, shredded lettuce, diced tomatoes, sour cream, and guacamole.
- Shredded BBQ chicken or pork with coleslaw.
- Fajita-style fillings with seasoned chicken or steak, peppers, and onions. For a truly decadent experience, consider filling your cheese wrap with the deliciousness from a Chicken Philly Cheesesteak Recipe.
- Snack Wraps: Simply spread with cream cheese and sprinkle with everything bagel seasoning, or roll up with a slice of ham.
Storing Your Cheese Wraps
Ideally, cheese wraps are best enjoyed fresh on the day they are made, especially if you like them crispy. However, you can store them:
- Refrigeration: Once completely cooled, store leftover cheese wraps in an airtight container in the refrigerator, separated by layers of parchment paper to prevent sticking. They should last for 3-4 days.
- Reheating: You can eat them cold from the fridge, or if you want to refresh their crispness, you can briefly reheat them in a dry frying pan over low heat or for a few seconds in a microwave (though this can make them softer).
Customising Your Cheese Wraps
Don’t be afraid to experiment to find your perfect cheese wrap!
Spice It Up!
If you like a bit of heat, try adding a pinch of red chilli flakes or a finely chopped jalapeño (seeds removed for less heat) to the cheese before melting. A dash of hot sauce in your filling can also do the trick.
Herbaceous Delights
Fresh herbs can also be used, but add them towards the end of the cooking process or sprinkle on after they come out of the oven, as they can burn more easily than dried herbs. Chopped chives or fresh parsley are lovely.
Different Cheeses, Different Flavours
Blend cheeses! A mix of cheddar and Parmesan offers great flavour and crispness. Provolone mixed with a little smoked Gouda can be divine. The possibilities are endless, so have fun discovering your favourite combinations.
Frequently Asked Questions (FAQ) about Cheese Wraps
- Are cheese wraps healthy?
- Cheese wraps can be a healthy part of many diets, especially low-carb and ketogenic ones. They provide protein and fat, and are very low in carbohydrates. However, cheese is also high in saturated fat and sodium, so moderation is key, especially if you have specific health concerns. For more information on navigating a keto diet, resources like Diet Doctor offer comprehensive guides.
- Can I make cheese wraps without parchment paper?
- For the oven method, we strongly advise against it. Cheese will stick terribly to an unlined baking tray. A silicone baking mat can be an alternative, but parchment paper is generally more reliable for easy release. For the stovetop method, a high-quality non-stick pan is essential.
- Why are my cheese wraps sticking?
- If using the oven, it’s likely due to not using parchment paper or trying to remove them too soon. If pan-frying, your pan might not be sufficiently non-stick, or you might be trying to flip/remove them before the edges have properly crisped and released.
- Can I freeze cheese wraps?
- Yes, you can freeze them. Once completely cooled, stack them with parchment paper between each wrap and place them in a freezer-safe bag or container. They can be frozen for up to a month. Thaw in the refrigerator. Their texture might change slightly upon thawing, becoming a bit more brittle.
- What’s the best cheese for cheese wraps?
- It depends on your preference! Cheddar, Provolone, and Monterey Jack are great all-rounders for flavour and meltability. Experiment to find your favourite. Sliced cheese can also work very well and simplifies the portioning.
- Are cheese wraps gluten-free?
- Yes, as they are made purely from cheese (and optional seasonings), they are naturally gluten-free wraps, making them an excellent choice for individuals with coeliac disease or gluten sensitivity.
- How do I make my cheese wraps extra crispy?
- Bake or pan-fry them a little longer until the edges are nicely browned and very crisp. Using a thinner layer of cheese also promotes crispiness. Letting them cool completely on a wire rack helps them firm up.
Beyond the Basic Wrap: Creative Uses for Cheese Wraps
Don’t just limit yourself to standard wrap fillings! We’ve found that these cheesy creations can be used in other fun ways:
- Taco Shells: As mentioned, drape warm cheese wraps over a spoon handle or muffin tin to create crispy taco shells.
- Crackers: Bake the cheese until very crispy, then break it into pieces once cooled to make delicious, low-carb cheese crackers.
- Mini Pizza Bases: Use smaller cheese circles as a base for mini pizzas. Top with a dab of tomato sauce, more cheese, and your favourite toppings, then broil briefly.
- Salad Bowls: If you’re feeling ambitious, you can drape a larger warm cheese wrap over an inverted bowl to create an edible salad bowl. Ensure it’s large enough and not too thin to hold its shape.
Conclusion: Your New Favourite Way to Wrap!
We hope we’ve convinced you to give cheese wraps a try! They are a wonderfully simple, incredibly delicious, and amazingly versatile addition to any meal plan. Whether you’re embracing a low-carb lifestyle, looking for gluten-free options, or simply a cheese aficionado like us, these wraps are sure to become a new favourite.
So, head to your kitchen, grab your favourite cheese, and get ready to create something truly special. We encourage you to experiment with different cheeses, seasonings, and fillings to discover your perfect cheese wrap combination. Happy cooking!
What are your favourite fillings for cheese wraps? Share your ideas and successes in the comments below – we’d love to hear from you! And for more mouth-watering recipes, be sure to explore the rest of our site.