Caramel Brownie Cheesecake Recipe: A Truly Indulgent Treat
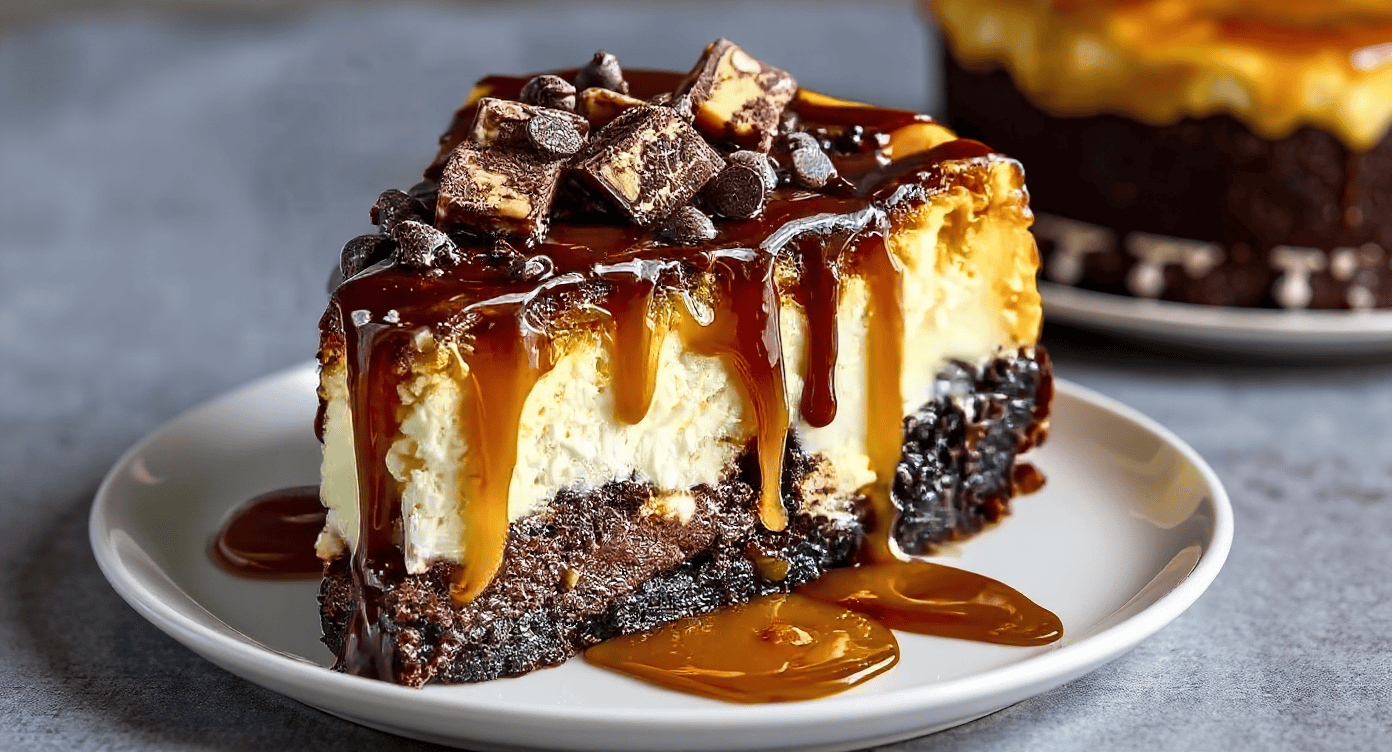
Imagine, if you will, a dessert that masterfully blends three of the most cherished confections into a single, breathtaking masterpiece. A creation so profoundly rich, so decadent, and so wonderfully satisfying that each mouthful is a pure moment of joy. Well, you need to imagine no longer. We are here to show you how to create the most sensational caramel brownie cheesecake you’ve ever had the pleasure of tasting. This is far more than a simple cake; it’s a culinary journey. It represents the perfect union of a dark, fudgy brownie base, a sublimely smooth and velvety cheesecake filling, and a generous cascade of golden, homemade caramel. This is the decadent dessert recipe that will have your friends and family pleading for the recipe.
Why You’ll Fall in Love with This Caramel Brownie Cheesecake
We understand this recipe might seem a touch complex upon first inspection, but we can assure you it is worth every moment of effort. Here is why we’re convinced this is the best cheesecake recipe you will ever try:
- The Perfect Trio: It combines a brownie, a cheesecake, and a caramel sauce into one glorious dessert. You no longer have to pick a favourite!
- A True Centrepiece: This cheesecake is simply made for special occasions. Be it a birthday, a dinner party, or a festive celebration, it is guaranteed to leave your guests in awe.
- Completely Achievable: We have carefully broken down the entire process into straightforward, manageable steps. With our clear guidance and handy tips, even baking beginners can produce a showstopper.
- Utterly Delicious: The harmony of textures and flavours is truly exceptional. The intense chocolate of the brownie beautifully balances the gentle tang of the cheesecake, while the caramel adds a buttery, sweet-salty note that ties it all together perfectly.
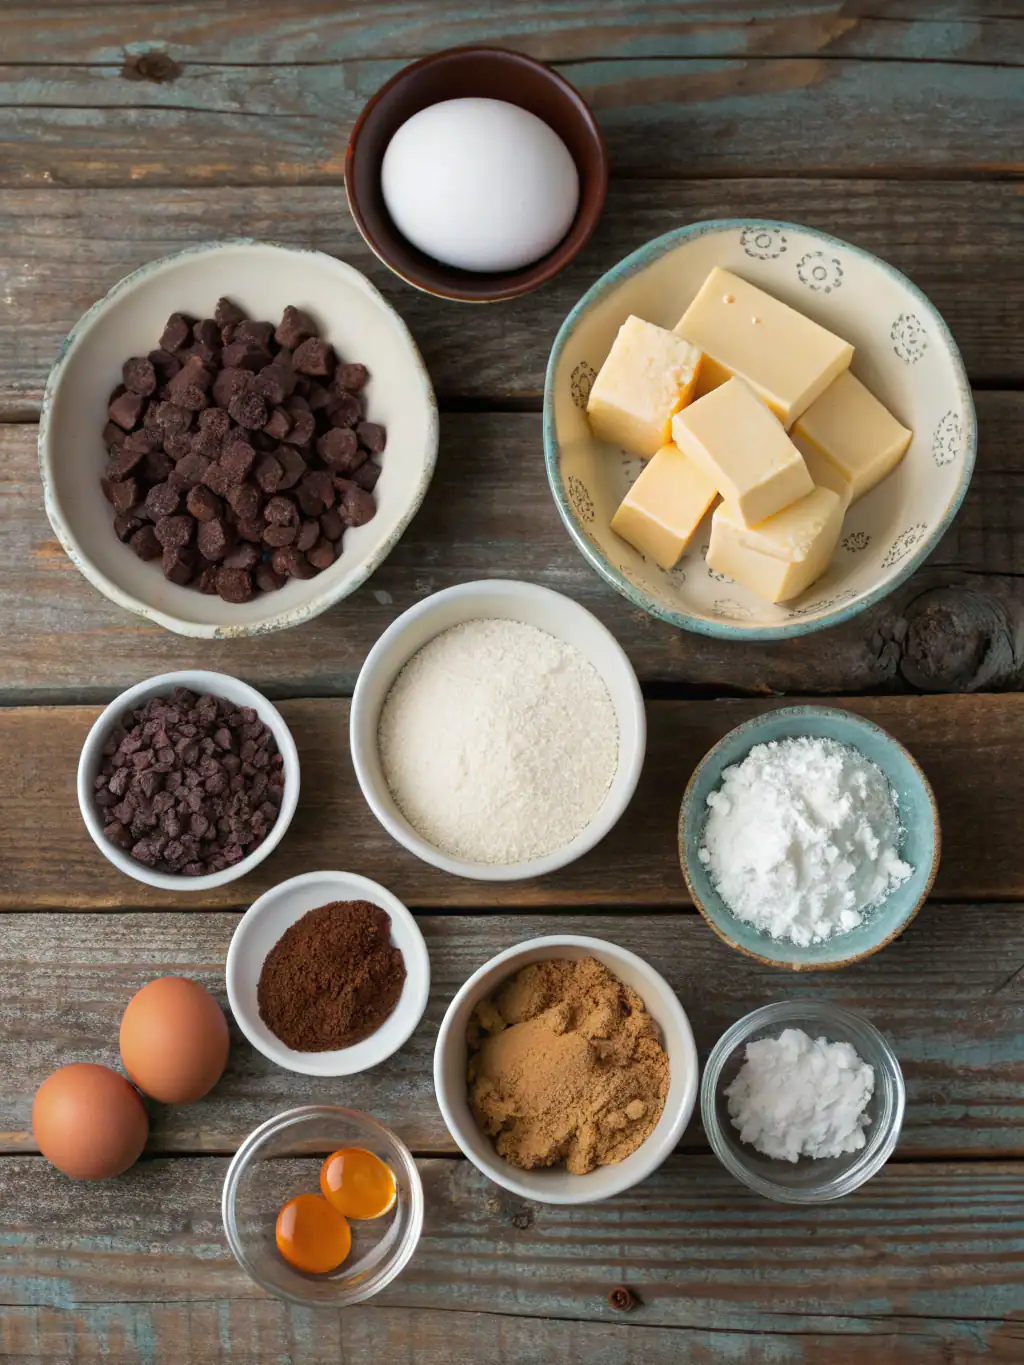
The Essential Ingredients for Your Masterpiece
For the most outstanding results, we always suggest using high-quality ingredients. The brilliance of this caramel brownie cheesecake comes from its distinct layers, so let’s outline what you will require for each component.
For the Fudgy Brownie Base
The foundation of our cheesecake is a wonderfully rich and fudgy brownie base. It must be robust enough to support the creamy filling, yet tender enough to simply melt in your mouth.
- 115g unsalted butter, cubed
- 150g dark chocolate (at least 70% cocoa solids), chopped
- 200g caster sugar
- 2 large eggs, at room temperature
- 1 tsp vanilla extract
- 60g plain flour
- 25g cocoa powder
- A pinch of salt
For the Creamy Cheesecake Filling
The main event is, of course, the velvety, smooth, and creamy cheesecake filling. Our secret to a perfectly smooth texture is to use full-fat ingredients that are all at room temperature.
- 680g full-fat cream cheese, at room temperature
- 200g caster sugar
- 3 large eggs, at room temperature
- 1 tsp vanilla extract
- 120ml soured cream, at room temperature
For the Luscious Caramel Drizzle and Topping
No cheesecake feels complete without a stunning topping. Our homemade caramel sauce is liquid gold, and you’ll be surprised at how simple it is to prepare.
- 200g granulated sugar
- 90g unsalted butter, cubed and at room temperature
- 120ml double cream, at room temperature
- 1 tsp sea salt flakes (optional, but highly recommended)
Let’s Get Baking: A Step-by-Step Guide
Are you ready to create something truly magical? Follow these instructions with care, and you will be well on your way to dessert perfection. Don’t forget to take your time and savour the creative process!
Step 1: Crafting the Perfect Brownie Base
To begin, preheat your oven to 180°C (160°C Fan/Gas Mark 4). Grease a 23cm (9-inch) springform tin and line the bottom with baking parchment. In a heatproof bowl suspended over a pan of gently simmering water, melt the butter and dark chocolate together, stirring until you have a smooth, glossy mixture. Take it off the heat and let it cool for a few minutes. Whisk in the caster sugar, then incorporate the eggs and vanilla extract. Sift in the flour, cocoa powder, and salt, and carefully fold them in until just combined. It’s crucial not to overmix! Pour this batter into your prepared tin and bake for 20-25 minutes. It’s done when a skewer inserted into the centre emerges with a few moist crumbs attached. Allow it to cool entirely within the tin.
Step 2: Whipping Up the Silky Cheesecake Filling
Lower the oven temperature to 160°C (140°C Fan/Gas Mark 3). In a large mixing bowl, use an electric mixer on a low setting to beat the cream cheese until it is completely smooth. Bit by bit, add the caster sugar, continuing to beat until everything is well incorporated. Introduce the eggs one by one, mixing on a low speed after each addition until just blended. To finish, gently stir in the vanilla extract and soured cream. Remember, the secret to a crack-free surface is to avoid incorporating too much air, so maintain a low mixer speed.
Step 3: Assembling and Baking Your Caramel Brownie Cheesecake
Gently pour the cheesecake filling over the cooled brownie base, using a spatula to level the top. To guarantee a moist and uniform bake, we are going to use a water bath (also known as a bain-marie). Wrap the outside of your springform tin securely with two layers of heavy-duty aluminium foil. Sit the tin inside a large roasting pan and carefully pour boiling water into the pan so that it comes halfway up the sides of the cheesecake tin. Cautiously move it to the oven and bake for 60-70 minutes. The cheesecake is baked when the edges look set, but the centre retains a slight jiggle. Switch off the oven, prop the door ajar, and let the cheesecake cool inside for at least one hour. This gradual cooling process is vital for preventing cracks.
Step 4: Creating the Golden Caramel Sauce
As your cheesecake cools, it’s the perfect time to make the homemade caramel sauce. In a medium-sized saucepan, heat the granulated sugar over a medium flame, stirring continuously with a heatproof spatula until it has completely melted into a smooth, amber-coloured liquid. As soon as it melts, add the cubed butter and whisk vigorously until it has all dissolved. The mixture will bubble up, so please be careful. Slowly and steadily pour in the double cream, whisking all the while. Allow the sauce to bubble away for one minute, then take it off the heat and stir in the sea salt. Let it cool down to room temperature, during which time it will naturally thicken.
Step 5: The Grand Finale – Chilling and Decorating
After the cheesecake has had its cooling time in the oven, take it out of the water bath and allow it to cool completely on a wire rack. Next, cover it with cling film and place it in the refrigerator for a minimum of 6 hours, although overnight is even better. This chilling phase is absolutely essential! It allows the cheesecake to set firmly and lets the flavours deepen and marry. When it’s time to serve, run a thin knife around the inside edge of the tin before you release the springform collar. Lavishly drizzle the cooled caramel sauce over the top, encouraging it to drip tantalisingly down the sides. For an extra flourish, you could top it with more brownie pieces or a scattering of chocolate shavings.
Pro Tips for a Flawless Cheesecake Every Time
We truly want your caramel brownie cheesecake to be a triumph. Here are some expert pointers that we’ve gathered over the years:
- Room Temperature is Key: Make certain your cream cheese, eggs, and soured cream are all at room temperature before you begin. This allows them to blend together seamlessly, preventing a lumpy batter.
- Don’t Overmix: When you overmix the cheesecake filling, you introduce too much air. This can cause the cheesecake to puff up dramatically in the oven and then crack as it cools down. Use a low speed and mix only until the ingredients are just incorporated.
- Embrace the Water Bath: A water bath generates a humid, steamy environment inside your oven. This encourages the cheesecake to bake gently and evenly, which is the key to a creamy consistency and a flawless, crack-free top. For more fantastic advice, take a look at this guide on how to make the perfect cheesecake from BBC Good Food.
- Patience is a Virtue: The slow cooling and extended chilling periods are not optional steps. Rushing them can result in a cracked surface and a cheesecake that has not set correctly.
Customising Your Caramel Brownie Cheesecake
Although this recipe is magnificent just as it is, we encourage you to be creative and add your own unique flair. Here are a few thoughts to get you started:
Flavour Twists
- Go Nuts: For a lovely textural contrast, try adding a handful of toasted pecans or walnuts into the brownie batter.
- Chocolate Overload: Gently stir some dark or milk chocolate chips through the cheesecake filling just before you bake it.
- Salted Caramel Supreme: Be generous with the sea salt flakes in your caramel sauce to create a more distinct and exciting sweet-and-salty taste.
Serving Suggestions
Present a slice of this glorious cheesecake with a spoonful of freshly whipped cream, a scoop of vanilla bean ice cream, or some fresh raspberries to provide a sharp counterpoint to the richness. If you discover a newfound love for baking after making this, why not have a go at our Blueberry Heaven Cookies The Definitive Recipe For Soft Chewy Perfection? Alternatively, for another chocolatey indulgence, our Almond Joy Cookie Recipe is always a hit.
Frequently Asked Questions (FAQ)
Can I prepare this caramel brownie cheesecake in advance?
Of course! In fact, we highly recommend it. This cheesecake benefits from being made a day ahead, as this gives it ample time to chill and set perfectly. Simply keep it covered in the fridge and pour over the caramel sauce just before you plan to serve it.
How should I store any leftovers?
Keep any remaining cheesecake in an airtight container in the refrigerator. It will remain fresh and delightful for up to 5 days.
My cheesecake has cracked! What went wrong?
Please don’t despair; a cracked cheesecake is still a very delicious cheesecake! Cracks are typically the result of overmixing, overbaking, or cooling the cheesecake too rapidly. To avoid this, follow our pro tips about using a low mixer speed, checking for that slight wobble in the centre, and allowing it to cool down slowly in the oven.
Is it alright to use a pre-made brownie mix?
Yes, if you’re pressed for time, a high-quality boxed brownie mix can be used for the base. That said, we find our homemade brownie recipe yields the ideal fudgy texture needed to support the cheesecake layer.
Can this cheesecake be frozen?
Yes, this cheesecake freezes beautifully for up to one month. We suggest freezing it either whole or in individual slices, wrapped snugly in cling film and then a layer of foil. For the best texture, freeze it without the caramel sauce, adding it after the cheesecake has thawed overnight in the refrigerator.
Your New Favourite Indulgent Dessert
So there you have it—our complete guide to making a truly unforgettable caramel brownie cheesecake. It is certainly a labour of love, but the final product is a spectacular dessert that is as much a feast for the eyes as it is for the palate. The combination of dense, fudgy brownie, creamy cheesecake, and a sweet, salty caramel is a flavour pairing made in heaven. We’re confident this will become your signature recipe for any special event that requires a dessert with a real “wow” factor.
We would be thrilled to see your creations! Please share a photo of your cheesecake on social media and be sure to tag us. Now, it’s time to put on your apron and get ready to bake the most amazing caramel brownie cheesecake you’ve ever made!


