Black Velvet Cake Recipe: A Guide to Decadent Perfection
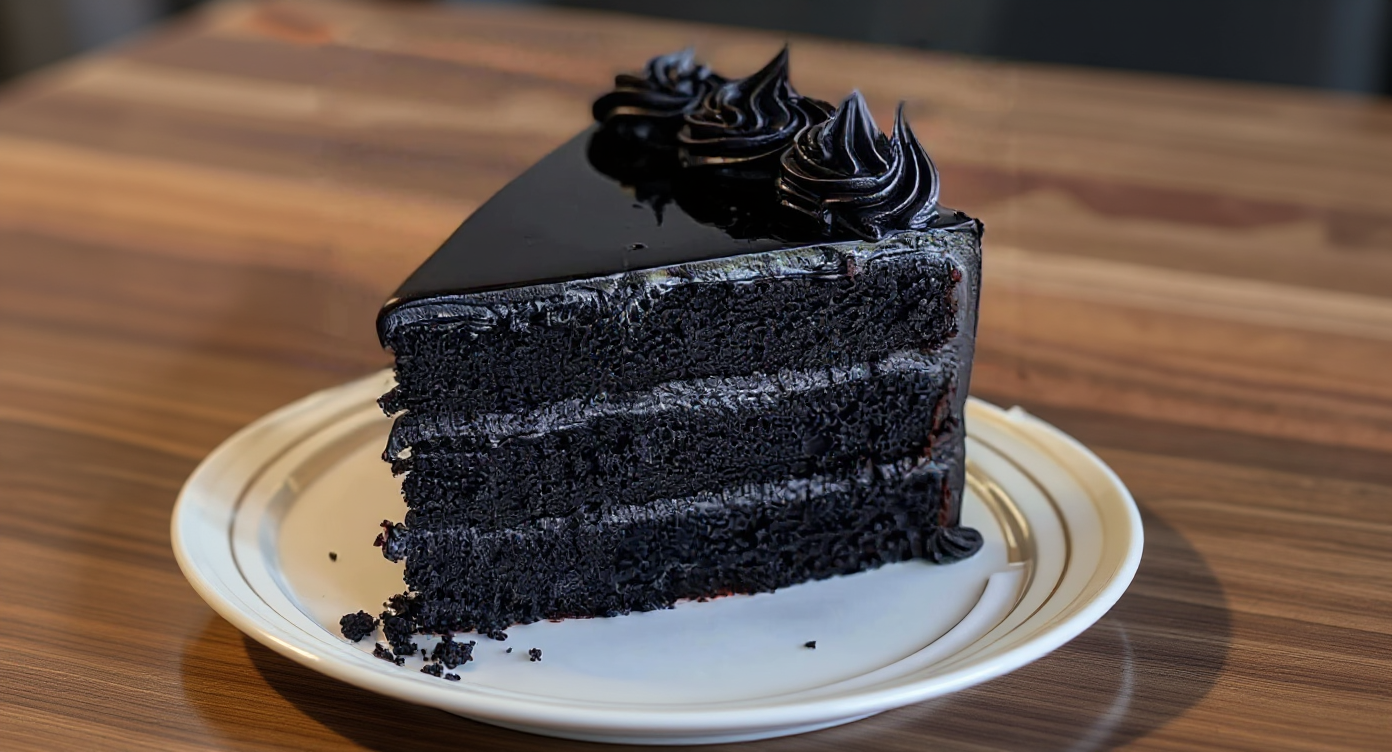
Are you on the hunt for a dessert that’s not just a treat for the taste buds but also a feast for the eyes? A cake so striking and elegant that it hushes the room before anyone has even tasted a slice? If so, we believe we have just the thing for you. Allow us to present the sophisticated, enigmatic cousin of the well-loved red velvet: the black velvet cake. This guide will walk you through creating a dessert with a stunningly dark, rich crumb and a complex, deeply satisfying flavour. It is, without a doubt, the perfect centrepiece for any memorable occasion.
What Exactly is Black Velvet Cake?
While red velvet cake is a familiar friend to most, its darker counterpart is a wonderful discovery waiting to be made. The black velvet cake boasts the same soft, tender, and “velvety” mouthfeel but trades the familiar crimson for a dramatic, deep black shade. This impressive colour isn’t the result of copious food colouring, but rather a special ingredient that also completely redefines its taste. It ventures beyond the gentle tang of red velvet into the realm of a profound dark chocolate velvet cake, echoing the flavour of a classic dark sandwich biscuit but with a far more delicate crumb.
The Secret Ingredient: Black Cocoa Powder
The true magic behind this cake’s spectacular colour and distinctive flavour is black cocoa powder. This is far from your standard-issue cocoa. It’s an “ultra-dutched” variety, which means it has undergone a more intensive treatment with an alkaline solution compared to regular Dutch-process cocoa.
So, what does this process do for our cake?
- Colour: It gives the cake an intensely dark, naturally black appearance without any need for artificial colouring.
- Flavour: The alkalising process neutralises its acidity, which yields an exceptionally smooth, non-bitter, and profoundly chocolatey taste. It is often likened to the flavour of an Oreo biscuit.
- Texture: As it contains less fat than other cocoas, it’s vital to pair it with moisture-rich ingredients, which our recipe is carefully designed to do.
You can usually source black cocoa powder from online retailers or specialist baking suppliers. For a fascinating look into the science of different cocoa powders, we heartily recommend this article from King Arthur Baking.
Gathering Your Ingredients for the Perfect Cake
Before we roll up our sleeves, let’s get all of our components ready. We have found that using ingredients at room temperature—particularly the eggs, buttermilk, and butter—encourages them to combine more harmoniously, leading to a superior texture in the finished cake. It’s a simple step that yields significant rewards.
For the Black Velvet Cake:
- 250g plain flour
- 300g caster sugar
- 65g black cocoa powder
- 1 ½ tsp bicarbonate of soda
- 1 tsp baking powder
- 1 tsp salt
- 2 large eggs, at room temperature
- 240ml buttermilk, at room temperature
- 120ml vegetable oil
- 2 tsp vanilla extract
- 240ml freshly brewed hot coffee (or hot water)
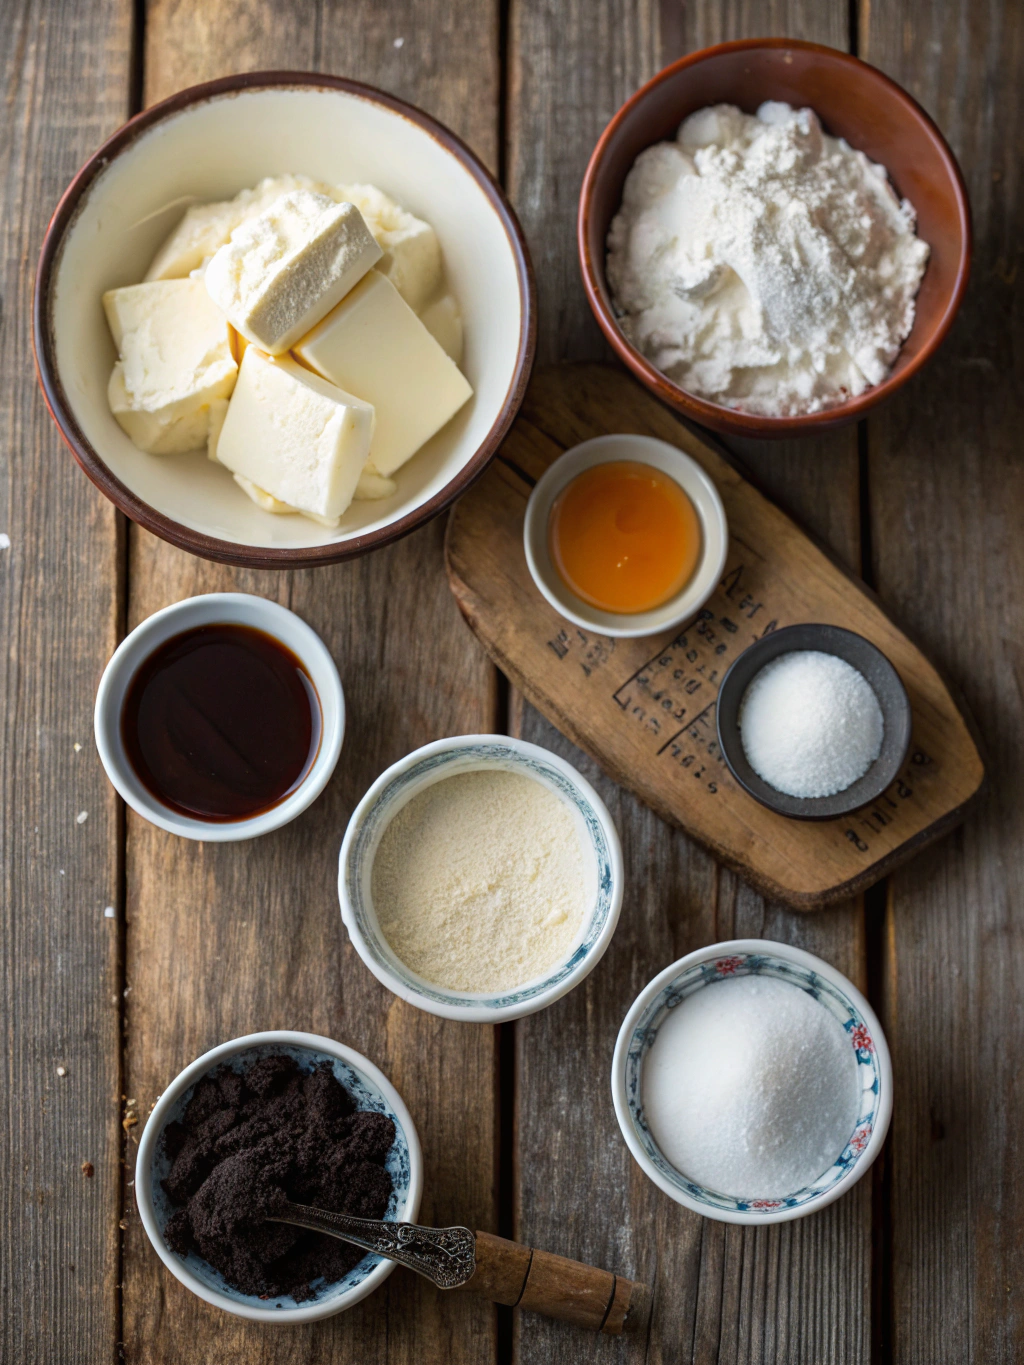
For the Classic Cream Cheese Frosting:
- 225g full-fat cream cheese, softened to room temperature
- 115g unsalted butter, softened to room temperature
- 480g icing sugar, sifted
- 2 tsp vanilla extract
- A pinch of salt
1. Preparing the Cake Batter
- Preheat and Prep: To begin, set your oven to 175°C (160°C Fan/Gas Mark 4). Thoroughly grease two 8-inch (20cm) round cake tins and line the bases with baking parchment.
- Combine Dry Ingredients: In a large bowl, whisk together the plain flour, caster sugar, black cocoa powder, bicarbonate of soda, baking powder, and salt. Sifting these first is a great way to prevent any lumps and achieve a silky batter.
- Mix Wet Ingredients: In a separate bowl, beat the eggs, buttermilk, vegetable oil, and vanilla extract until fully incorporated.
- Combine Wet and Dry: Gently pour the wet mixture into the dry ingredients. Using an electric mixer on a low setting (or a whisk), mix until everything is just combined. It’s important not to overmix here, as we want to maintain a tender crumb.
- Add the Coffee: For the final step, slowly pour the hot coffee into the batter, mixing on low speed until perfectly smooth. You’ll notice the batter is quite thin; this is exactly as it should be! The heat from the coffee helps to ‘bloom’ the cocoa, intensifying its rich flavour.
2. Baking to Perfection
- Divide and Bake: Pour the batter evenly between your two prepared tins.
- Bake: Pop the tins into your preheated oven and bake for 30–35 minutes. You can check if they are ready by inserting a skewer into the centre of each cake; if it comes out clean, they are done.
- Cooling is Crucial: Once out of the oven, allow the cakes to cool in their tins for around 15 minutes. Then, carefully invert them onto a wire rack to cool down completely. This step is essential – attempting to frost a warm cake will only result in a soupy, melted mess!
Whipping Up the Perfect Cream Cheese Frosting
The zesty, creamy sweetness of a traditional cream cheese frosting provides the ideal counterbalance to the cake’s deep chocolate notes. The secret to a perfectly smooth frosting is to ensure your butter and cream cheese are properly softened to room temperature.
- Beat Butter and Cream Cheese: In a large mixing bowl, use an electric mixer on a medium speed to beat the softened butter and cream cheese together until they are completely smooth and creamy. This should take about 2–3 minutes.
- Add Sugar and Vanilla: Bit by bit, add the sifted icing sugar, mixing on a low speed until it has been fully worked in. Next, add the vanilla extract and a little pinch of salt.
- Whip Until Fluffy: Turn the mixer speed up to medium-high and continue to beat for another 2–3 minutes, until the frosting becomes wonderfully light, airy, and fluffy.
Assembling Your Masterpiece
And now for the most satisfying part! Once your cake layers have cooled completely, it’s time to put together your homemade black velvet cake.
- Level the Cakes: If the tops of your cakes have risen into a dome, take a large serrated knife and carefully trim them to create a flat, even surface. (The offcuts make for a well-deserved baker’s treat!).
- First Layer: Position one of the cake layers onto your serving plate or cake stand. Spread a generous amount of cream cheese frosting evenly across the top.
- Second Layer: Gently place the second cake layer directly on top of the first.
- Frost the Cake: Use the rest of your frosting to coat the top and sides. You can aim for a sleek, polished finish with an offset spatula or create an attractive rustic texture with swirls. For an extra touch of decoration, you could sprinkle over some chocolate shavings or reserved cake crumbs.
After a rewarding day of baking, why not unwind with a different kind of sweet? Our recipe for this Almond Joy Cookie Recipe delivers a heavenly mix of coconut, almond, and chocolate that is sure to delight.
Frequently Asked Questions (FAQ)
What’s the difference between red velvet and black velvet cake?
The primary distinction is found in the cocoa powder and the source of the colour. A traditional red velvet cake uses a small quantity of regular cocoa, and its reaction with buttermilk gives it a reddish-brown tint, which is usually amplified with red food colouring. In contrast, black velvet cake relies on ultra-dutched black cocoa powder for its natural black colour and its much deeper, Oreo-like chocolate taste.
Can I use regular cocoa powder instead of black cocoa?
While you can, the result will not be a true black velvet cake. Using regular or standard Dutch-process cocoa powder will produce a lovely chocolate cake, but it will lack the signature black hue and distinctive flavour profile that only black cocoa can provide.
How should I store my cake?
Due to the cream cheese frosting, it’s essential to store this cake in the refrigerator. Placed in an airtight container, it will remain fresh and delicious for up to 4–5 days. We suggest taking it out of the fridge about 20–30 minutes before serving, as this allows the cake and frosting to soften up a little.
Why is my cake dry?
A dry cake is usually down to one or two simple errors. The most common reasons are overbaking or measuring the flour incorrectly. To measure flour accurately, use the ‘spoon and level’ technique: spoon the flour into your measuring cup and then level it off, rather than scooping from the bag, which packs it down. Also, be sure to keep a watchful eye on your cake as it nears the end of its baking time! A beautifully moist black cake is what we’re aiming for, and our recipe is tailored to achieve just that.
Conclusion: Your New Favourite Celebration Cake
And there we have it—our complete guide to creating a truly breathtaking black velvet cake. With its show-stopping appearance and intensely rich flavour, this is a dessert that promises to leave a lasting impression. It’s so much more than a simple cake; it’s a memorable experience. If you love baking unique and wonderful cakes, you may also enjoy our incredibly light and fluffy Cloud Cake Recipe.
We firmly believe that baking should be a delightful and fulfilling activity, and we are confident this recipe ticks all the boxes. Now, it’s over to you to get into the kitchen and create a little bit of magic.
We would be absolutely thrilled to see your beautiful cakes! Please do share a picture in the comments section below or feel free to tag us on social media. Happy baking!