The Ultimate No-Bake Banana Split Cake Recipe You’ll Love!
Do you ever dream of transforming that classic ice cream parlour favourite, the banana split, into an even more shareable and impressive dessert? Imagine all those iconic flavours – sweet bananas, juicy pineapple, luscious strawberries, rich chocolate, and fluffy whipped cream – but all layered into a delightful, easy-to-serve cake form.
Well, dream no more! We’re here to share our sensational no-bake banana split cake recipe that captures all the joy of a traditional banana split without even needing to turn on your oven. It’s the perfect treat for parties, family gatherings, or any time you crave a show-stopping **banana split dessert**!
What Makes This Banana Split Cake Recipe So Irresistible?
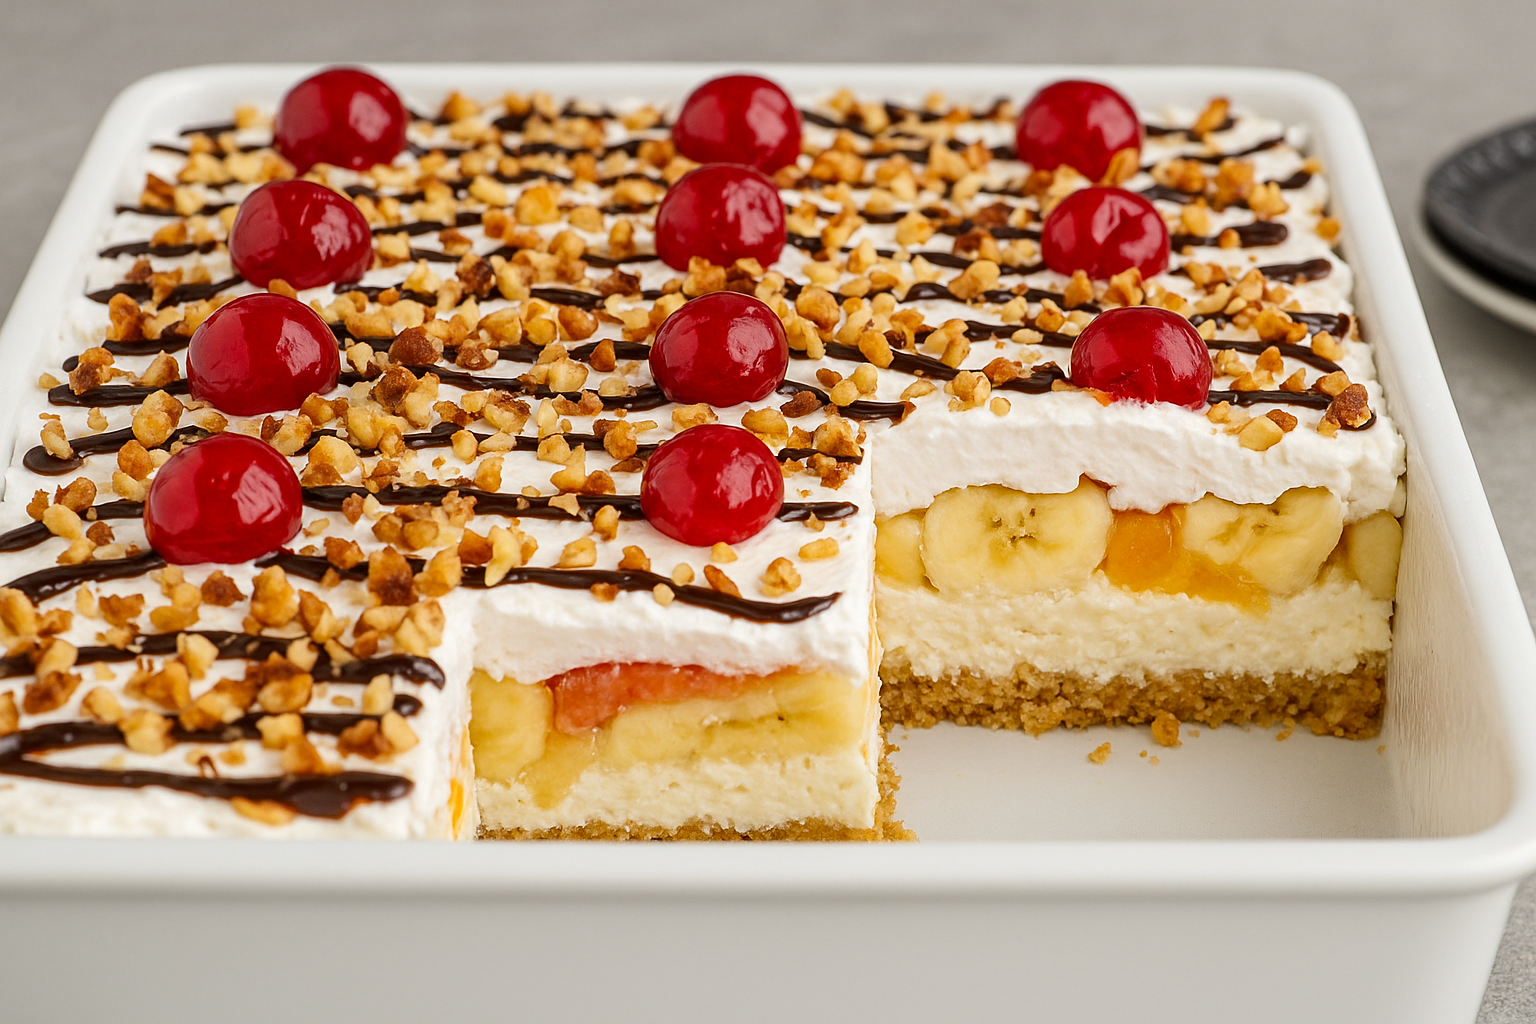
The magic of our banana split cake recipe lies in its delightful layers and the nostalgic flavours it evokes. It’s a true celebration of the classic **banana split dessert**. We start with a crumbly, buttery biscuit base, followed by a smooth, tangy cream cheese filling that’s light yet satisfying. Then come the stars of the show: sweet, ripe bananas and juicy pineapple chunks, all topped off with a generous layer of whipped cream and a dazzling array of classic banana split toppings like chocolate sauce, strawberry sauce, chopped nuts, and, of course, glacé cherries!
What we love most is that it’s a no-bake dessert. This means less fuss, no heating up the kitchen, and it’s incredibly simple to assemble. It’s the kind of **banana split cake** that looks like you spent hours on it, but it’s actually a breeze to put together. The most challenging step is waiting for it to chill!
Gathering Your Ingredients: The Building Blocks of Our Banana Split Cake Recipe
To create this show-stopping no-bake banana split cake recipe, you’ll need a few key components. Let’s break them down:
For the Biscuit Base:
- Digestive Biscuits (or Graham Crackers): About 250g (approx. 1.5 – 2 cups crumbs). These provide a lovely, slightly savoury and crumbly base.
- Unsalted Butter: 100g, melted. This binds the crumbs together.
- Optional: 1-2 tablespoons of granulated sugar if you prefer a sweeter base.
For the Creamy Filling:
- Full-Fat Cream Cheese: 450g (two 8-ounce blocks), softened to room temperature. This is crucial for a smooth, lump-free filling.
- Icing Sugar (Confectioners’ Sugar): 100g (about 1 cup), sifted.
- Vanilla Extract: 1 teaspoon.
- Double Cream (Heavy Cream): 240ml (1 cup), chilled. This will be whipped and folded in to make the filling light and airy.
The Fruity Layers: Essential Banana Split Flavours
- Ripe Bananas: 3-4 medium, ripe but still firm, sliced.
- Crushed Pineapple: 1 large tin (approx. 400-450g), well-drained. Squeeze out as much liquid as possible!
- Optional: Fresh strawberries, sliced, or a layer of strawberry jam/sauce.
For the Topping Extravaganza:
- Double Cream (Heavy Cream) or Whipped Topping: 300-480ml (1.25 to 2 cups) for whipping, or one large tub of pre-made whipped topping (like Cool Whip, if available). If whipping your own, add a tablespoon or two of icing sugar and 1/2 teaspoon of vanilla flavouring while whipping.
- Chocolate Sauce/Syrup: For drizzling.
- Strawberry Sauce/Syrup (Optional): For drizzling.
- Chopped Nuts: Walnuts or pecans are classic choices, about 50-100g (1/2 to 1 cup).
- Sprinkles (Hundreds and Thousands): For a fun, colourful touch.
- Glacé Cherries (Maraschino Cherries): With stems, for that iconic banana split finish.
Step-by-Step: Assembling Your No-Bake Banana Split Cake Masterpiece
Now, let’s get to the fun part – putting together your incredible no-bake banana split cake recipe! This is all about layering the goodness.
- Step 1: Prepare the Biscuit BaseCrush your digestive biscuits into fine crumbs. This can be achieved with a food processor or by putting them into a strong, resealable plastic bag and crushing them with a rolling pin. In a medium-sized bowl, combine the crushed biscuits with the melted butter. (and sugar, if you’re including it). Combine thoroughly until the crumbs are uniformly damp. Press this mixture firmly and evenly across the bottom of a 23cm x 33cm (9×13 inch) baking dish or a springform tin of comparable dimensions. Employ the back of a spoon or the flat base of a glass to create a smooth, compact layer. Transfer the base to the refrigerator to set for a minimum of 30 minutes as you get the filling ready.
- Step 2: Make the Creamy Filling. In a spacious bowl, use an electric mixer to beat the softened cream cheese until it is smooth and creamy, ensuring there are no lumps. Bit by bit, incorporate the sifted icing sugar and vanilla extract, beating until fully mixed. In a different bowl, whip the chilled double cream until it forms stiff peaks. Carefully fold the whipped cream into the cream cheese blend until they are just combined. Be cautious not to overmix, as this could cause the whipped cream to lose its volume. The aim is to achieve a light, airy, and smooth consistency for the filling of your banana split cake.
- Step 3: Assemble the First LayersRemove your chilled biscuit base from the refrigerator. Distribute the cream cheese filling evenly across the base with care. Following that, place the sliced bananas in a single, even layer on top of the cream cheese filling. Continue with a layer of the thoroughly drained crushed pineapple, spreading it uniformly over the bananas. If you are incorporating fresh strawberries or strawberry sauce, this would be the subsequent layer.
- Step 4: Add the Whipped Cream ToppingIf you’re preparing your own cream for the topping, do so at this point until stiff peaks are achieved (you can add a little icing sugar and vanilla for extra flavour). Delicately spread the whipped cream (or a pre-made whipped topping) in an even layer over the fruit. This creates the fluffy cloud that crowns your banana split dessert.
- Step 5: The Grand Finale – Toppings! Now, it’s time to decorate your banana split cake recipe like a classic banana split! Drizzle generously with chocolate sauce (and strawberry sauce, if using). Sprinkle evenly with the chopped nuts and colourful sprinkles. Finally, dot the top with glacé cherries. Get creative and have fun with it!
- Step 6: Chill to Perfection Cover your assembled banana split cake loosely with cling film (try not to let it touch the whipped cream topping too much). Refrigerate for at least 4-6 hours, or preferably overnight. This chilling time is crucial for the cake to set properly, making it easy to slice, and for all the flavours to meld together beautifully. This is a key step in any great **banana split recipe** in cake form.
- Step 7: Slice, Serve, and Enjoy ! Once thoroughly chilled and set, carefully slice your no-bake banana split cake into squares or wedges. Serve immediately and watch it disappear! Store any leftovers covered in the refrigerator.

Tips and Tricks for the Best No-Bake Banana Split Cake
To ensure your no-bake banana split cake recipe is an absolute triumph, here are some helpful tips:
- Use Room Temperature Cream Cheese: This is vital for a smooth, lump-free filling. If your cream cheese is too cold, it won’t beat properly.
- Drain Pineapple Thoroughly: Excess liquid from the pineapple can make your cake soggy. Squeeze it well in a sieve or even pat it with paper towels.
- Chill Time is Key: Don’t rush the chilling process! This dessert needs ample time to set properly so you can get clean slices.
- Fresh Bananas: Use ripe yet firm bananas. Excessively ripe bananas can become overly soft. Slice them immediately before layering to avoid browning, or gently toss them with a very small amount of lemon juice (though be mindful this can slightly change the taste).
- Customise Your Toppings: Feel free to add other favourite banana split toppings like caramel sauce, butterscotch sauce, or different types of nuts and sprinkles. Make this **banana split cake** your own!
- Clean Slices: For the most attractive slices, immerse a sharp knife in hot water and then wipe it dry between each cut.
Variations on Our Classic Banana Split Cake Recipe
While our classic no-bake banana split cake recipe is a winner, it’s also a fantastic base for your own creative twists:
- Chocolate Lover’s Banana Split Cake: Use chocolate digestive biscuits for the base, add a layer of chocolate pudding or ganache under the whipped cream, and use plenty of chocolate sprinkles.
- Strawberry Banana Split Cake: Increase the strawberry element by adding a layer of fresh sliced strawberries and using strawberry-flavoured biscuits for the base if you can find them.
- Individual Banana Split Cake Trifles: Layer all the components in individual trifle dishes or glasses for elegant single servings. Perfect for dinner parties!
- Banana Split Icebox Cake: Add layers of vanilla wafers or ladyfingers, which will soften as the dessert is refrigerated, similar to how an icebox cake is made.
- Different Biscuit Base: Try using Oreo crumbs (filling removed), shortbread crumbs, or even a nutty Biscoff base for a different flavour profile for your **banana split dessert**.
The Perfect Occasions for Your Banana Split Cake
This delightful no-bake banana split cake recipe is perfect for almost any occasion. We especially love making it for:
- Summer barbecues and picnics (keep it chilled!).
- Birthday parties (it’s always a hit with kids and adults alike).
- Family gatherings and potlucks – it’s easy to transport.
- A fun weekend dessert treat.
- Anytime you need an impressive but easy-to-make dessert!
Storing Your Leftover Banana Split Cake
If you happen to have any leftover banana split cake (which might be surprising!), it should be kept under cover in the fridge. It will remain good for up to 2-3 days. The bananas might show some browning over time, but the taste will still be delightful.
We do not recommend freezing this cake, as the texture of the bananas and the cream cheese filling can change significantly upon thawing, becoming watery and less appealing.
- Explore more Easy Dessert Recipes on our site.
- Find inspiration for Perfect Party Food Ideas.
- For fun facts and the history of the classic banana split, a reputable food history site like FoodTimeline often has interesting tidbits (search for “banana split” on their site).
Frequently Asked Questions (FAQ) about Banana Split Cake Recipe
Can I make this banana split cake recipe ahead of time?
Yes, absolutely! This cake is actually best when made at least 4-6 hours in advance, or even the day before, to allow it to chill thoroughly and set properly. This makes it a fantastic option for stress-free entertaining.
How do I prevent the bananas from browning in the cake?
To minimize browning, slice your bananas just before you’re ready to layer them. You can also very lightly toss the banana slices in a tiny amount of lemon juice, but be aware this can add a slight citrus tang. Ensuring they are well covered by the pineapple and subsequent layers also helps.
Can I use low-fat cream cheese or whipped topping?
You can try using low-fat cream cheese, but the filling may not be as rich or set as firmly. Light or low-fat whipped topping can also be used, but full-fat versions generally provide the best flavour and texture for this indulgent banana split dessert.
What if I don’t have a 9×13-inch dish?
You can use a slightly smaller or larger dish, but you may need to adjust the thickness of your layers accordingly. A 23cm (9-inch) square dish or a deep 25cm (10-inch) springform pan could also work. If using a springform pan, it makes for a lovely presentation when released.
Can I substitute other fruits in this banana split cake recipe?
Definitely! While bananas and pineapple are classic, feel free to get creative. Sliced peaches, mandarin oranges (well-drained), or a mix of berries would also be delicious. Just ensure any tinned fruit is very well-drained.
Conclusion: Your New Favourite No-Bake Delight Awaits!
We are so thrilled to share our no-bake banana split cake recipe with you! It’s a truly joyful dessert that brings together all the beloved flavours of a classic banana split in an easy-to-make, crowd-pleasing format. From its buttery biscuit base to its creamy filling, fruity layers, and delightful toppings, every bite is a taste of happiness.
This **banana split cake** is perfect for any celebration or simply as a fun treat to brighten your day. The fact that it requires no baking is just the cherry on top! So, gather your ingredients, embrace the easy layering process, and prepare to create a dessert that will have everyone asking for the recipe. This is more than just a cake; it’s a **banana split dessert** experience!
We’d love to see your creations and hear how your banana split cake recipe turns out! Share your experiences, photos, or any fun variations you tried in the comments below. And if you’re looking for more dessert recipes.


One Comment