Artisan No Knead Bread Dutch Oven Recipe
There’s a certain kind of magic that fills the house when a loaf of bread is baking. The aroma alone is enough to make anyone feel instantly at home. For years, I thought that achieving a bakery-quality loaf with a deeply golden, crackly crust and a soft, airy crumb was beyond my reach as a home cook. It seemed to involve complicated techniques, endless kneading, and special equipment. Then I discovered the transformative power of a simple cast iron pot and a recipe that lets time do all the hard work. I make this at least once a week – it’s become a family favourite.
This no knead bread Dutch oven recipe is, quite simply, a game-changer. It relies on a very wet dough and a long, slow fermentation to develop flavour and structure, entirely removing the need for kneading. The secret weapon is a preheated Dutch oven, which traps steam as the bread bakes. This steam keeps the crust soft at the beginning, allowing the bread to rise dramatically (a phenomenon known as ‘oven spring’), before the lid is removed to create that signature crisp, browned finish. It’s the kind of bread that makes you want to tear a piece off the moment it’s cool enough to handle, slather it with butter, and just enjoy.
This recipe is ideal when you want the satisfaction of homemade bread without the hands-on effort. It works beautifully for a quiet weekend project, filling the house with a comforting scent, or as a stunning addition to a dinner party. Anyone, from complete beginners to seasoned bakers, will find joy in pulling this gorgeous loaf from their oven.
Recipe Overview
This recipe produces a rustic, artisan-style loaf with minimal active time. The flavour is wonderfully complex thanks to the long, slow fermentation, and the texture is unbeatable: a shatteringly crisp crust gives way to a chewy, open crumb. The Dutch oven is the key to creating a professional result, as it traps steam and ensures an even, golden bake. I’ve found that letting the dough rest for the full 18 hours gives it a noticeably deeper, slightly tangy flavour that we absolutely love.
- Prep Time: 5 minutes
- Cook Time: 45 minutes
- Total Time: 50 minutes (+ 12 to 18 hours rising time)
- Servings: 1 loaf (about 10 slices)
- Difficulty: Easy
Why You’ll Love This No Knead Bread Dutch Oven Recipe
- Genuine Flavour: The slow fermentation develops a deep, yeasty, almost savoury flavour that you just don’t get from a shop-bought loaf. The crust becomes beautifully caramelised and crisp during the final bake.
- Just 5 Minutes of Active Prep: The hands-on part of this recipe is genuinely just stirring four ingredients together. Time and your oven do the rest of the work, making it incredibly manageable.
- Flexible Recipe: You can easily adapt this base recipe. Try adding a tablespoon of chopped rosemary, a handful of Kalamata olives, or a mix of sunflower and poppy seeds for a new twist.
- Great for Any Meal: This bread is incredibly versatile. It’s wonderful for dipping into a hearty soup, perfect for building a delicious sandwich, or simply toasted and spread with good-quality butter.
- Family Tested: This recipe always gets compliments. My husband, who’s usually picky about bread, asked for a second slice before the first was even finished!
Ingredients You’ll Need
The beauty of this bread recipe lies in its simplicity, requiring just four basic pantry staples. For the flour, I get the most consistent results using a good quality strong white bread flour. Allinson’s or a similar brand works wonderfully as the higher protein content helps create that lovely chewy structure.
- 400g strong white bread flour, plus extra for dusting
- 1 ½ tsp fine sea salt
- ¼ tsp fast-action (instant) dried yeast
- 300ml tepid water
Sara’s Tip: Tepid water is key – it should feel neither hot nor cold to the touch. If the water is too hot, it can kill the yeast, and if it’s too cold, it will slow down the fermentation process significantly.
How to Make No Knead Bread Dutch Oven Recipe
The process is incredibly straightforward. It’s all about mixing, waiting, and baking. The magic happens during the long rest, where the gluten develops all on its own.
- Combine Dry Ingredients: In a large mixing bowl, whisk together the 400g of strong white bread flour, 1 ½ tsp of fine sea salt, and ¼ tsp of fast-action yeast. Make sure the salt and yeast are evenly distributed.
- Add Water and Mix: Pour in the 300ml of tepid water. Use a spatula or wooden spoon to mix everything together until just combined. The dough will be very sticky and shaggy – this is exactly what you want. Don’t be tempted to knead it.
- The First Rise: Cover the bowl with cling film or a clean tea towel. Leave it on your worktop at room temperature for 12 to 18 hours. After this time, the dough will have doubled in size and be covered in bubbles.
- Shape the Dough: Generously flour a clean work surface. Scrape the sticky dough out of the bowl and onto the flour. Sprinkle a little more flour on top. Gently fold the dough over on itself two or three times to form a rough ball. There’s no need to be aggressive here.
- The Second Rise: Place the dough on a piece of baking parchment. Cover it loosely with cling film or a tea towel and let it rest for 30 minutes.
- Preheat the Oven: While the dough is having its final rest, place a cast iron Dutch oven (with its lid on) into your oven. Preheat the oven to 230°C (210°C fan). What works best for me is letting the Dutch oven heat up for the full 30 minutes to ensure it’s searingly hot.
- Bake with the Lid On: Carefully remove the hot Dutch oven from the oven. Using the baking parchment as a sling, lower your dough into the pot. Be very careful as the pot will be extremely hot. Put the lid back on and return it to the oven. Bake for 30 minutes.
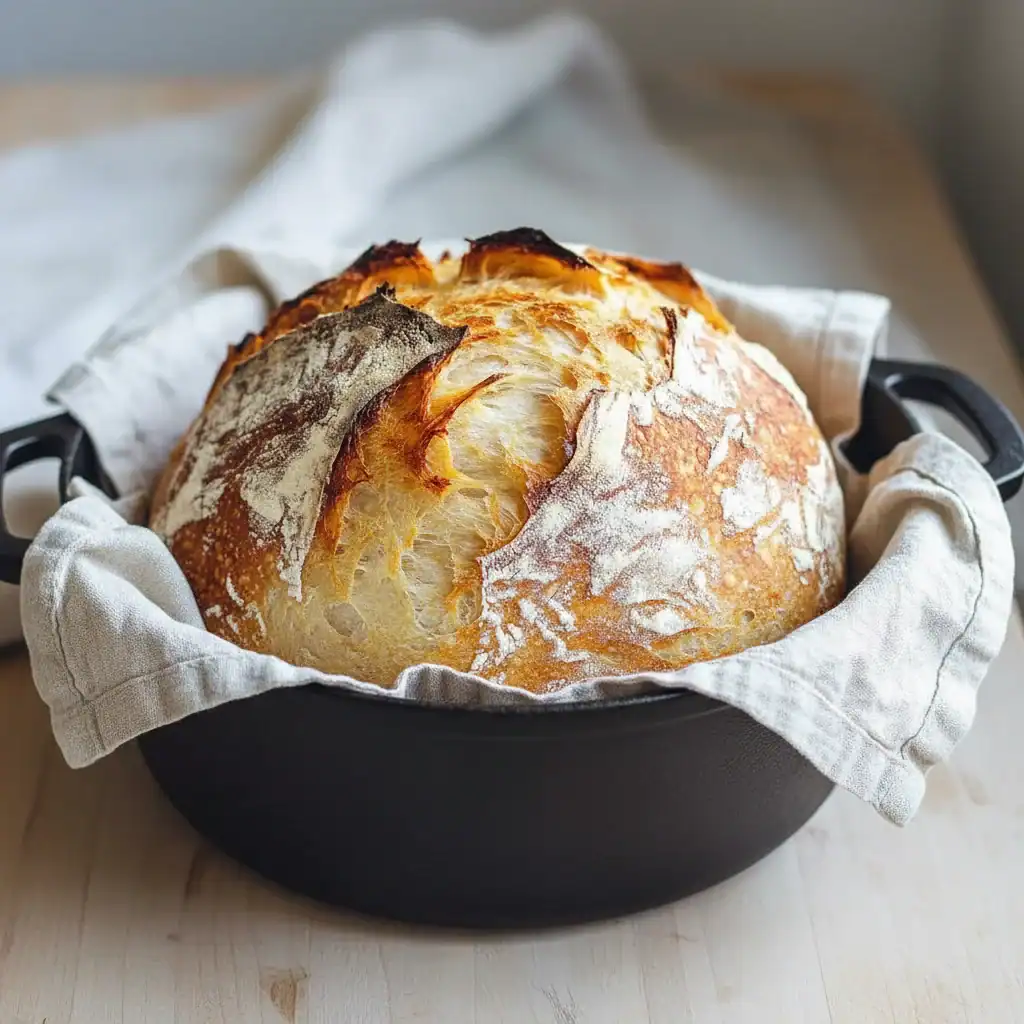
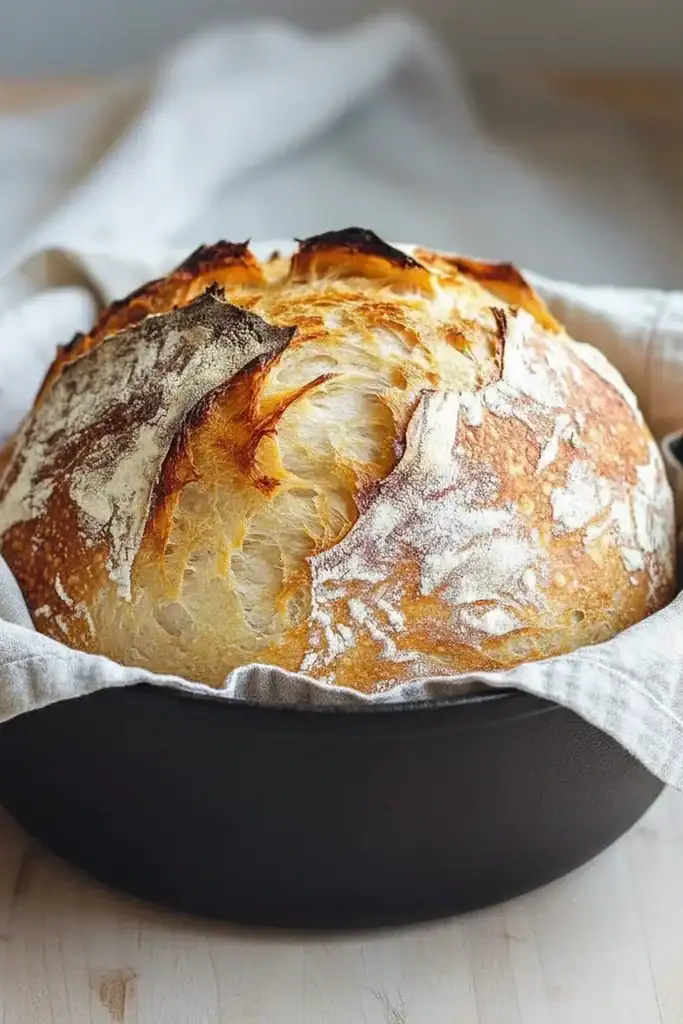
- Bake with the Lid Off: After 30 minutes, carefully remove the lid. The bread will be pale but well-risen. Continue to bake for another 15-20 minutes, or until the crust is a deep, golden brown and looks beautifully crisp.
- Cool Completely: Carefully lift the bread out of the Dutch oven and place it on a wire rack to cool completely. This step is crucial! It allows the crumb to set properly. Resist the urge to slice into it for at least an hour.
Tips From My Kitchen
- Temperature Control: A very hot oven and a preheated Dutch oven are non-negotiable for this recipe. This initial blast of intense heat is what creates the “oven spring,” causing the loaf to puff up dramatically for a light and airy texture.
- The Secret Step: The lid on the Dutch oven is the most important part of the technique. I learned that this trapped steam creates a humid environment, which keeps the crust soft and allows the bread to expand fully. It essentially mimics a professional baker’s steam-injected oven. You can read more about why a Dutch oven works so well on food science websites.
- Make-Ahead: This recipe is all about making it ahead. You need to start the dough the day before you plan to bake. You can even place the dough in the fridge after its initial 12-hour rise for up to three days for a more pronounced, tangy flavour.
- Storage: The bread is best enjoyed on the day it’s baked, but it will keep well for 2-3 days. Store it at room temperature in a paper bag or a bread bin. Avoid storing it in plastic, which can make the crust soft, and don’t keep it in the fridge as it will go stale faster.
Delicious Variations to Try
Once you’ve mastered the basic loaf, it’s fun to start experimenting. Here are a few variations we love in our house:
- Rosemary and Sea Salt: Add 1 tablespoon of finely chopped fresh rosemary to the dry ingredients. Before the final bake, brush the top of the loaf with a little water and sprinkle with flaky sea salt.
- Seeded Loaf: Mix 50g of mixed seeds (like sunflower, pumpkin, and linseed) into the dry ingredients. For a lovely finish, brush the loaf with water and press more seeds onto the top before baking.
- Cheese and Chilli Loaf: Gently fold in 75g of grated mature cheddar and 1 teaspoon of dried chilli flakes during the shaping stage. This makes an excellent loaf for serving with soup.
What to Serve With This No Knead Bread
A fresh loaf of this bread is a treat in itself, but it also complements so many meals. Here are a few of our favourite ways to enjoy it:
- With a Hearty Soup: Its sturdy crust and soft crumb are ideal for dipping into a rich tomato soup or a chunky vegetable stew.
- For Bruschetta: Slice the day-old bread, toast it until golden, rub with a garlic clove, and top with fresh tomatoes and basil. It’s a wonderful base for our Bruschetta Chicken.
- As a Side: It’s lovely for mopping up flavourful sauces. It works wonderfully alongside saucy dishes like our Lemon Garlic Chicken.
- Drink Pairing: Enjoy a thick slice with butter alongside a simple cup of tea for a comforting snack. If serving with a cheese board, a medium-bodied red wine like a Merlot is a great match.
Frequently Asked Questions
No Knead Bread Dutch Oven Recipe
Ingredients
Method
- Combine Dry Ingredients: In a large mixing bowl, whisk together the 400g of strong white bread flour, 1 ½ tsp of fine sea salt, and ¼ tsp of fast-action yeast. Make sure the salt and yeast are evenly distributed.
- Add Water and Mix: Pour in the 300ml of tepid water. Use a spatula or wooden spoon to mix everything together until just combined. The dough will be very sticky and shaggy – this is exactly what you want. Don't be tempted to knead it.
- The First Rise: Cover the bowl with cling film or a clean tea towel. Leave it on your worktop at room temperature for 12 to 18 hours. After this time, the dough will have doubled in size and be covered in bubbles.
- Shape the Dough: Generously flour a clean work surface. Scrape the sticky dough out of the bowl and onto the flour. Sprinkle a little more flour on top. Gently fold the dough over on itself two or three times to form a rough ball. There's no need to be aggressive here.
- The Second Rise: Place the dough on a piece of baking parchment. Cover it loosely with cling film or a tea towel and let it rest for 30 minutes.
- Preheat the Oven: While the dough is having its final rest, place a cast iron Dutch oven (with its lid on) into your oven. Preheat the oven to 230°C (210°C fan). What works best for me is letting the Dutch oven heat up for the full 30 minutes to ensure it's searingly hot.
- Bake with the Lid On: Carefully remove the hot Dutch oven from the oven. Using the baking parchment as a sling, lower your dough into the pot. Be very careful as the pot will be extremely hot. Put the lid back on and return it to the oven. Bake for 30 minutes.
- Bake with the Lid Off: After 30 minutes, carefully remove the lid. The bread will be pale but well-risen. Continue to bake for another 15-20 minutes, or until the crust is a deep, golden brown and looks beautifully crisp.
- Cool Completely: Carefully lift the bread out of the Dutch oven and place it on a wire rack to cool completely. This step is crucial! It allows the crumb to set properly. Resist the urge to slice into it for at least an hour.
Notes
I truly hope you give this no knead bread Dutch oven recipe a try. There is nothing more satisfying than slicing into a warm loaf that you’ve made yourself, especially one that requires so little effort for such a spectacular result. It’s a simple pleasure that makes any day feel a little more special. If you try it, please let me know how it turned out in the comments below! I love hearing about your baking adventures.
From my kitchen to yours,
Sara Gomez